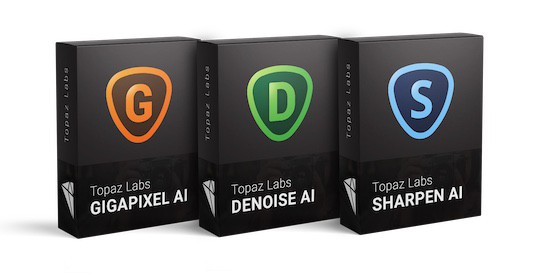
For those of you wishing to purchase the Topaz Image Quality Bundle or any other Topaz Labs products, please consider using my affiliate link. It helps to support my content creation efforts and there is no extra cost to you. Topaz Labs has rebranded the Topaz Utility Bundle and it is now referred to as the Topaz Image Quality Bundle.
The old Topaz Utility Bundle had four products in the bundle which I have left below for your reference. However the rebranding, the new Topaz Image Quality Bundle dropped JPEG to RAW AI so there are now just three products in the bundle. This rebranding made a lot of sense to me as the most used tools are most certainly Denoise AI, Sharpen AI and Gigapixed AI. Given I had previously review all four products within the bundle in-depth I left a link below to JPEG To RAW AI for those who might require such a product.
In my opinion this Topaz Image Quality Bundle AI should be part of every serious photographer’s kit. There are two products out of the three that I use on every photo that I edit. Those are Topaz Denoise AI which as the name implies is used for minimizing noise created by high ISO settings. The second is Topaz Sharpen AI which is not only for sharpening already in focus images but also for bringing slightly out of focus images back in to focus.
The third product is Topaz Gigapixel AI which is used for upscaling images by up to 600% while totally preserving image quality. I use Gigapixel for two primary applications within my editing workflow. The first is on images where I need to crop in on the subject. Example, with my Nikon D5 at 20MP if I crop out half of the frame I am left effectively with 10MP to work with. Topaz Gigapixel AI allows me to render that image back to a resolution of my choice up to 600% of the size.
And the final review is on JPEG to RAW AI which allows you to convert a JPEG to a RAW format which provides an enhanced editing capability that would not be possible if we were editing a JPEG image. This product has now been dropped from the Image Quality Bundle.
I’ll give you a high-level overview of each product within the Topaz Image Quality Bundle AI below however, I do encourage those who wish to go deeper to explore each product through the links above for full reviews.
Bundle To Save Cash: Before I get into the review, please learn from my mistake and save some cash. Purchasing the products one by one is more expensive than buying the Topaz Image Quality Bundle AI out of the gate and trust me you’re going to want all three; Topaz Denoise, Sharpen and Gigapixel if you are a wildlife photographer.
Topaz Image Quality Bundle In Action
When you’re done reading this post, come back and watch this video I put together which shows my RAW image editing workflow from start to finish. It includes the use of DXO Pure RAW2 as well as all three products from the Topaz Image Quality Bundle.
Product #1 in the Topaz Image Quality Bundle AI Suite – Topaz Denoise AI
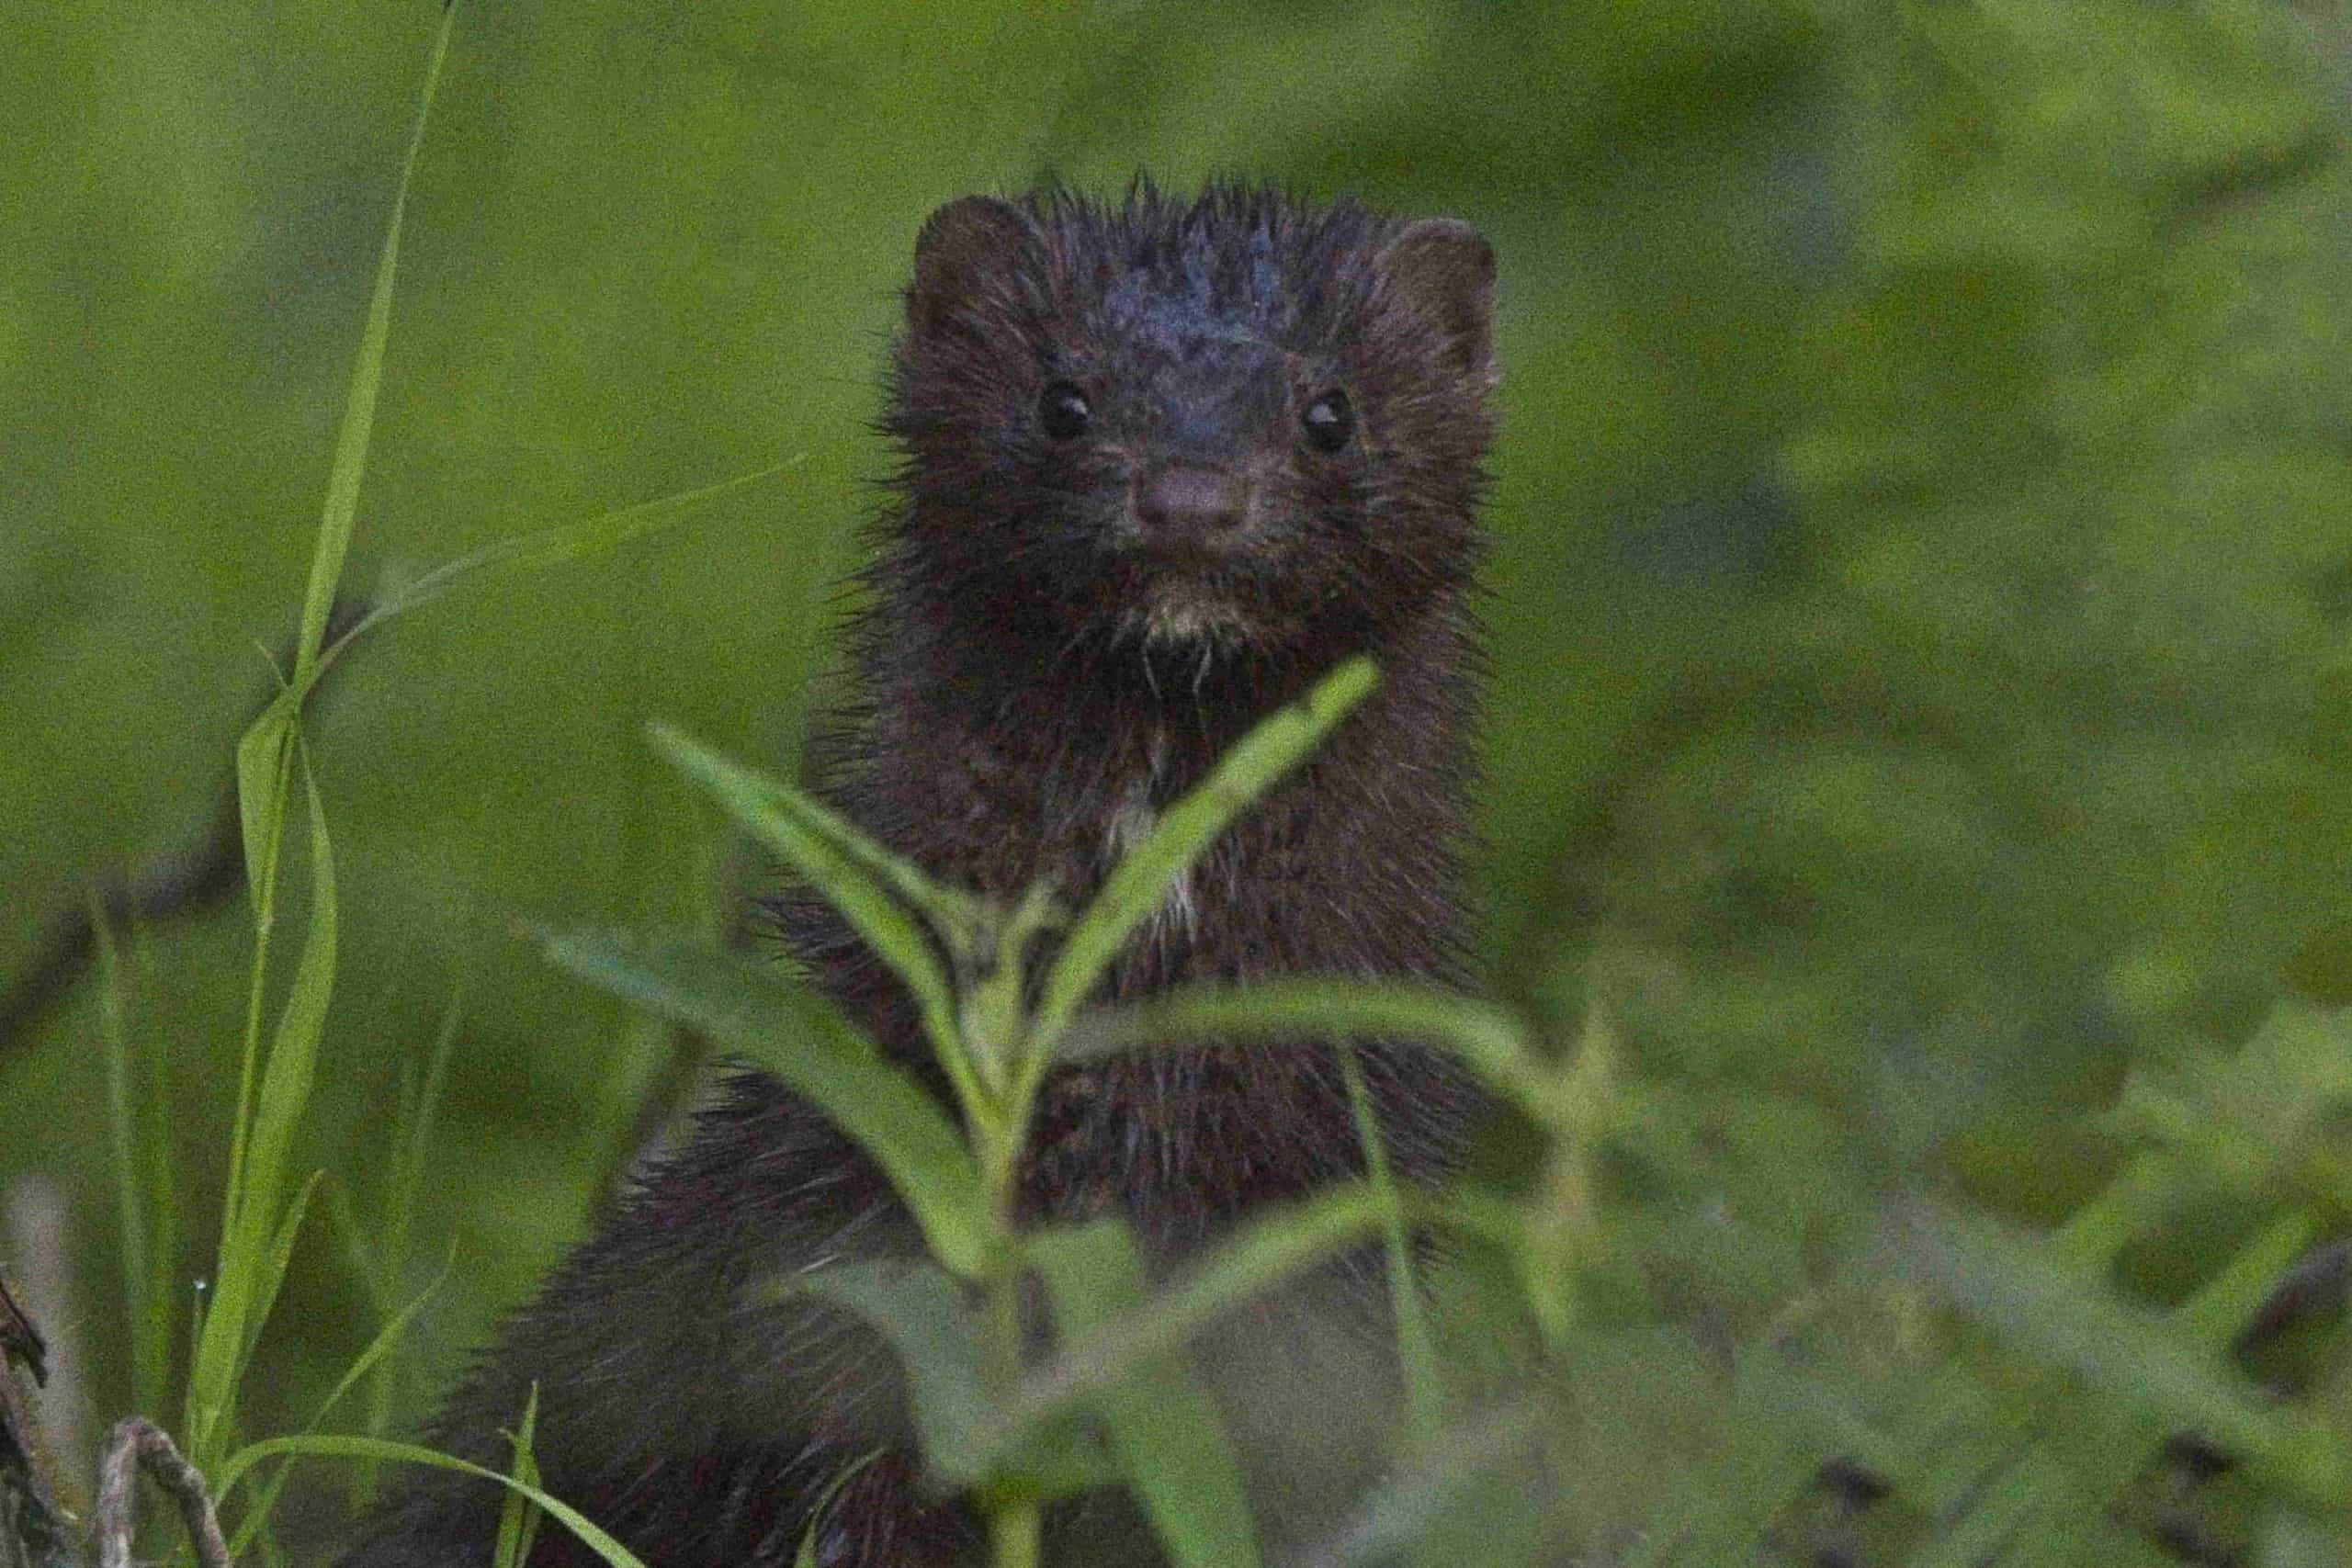
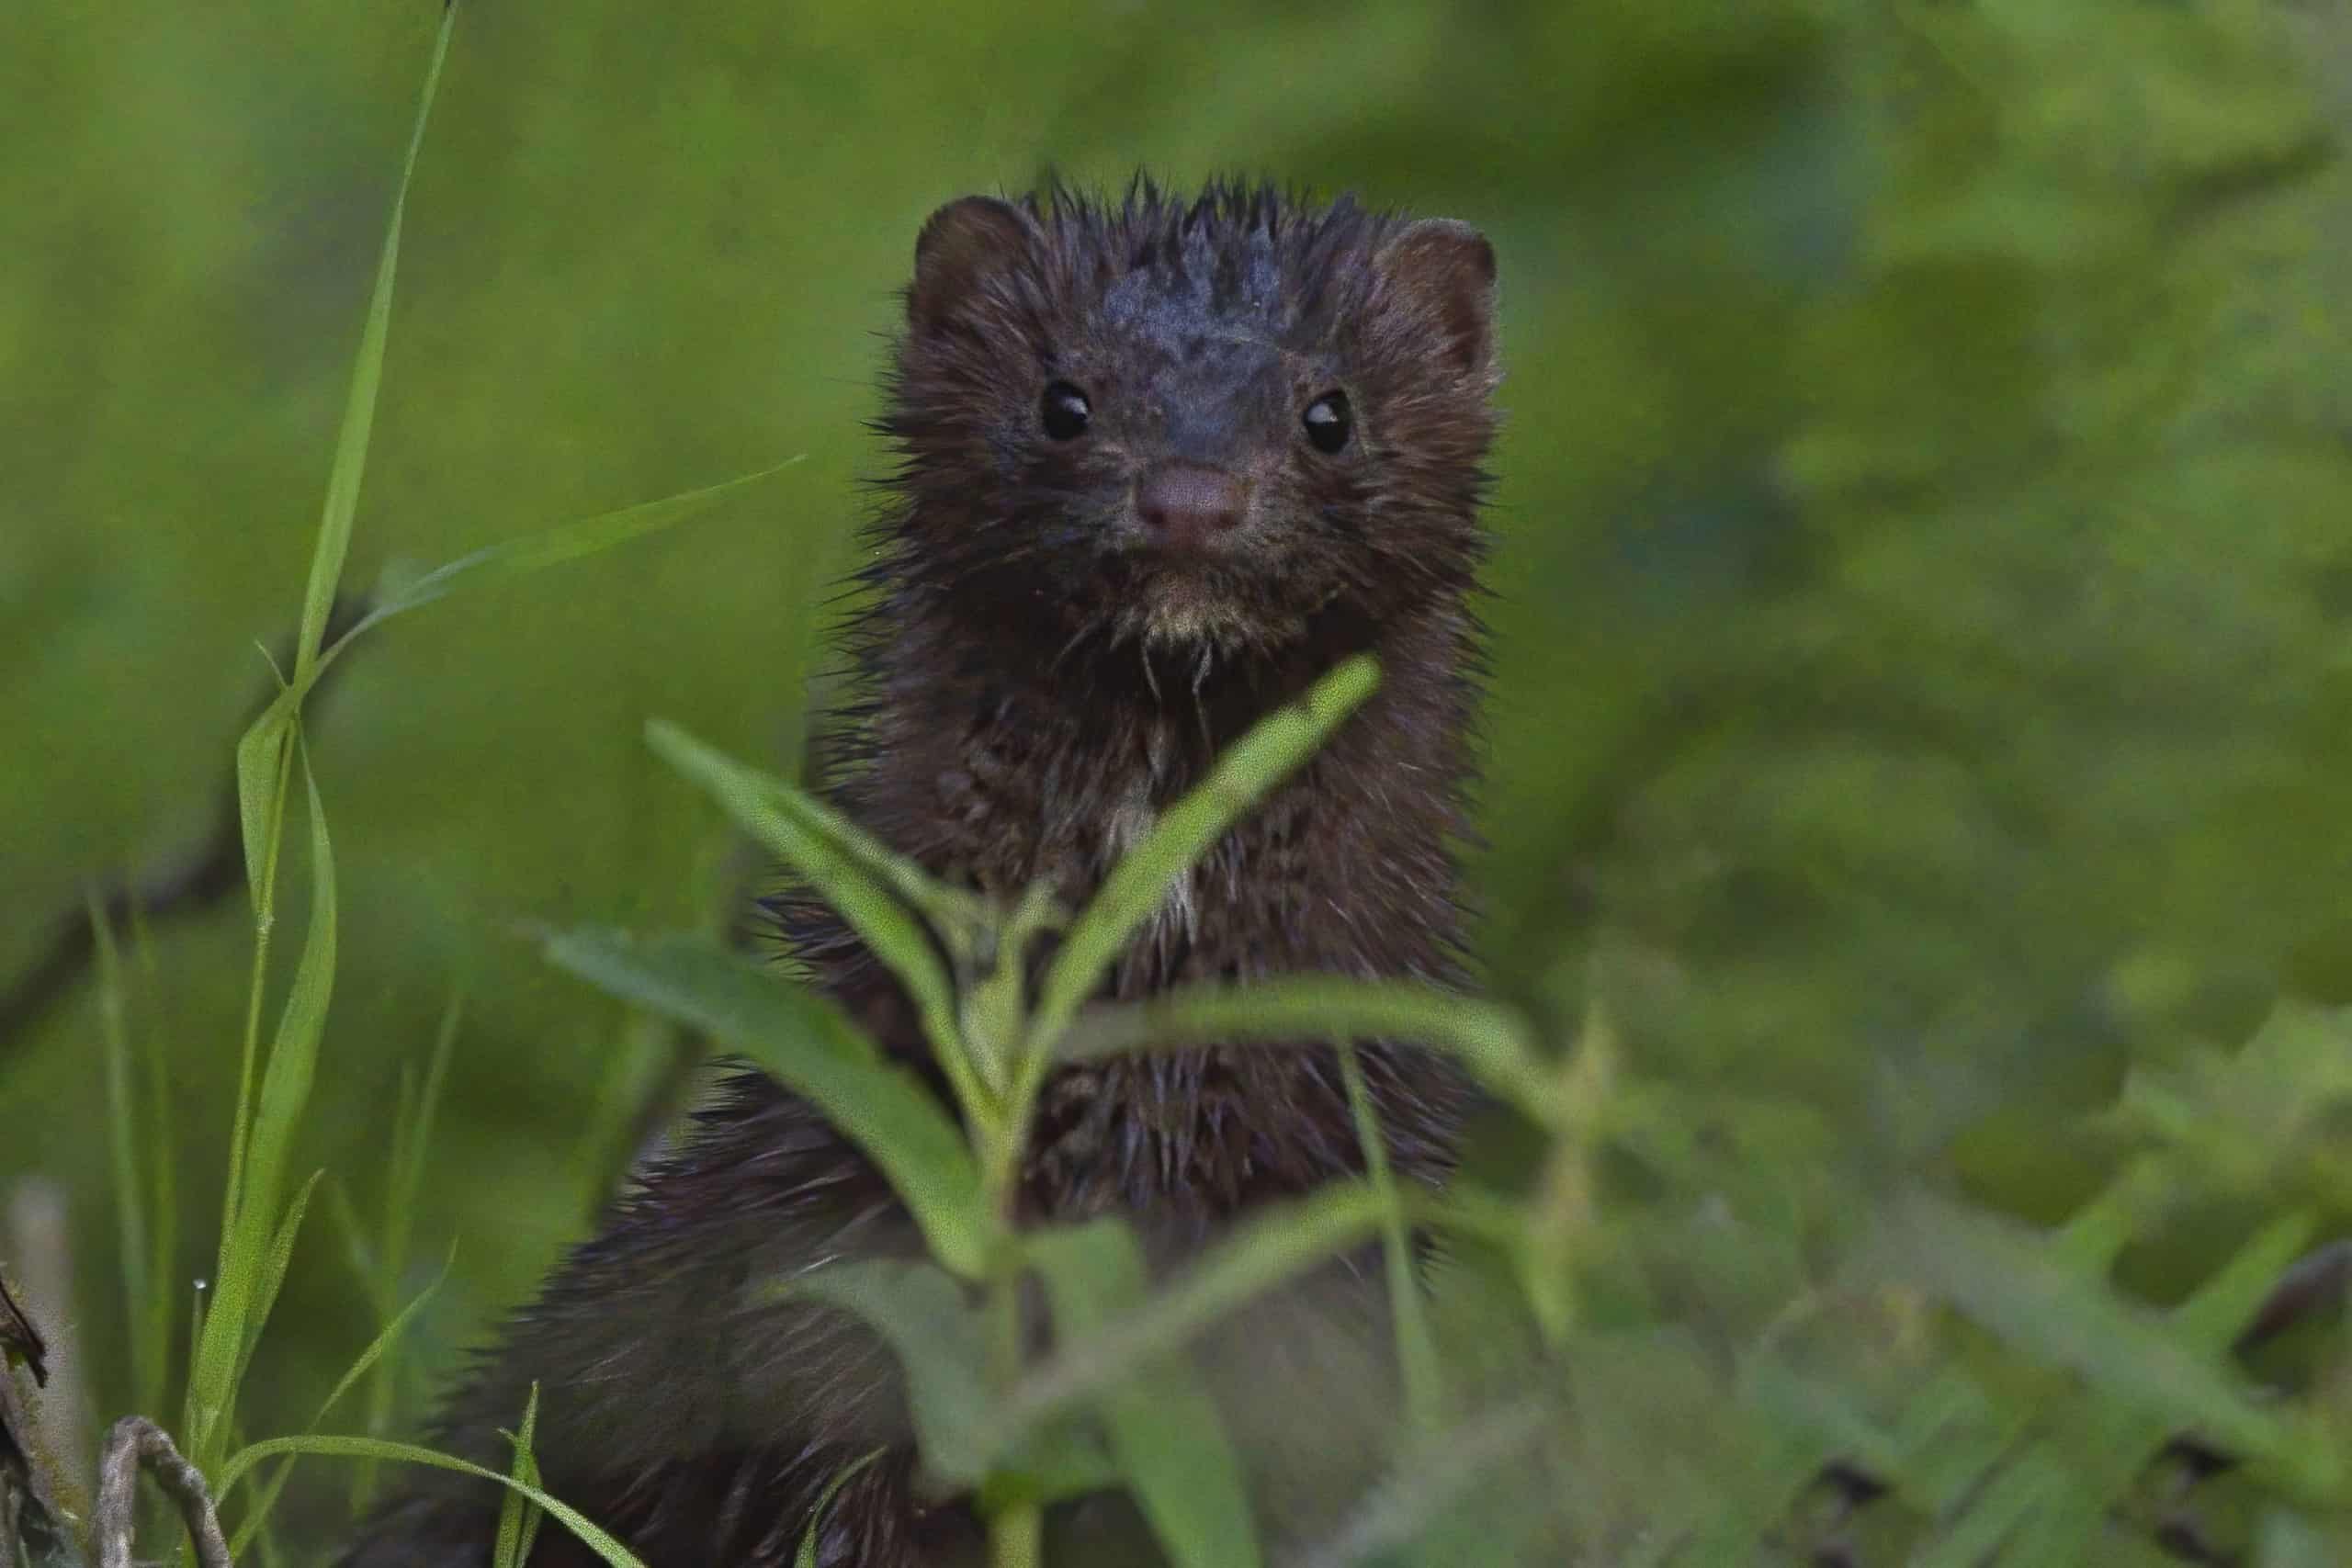
Topaz states that this latest version inspected thousands of noisy images to train its Artificial Intelligence (AI) engine to discern between noise and image data. I had the pleasure of shooting with a Nikon Z7 this past Summer and I captured this image of a mink at ISO 4000.
Regardless of the camera you use, shooting at ISO 4000 is going to introduce some level of noise. I have included a before and after set of images below for your review. You can click on each image if you wish to enlarge it. I think you will agree that the noise in the first image has been drastically reduced in the second image and the level of detail has been maintained if not enhanced.
New Batch Processing: Topaz Labs recently introduced a batch processing feature to Denoise AI. I personally treat every photo as unique in my workflow and I only ever edit one image from a shoot thus the adjustments within each of three available sliders is always different for me.
However I can see where this may be a very worthwhile enhancement for wedding photographers as an example, where many images from their shoots are shot in the same lighting conditions and multiples of a photo will be shown to a client to allow them to select the image they like best.
Using The Sliders: The three available sliders are remove noise, enhance sharpness and recover details. Processing changes to an image is quick and easy and you can set the software to automatically update the preview although depending on the speed of your computer you may wish to test whether that is best left off. If you do choose to set the preview to on, you’ll be able to see the affect of your changes to noise and detail on the fly.
The speed of rendering will be dependent on the performance of your computer, especially your graphics card. You can set GPU speed preferences within the software to step things up. If you get too aggressive with the noise slider you will lose detail so keep an eye on the preview at 200 and 400% and you’ll be able to find a balance where the noise is removed and the detail preserved without halos and artifacts being present.
Product #2 in the Topaz Image Quality Bundle AI Suite – Topaz Sharpen AI
There are different ways to sharpen an image in Topaz Sharpen AI. Within the interface you will see three sharpening options: Sharpen, Stabilize and Focus.
- Sharpen – used for images that are mostly in focus and stable. This is the standard image sharpening mode most of us have used for years to add a little sharpening to our images except now it is AI based and the software can recommend the optimal settings as a starting point.
- Stabilize – used when you have camera shake or blur from reduced shutter speed. This is very common especially when using long lenses or hand holding. This is the method I have found provides the best results for my wildlife photography which is mostly with a long lens.
- Focus – recovery for images that are out of focus and I do try it as a secondary method when stabilize does not yield a good result.
You can choose to use the AUTO mode within each of these methods such that the software will analyze your image and set the sliders to the recommended settings for correcting the image. Of course you can manually adjust those sliders which is my preferred method. Those three sliders allow the user to Remove Blur, Suppress Noise and Add Grain.
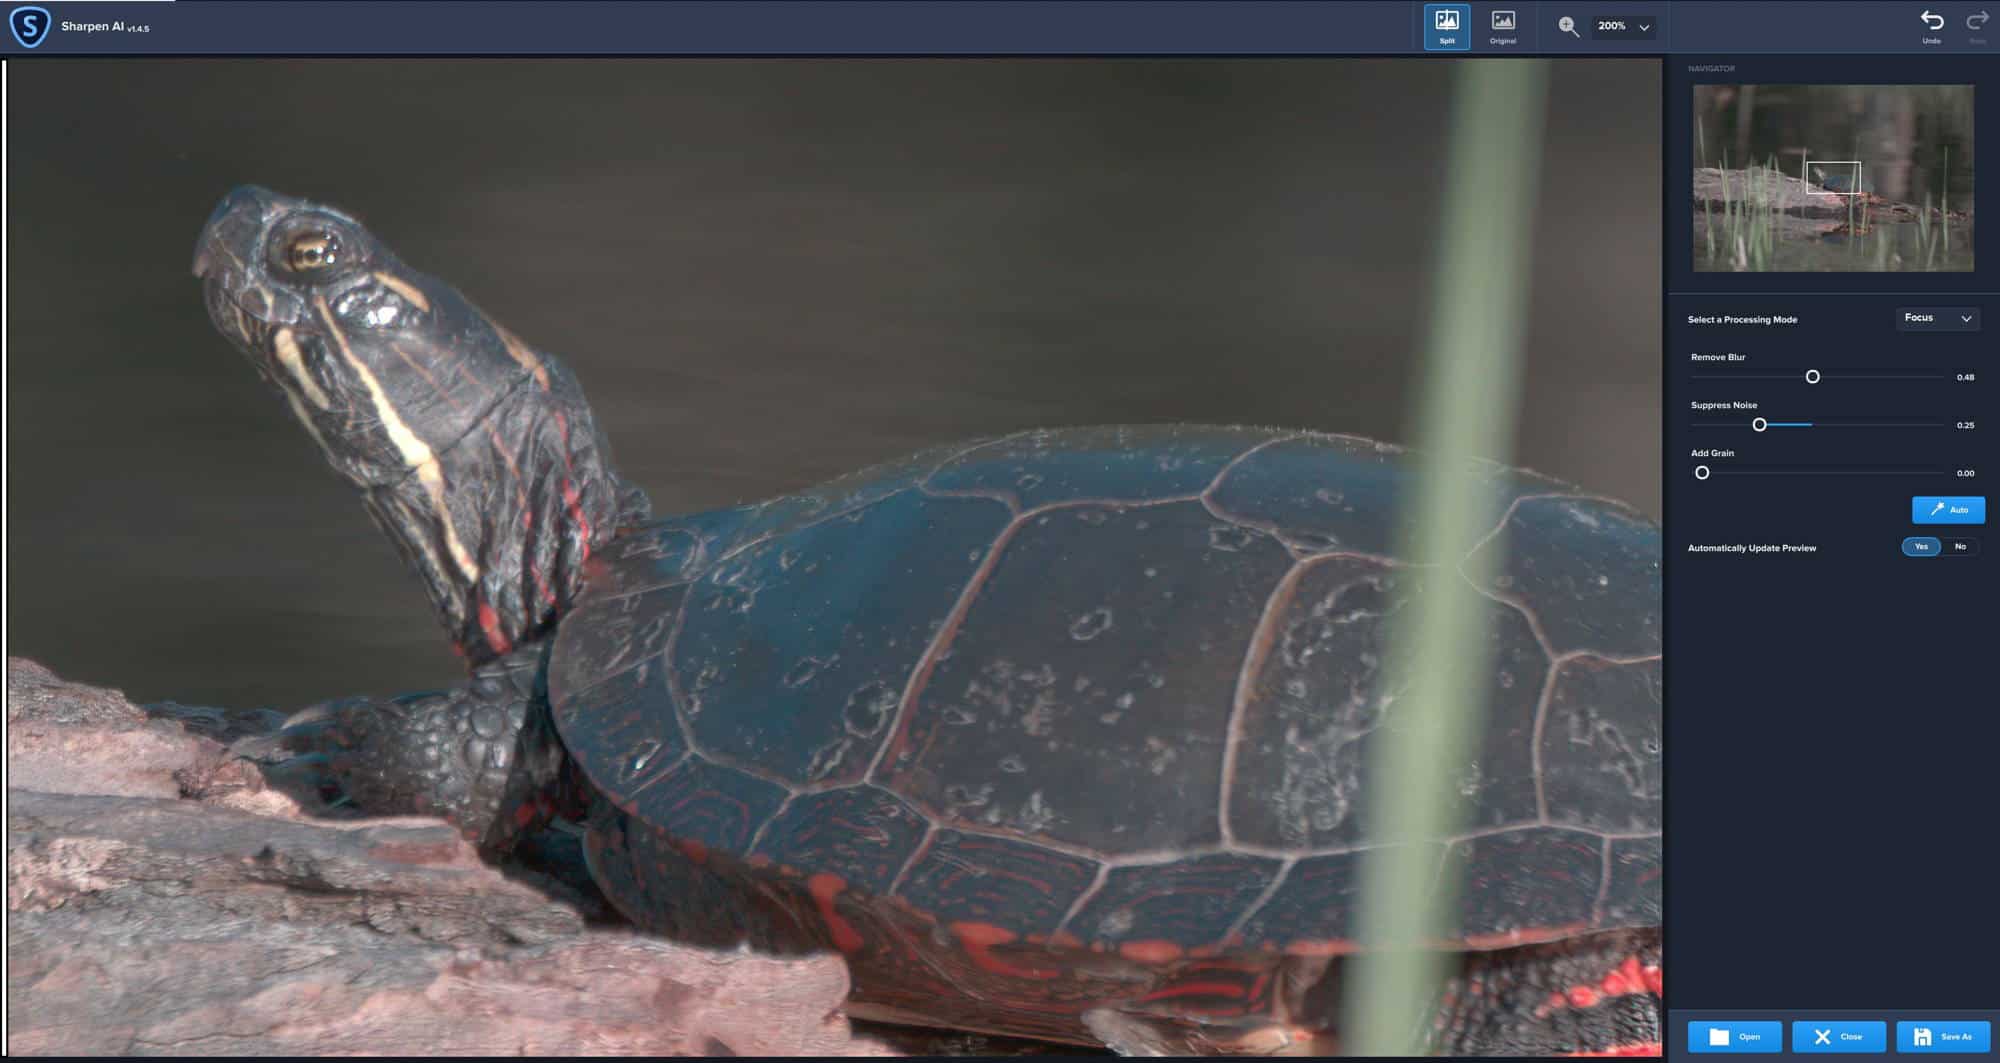
Each slider works independently and you can view your changes on the fly just as you did in Denoise AI. I really like the split view, it allows you view the original image and the modified view as you make your changes to each slider so as you move the line across the image you can really get a good sense of what the new image will look like and adjust the sliders in accordance with what you see.
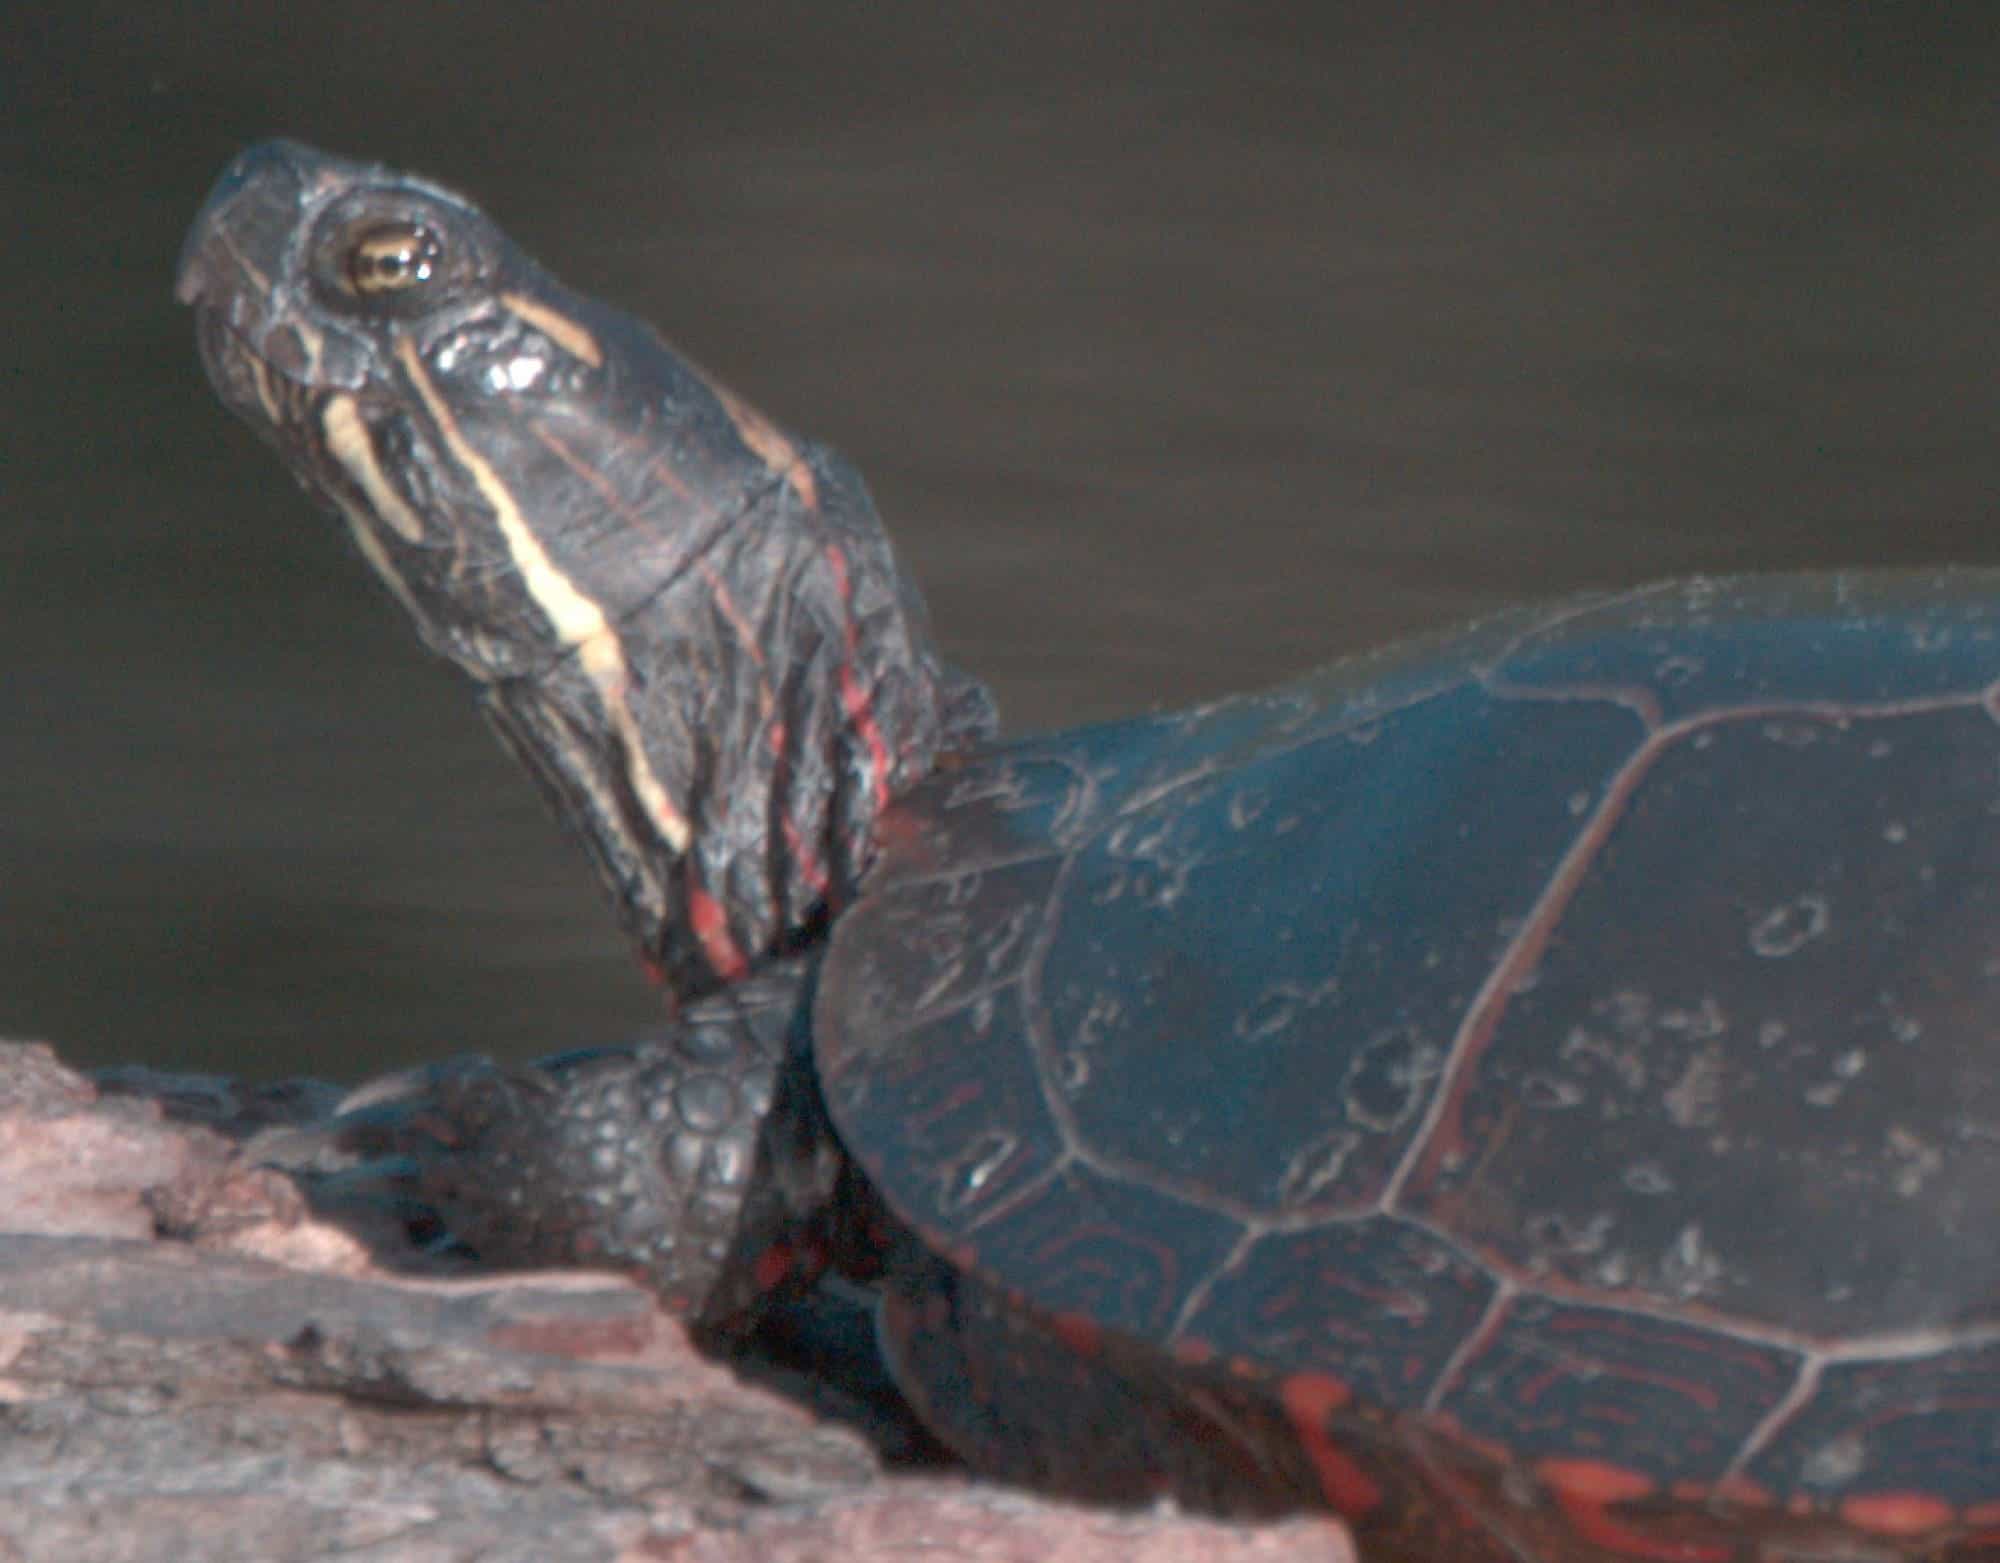
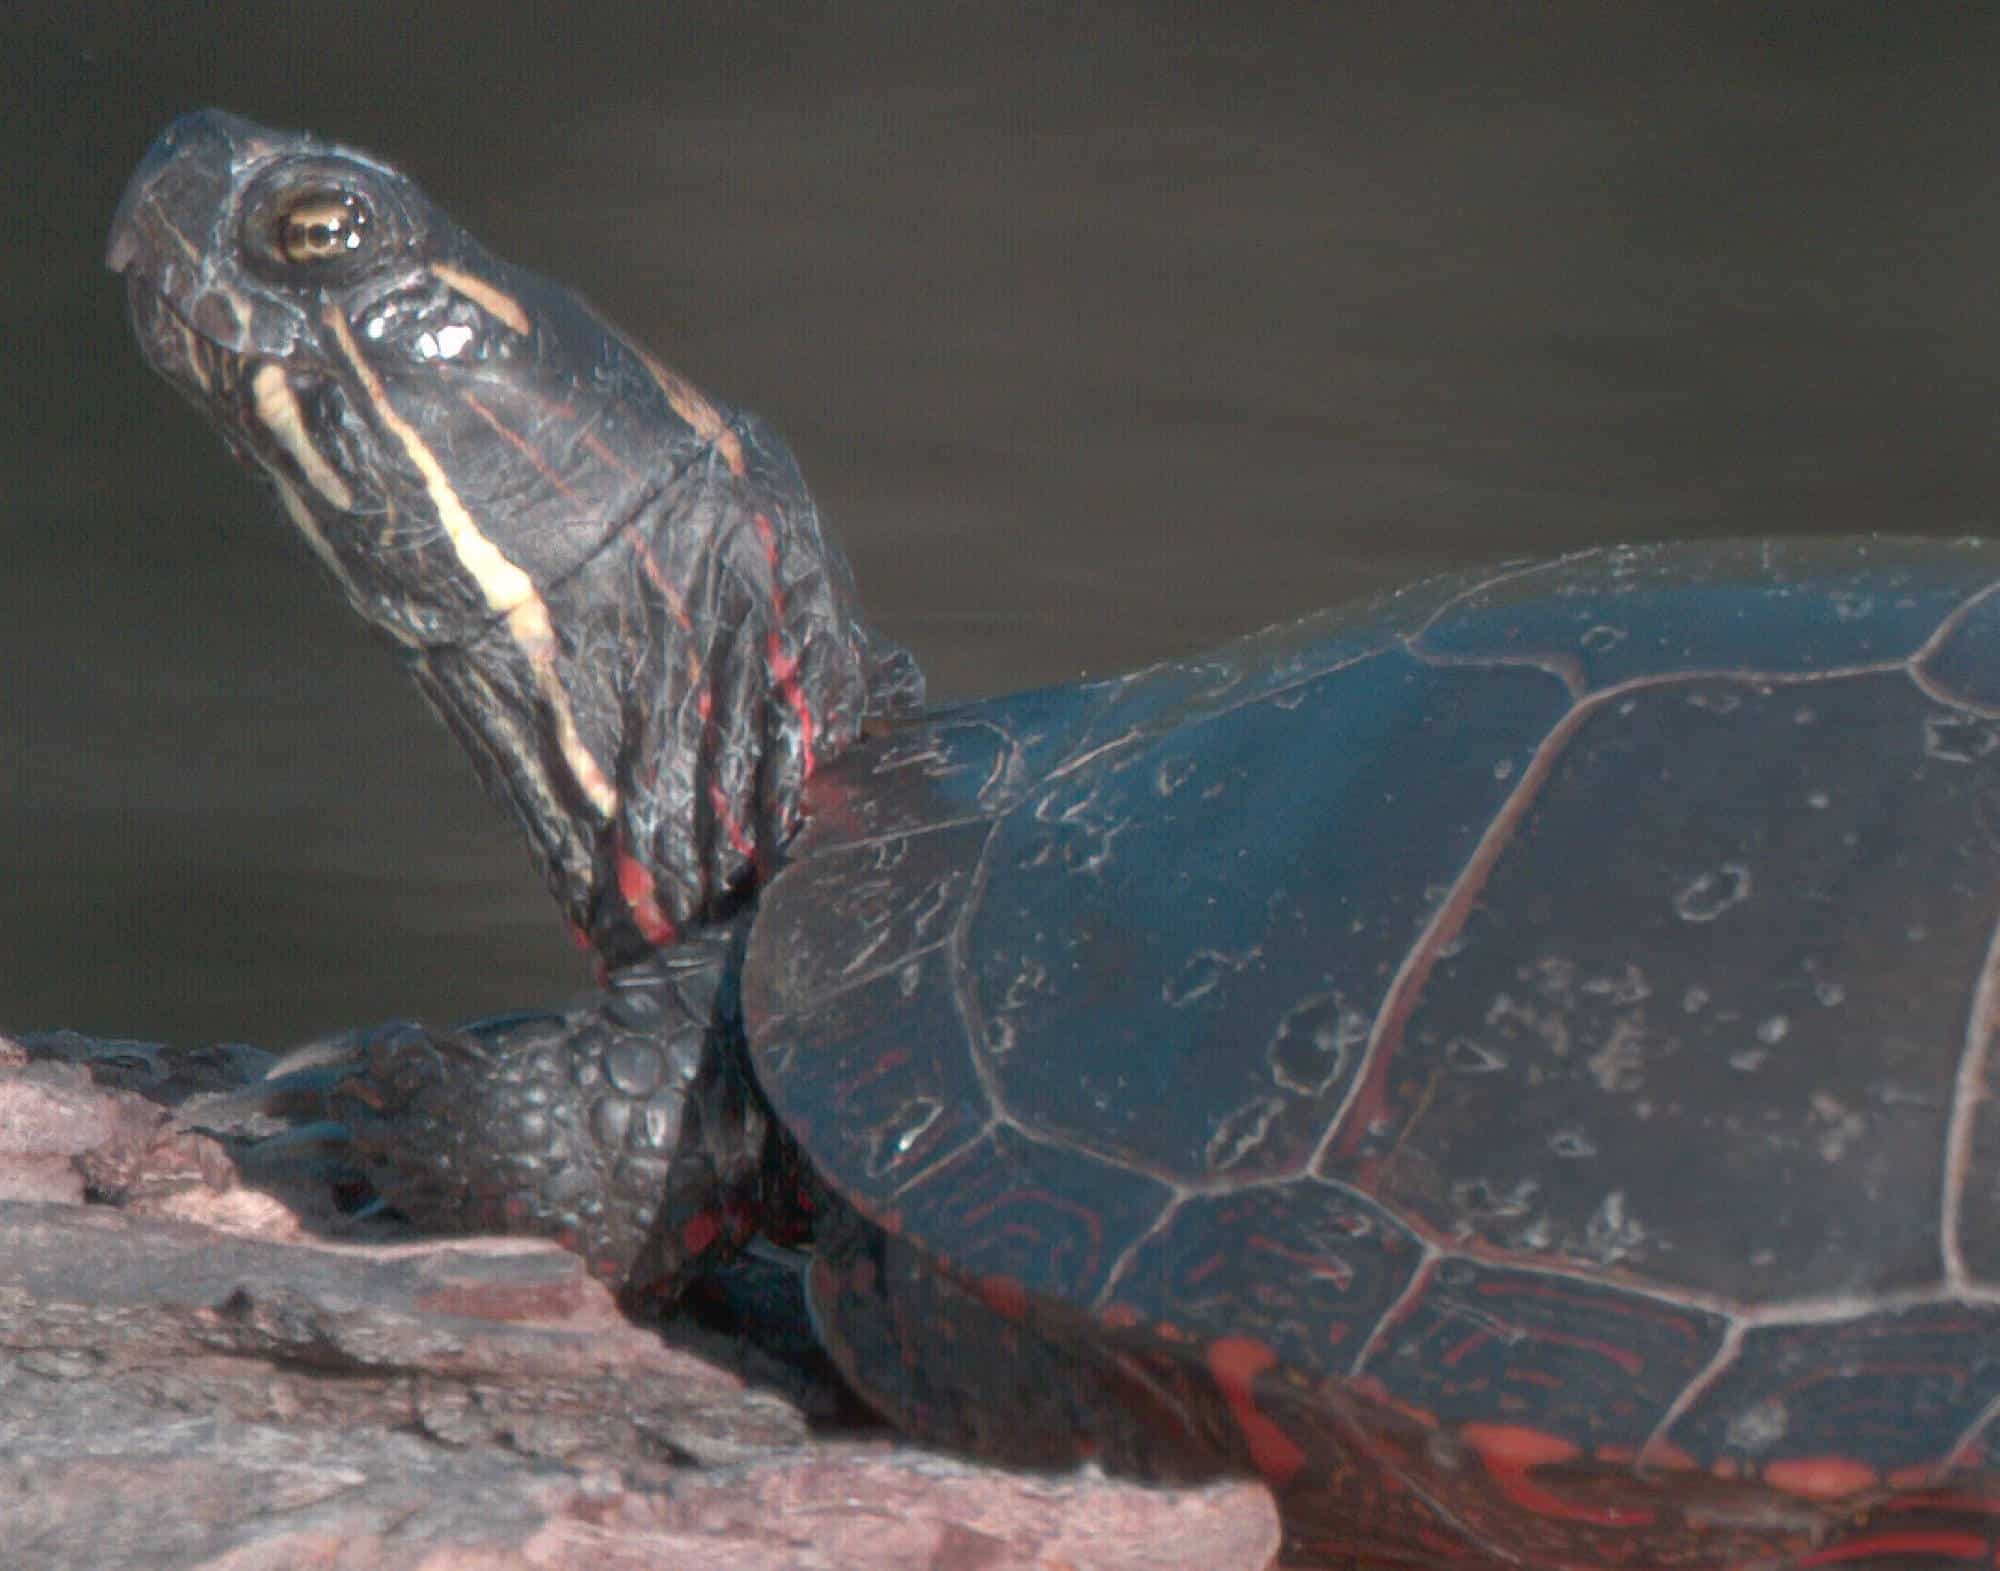
Results: To give you a sense for just how good Topaz Sharpen AI is I have provided a number of RAW images below that I processed. Each one is zoomed in to 200% and I let the software process the image in AUTO mode for comparison sake. The first image has been added so you can see what the interface looks like, you’ll see the controls on the right hand side. The next three images depict the difference between the original image and the Stabilize and Focus modes. You can click on each image to magnify them for a better look.
This image was hand held from my kayak so not surprisingly there was camera movement so the Stabilize mode did the best job sharpening the image. You can really see the difference between the comparison images around the eye, the wrinkles in the neck and the scales on the foot. Note this rendering is from AUTO mode only without me tweaking the image any further.
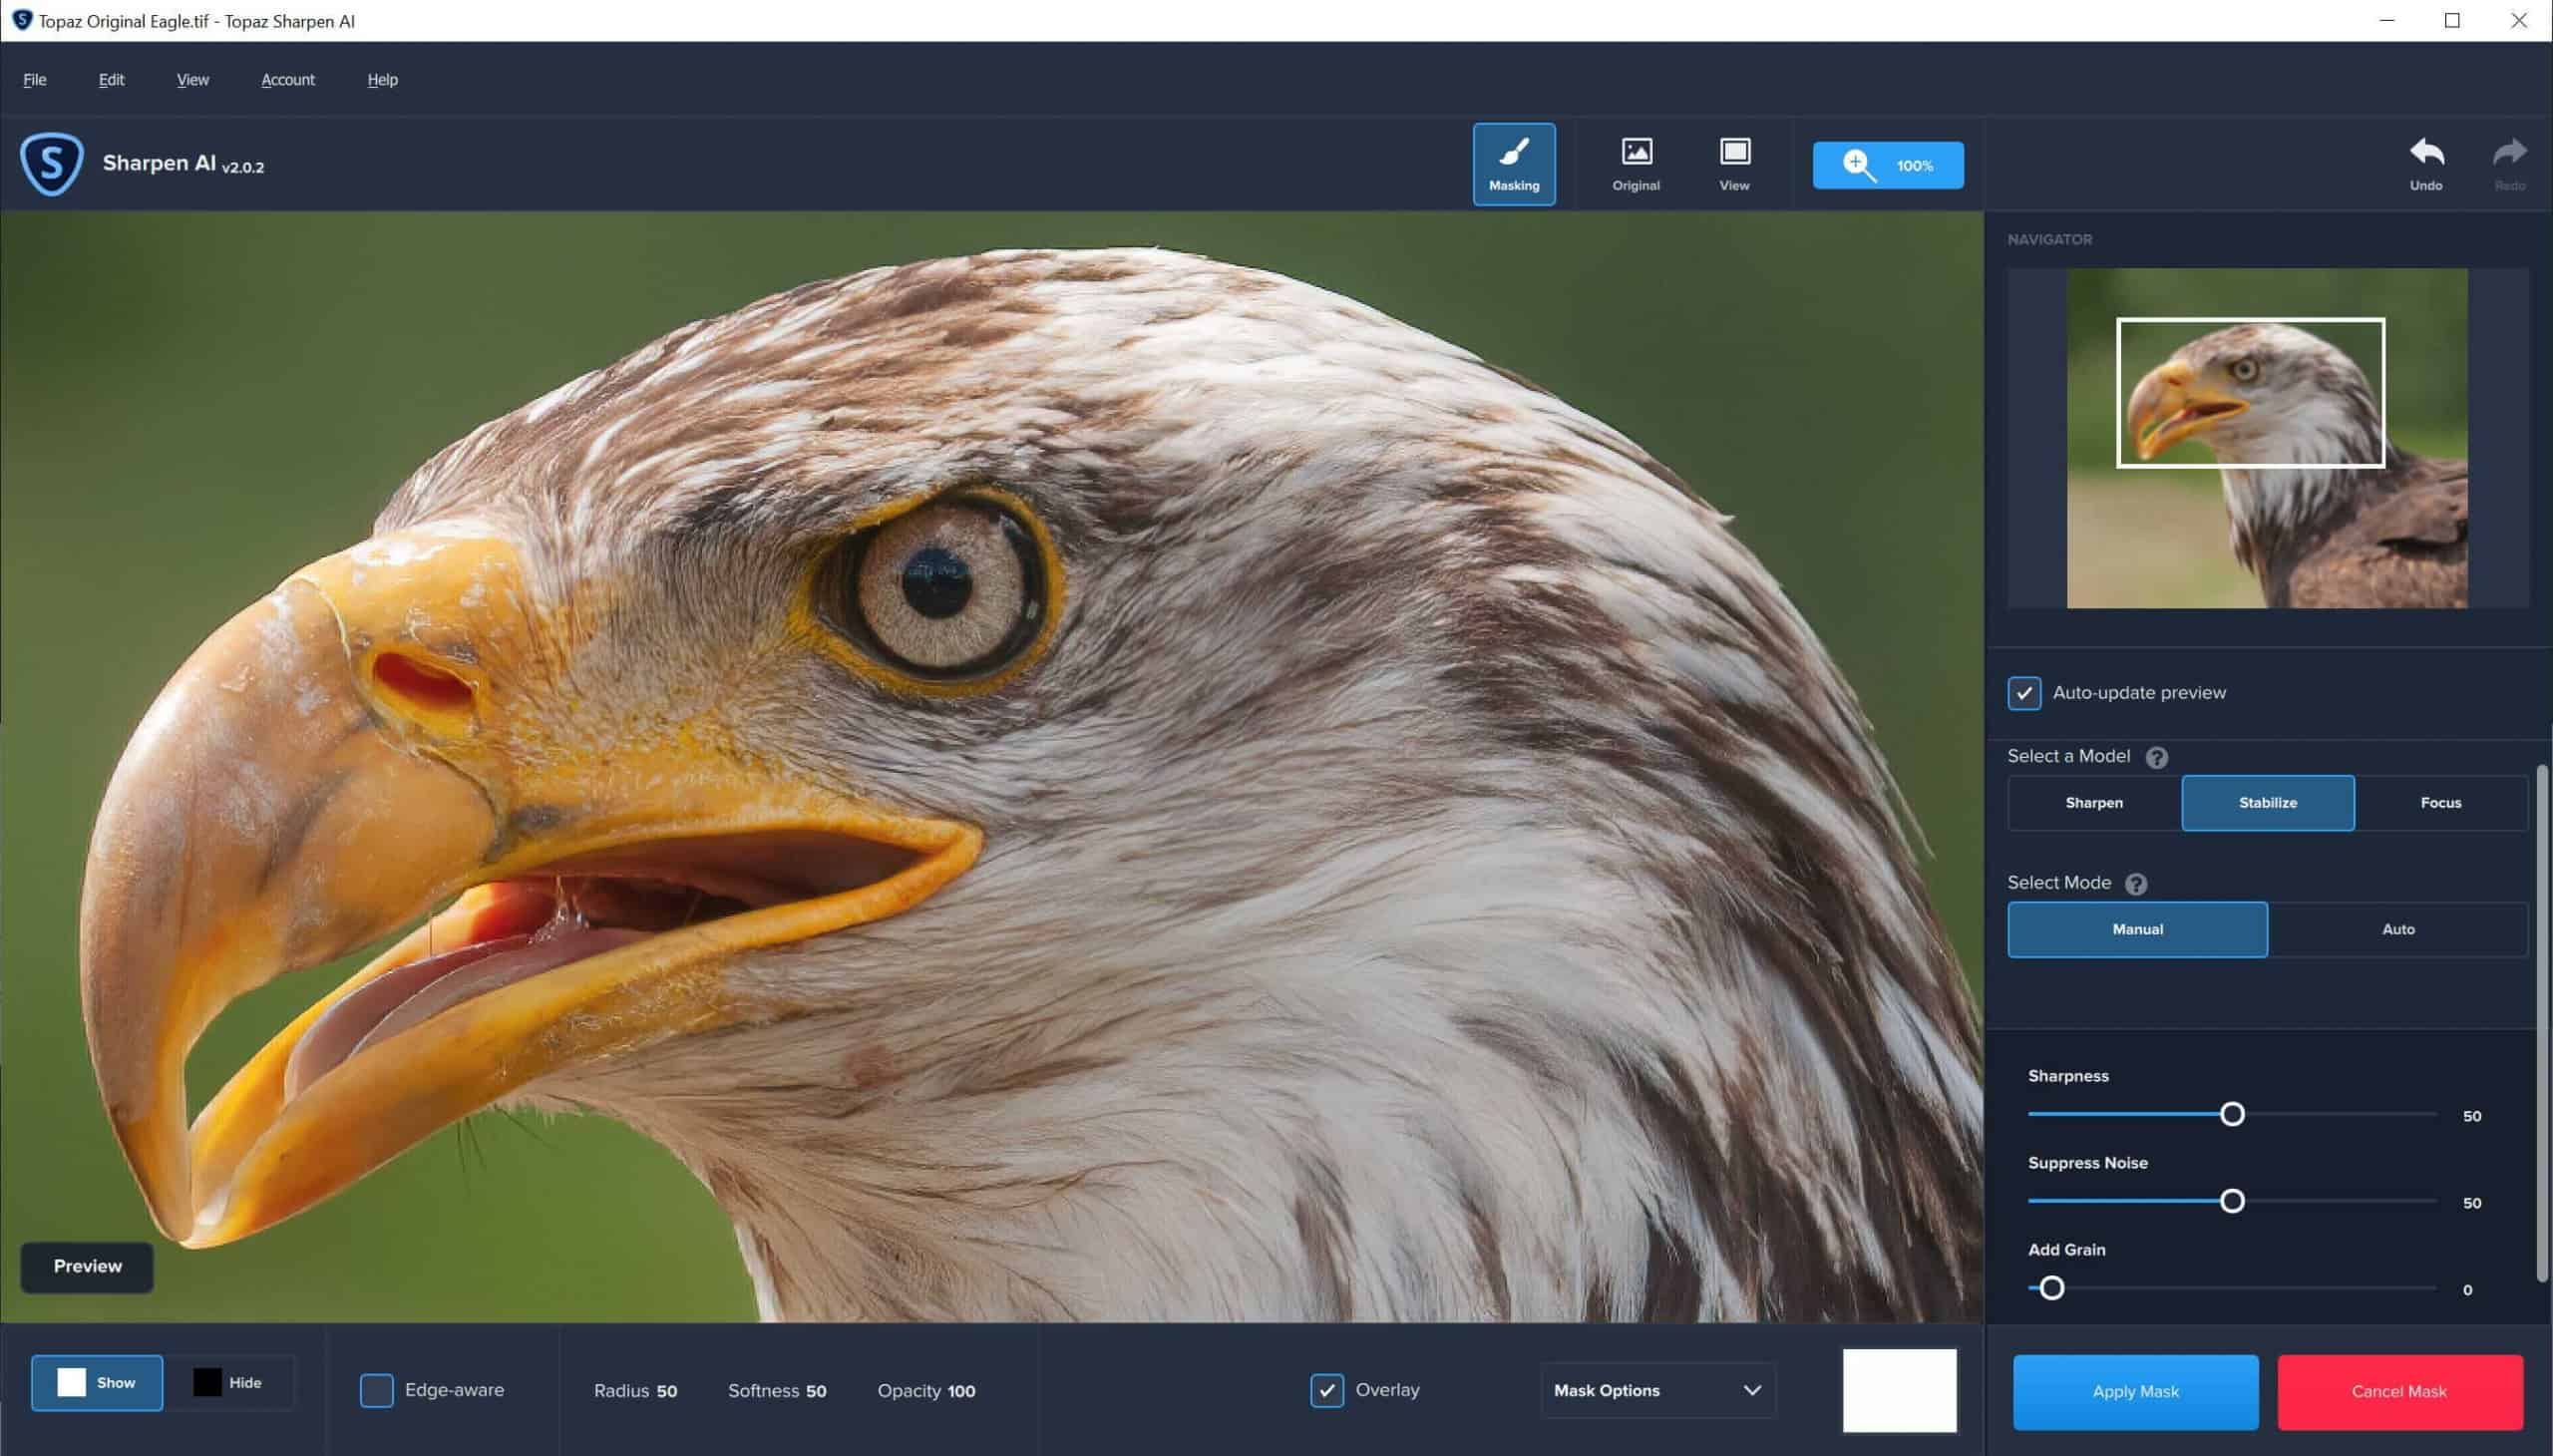
Selective Adjustments: This is the one feature those who were using previous versions of Sharpen AI got really excited about. Wildlife photographers only want to sharpen their subjects not the backgrounds and now with selective adjustments we can pick and choose exactly the parts of an image that we feel requires sharpening which is almost always going to be the eyes for starters. If the eyes are not in focus and tack sharp the image goes in to the trash.
All New Interface: The new interface with the masking toggle at the top and the selective adjustments tools on the bottom is shown below. If you want to see this image in full size click on it to enlarge it. This feature alone makes editing a real treat, no more additional layers in Photoshop.
Selective adjustments in Sharpen AI are very easy to use and to help you get started with the new tools I created this step by step video to walk you through the workflow.
Product #3 in the Topaz Image Quality Bundle AI Suite – Topaz Gigapixel AI
One thing about wildlife is you just never know how close you’re going to be able to get to your subject. Sometimes you can fill the frame and other times you’re a ways back. For this reason cropping images in post is common place with wildlife photographers.
Cropping: What you need to keep in mind is that there is a cost to cropping. Any time you crop an image you are loosing megapixels that were part of the original image and as such your ability to print at scale is reduced. Even if you did not crop your image your ability to scale to large prints is limited by the resolution capability of your camera.
This is where Topaz Gigapixel AI really shines. The software gives you the capability to render your image at up to 600% while perfectly preserving image quality and it really works as you will see in this real world example.
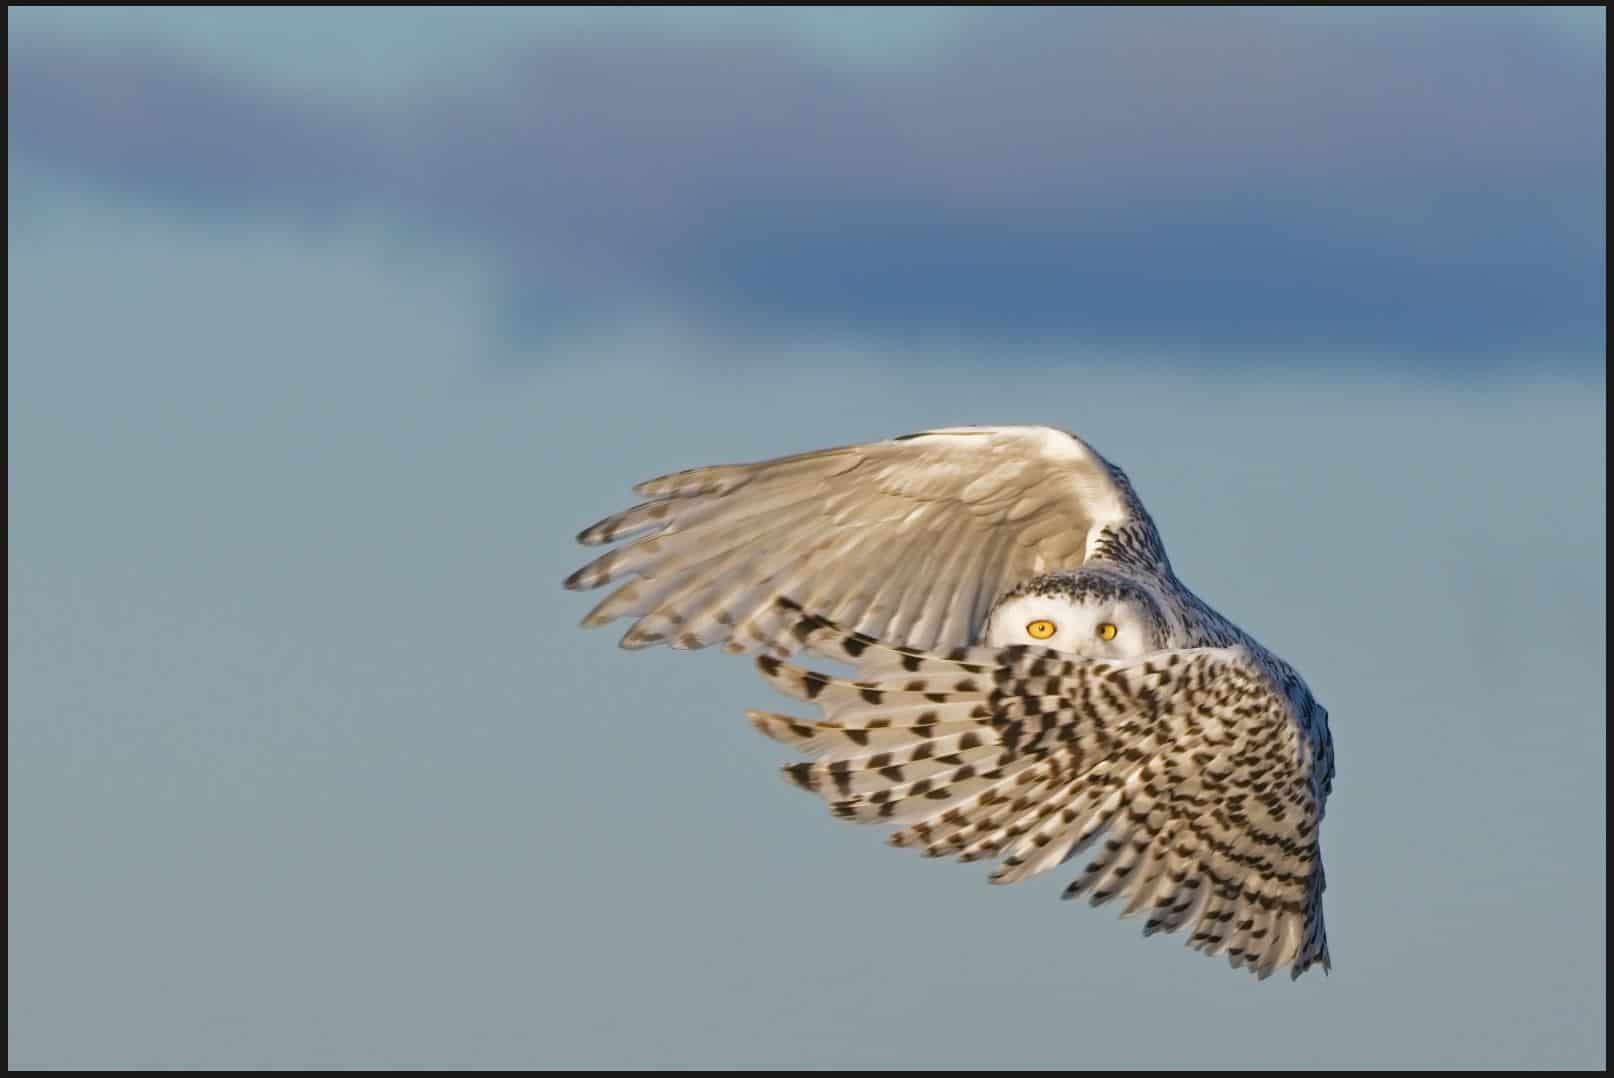
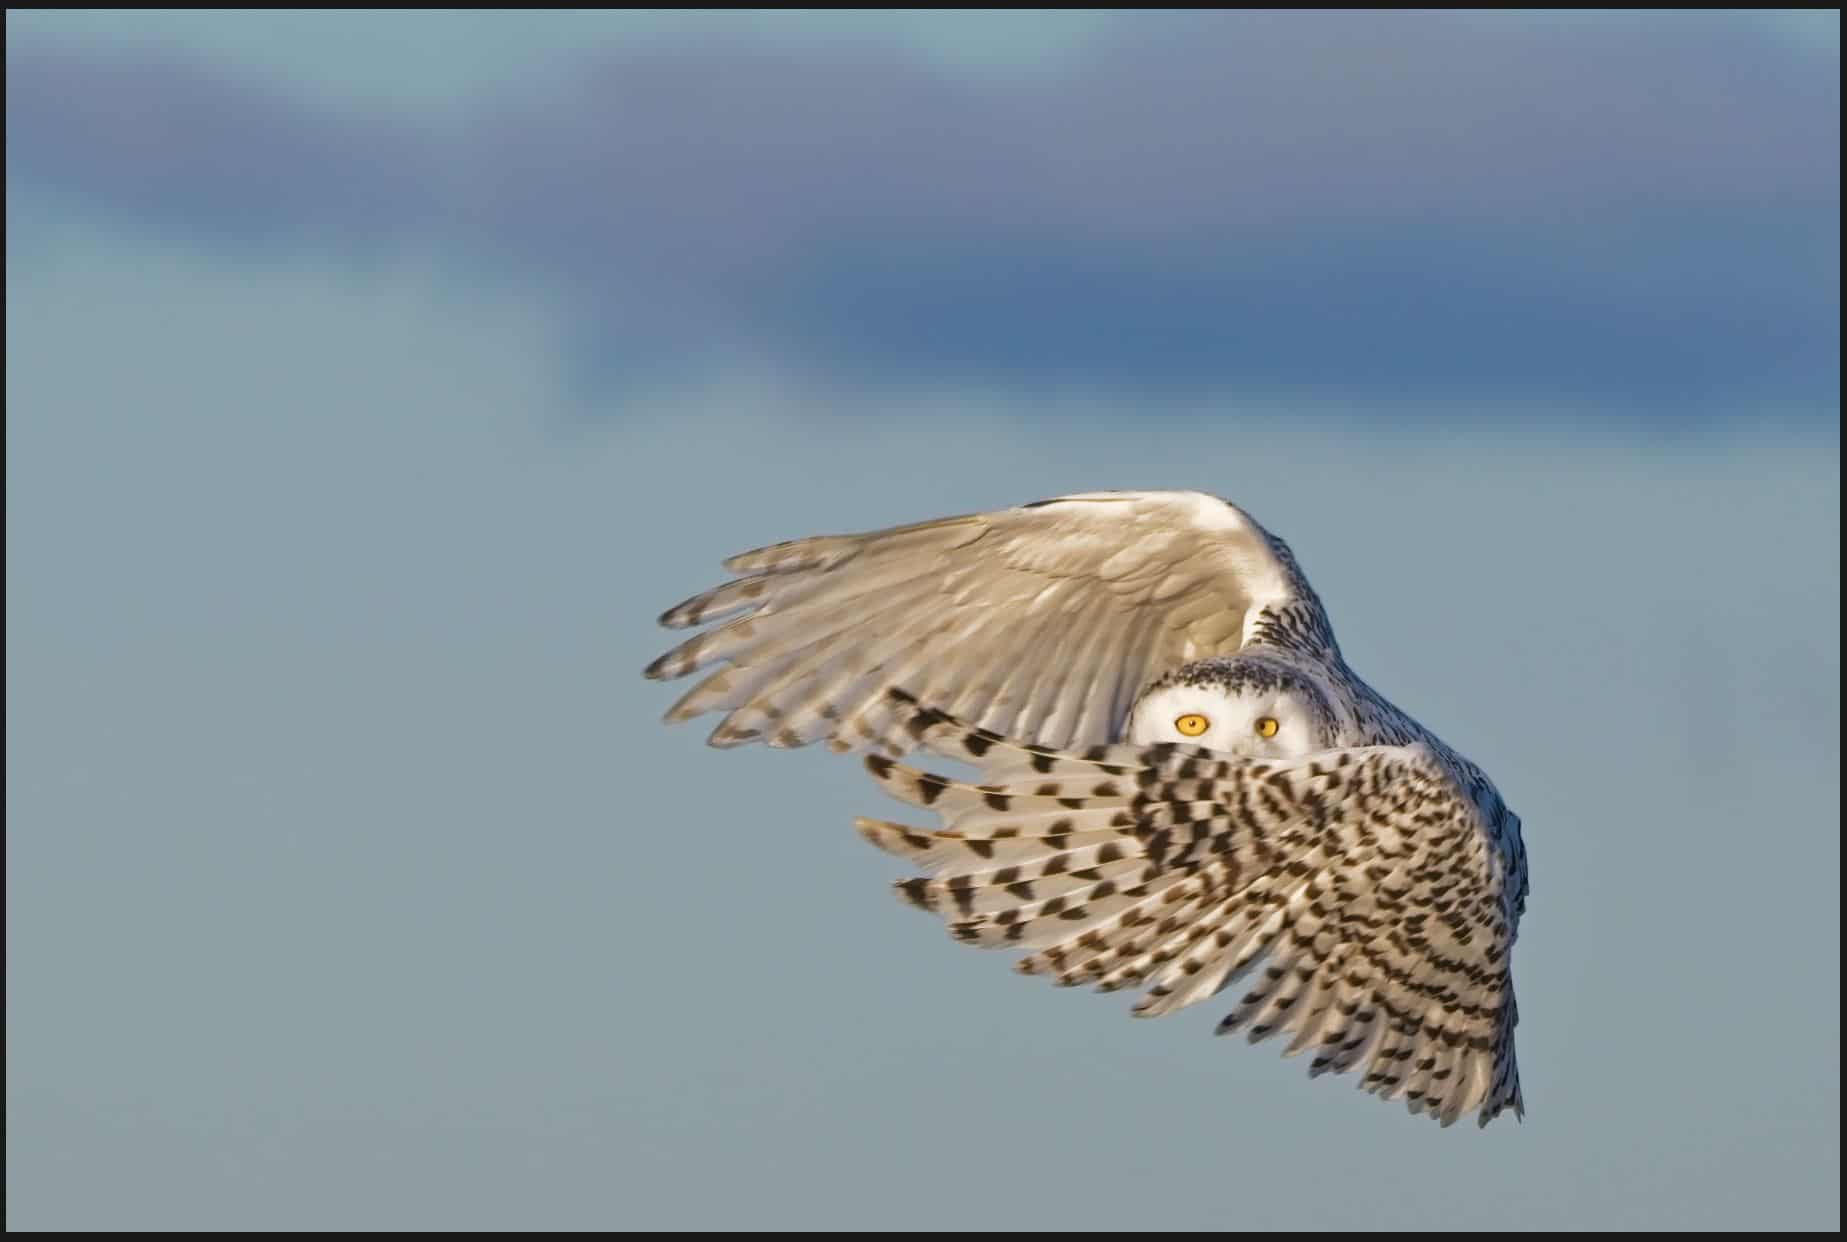
Topaz Gigapixel AI Proof Point: The two images below of a snowy owl make for a good comparison. The first is the original 87 MB file which renders a 16 x 10 inch image. I went crazy and let Topaz Gigapixel AI upscale the second photo by 6X to render an image at 73 x 48 (6 ft x 4 ft).
Both images can be viewed in a larger size by clicking on them in case you wish to take a closer look.
The Topaz Gigapixel AI interface is shown below. If you click to zoom in on the interface you will see the dimensions of the original on the left and the scaled out dimensions on the right just to prove out the experiments validity.
Topaz Gigapixel AI Is The Final Step: Once I have completed all of my edits such as white balance, blacks, highlights I then Denoise the image followed by selective sharpening. When the image is completed to my satisfaction I then perform my enlarging in Topaz Gigapixel AI as my last step to render the image in the resolution and dimensions that I require for printing.
Product #4 No Longer Part Of The Topaz Image Quality Bundle AI Suite – JPEG to RAW AI
Based on what Topaz Labs claims I expect for any shooter of JPEG images or anyone who started in photography and shot JPEG before they migrated to RAW this will be a software they will wish to take a closer look at. In the early days I shot JPEG so I have a ton of images that I would want to revisit with JPEG to RAW to see what I can do with them. I now shoot RAW and have for years because I want as much control over each of the editing parameters as I can realize in post and I just can’t get that shooting JPEG’s. Specifically I am thinking white balance and higher bit depth.
RAW Quality or Hype? Topaz JPEG to RAW AI is an interesting proposition if it works the way Topaz Labs says it will.
- Recover shadows and highlight detail with an expanded dynamic range
- Expand the bit depth from 8-bit to 16-bit and color space from sRGB to ProPhoto
- Remove compression artifacts common in JPEG images
- Fix noise and chromatic aberration which are common issues caused by small sensors
- Convert the actual file format to a RAW format (DNG)
One important note, you need to be aware that when you open a native JPEG image it will not open in Camera Raw. That is a huge limitation as you are locked in to the elements that were processed in camera without the ability to edit those facets of your image. JPEG to RAW AI fills this gap for photographers.
How To Use JPEG To RAW AI.
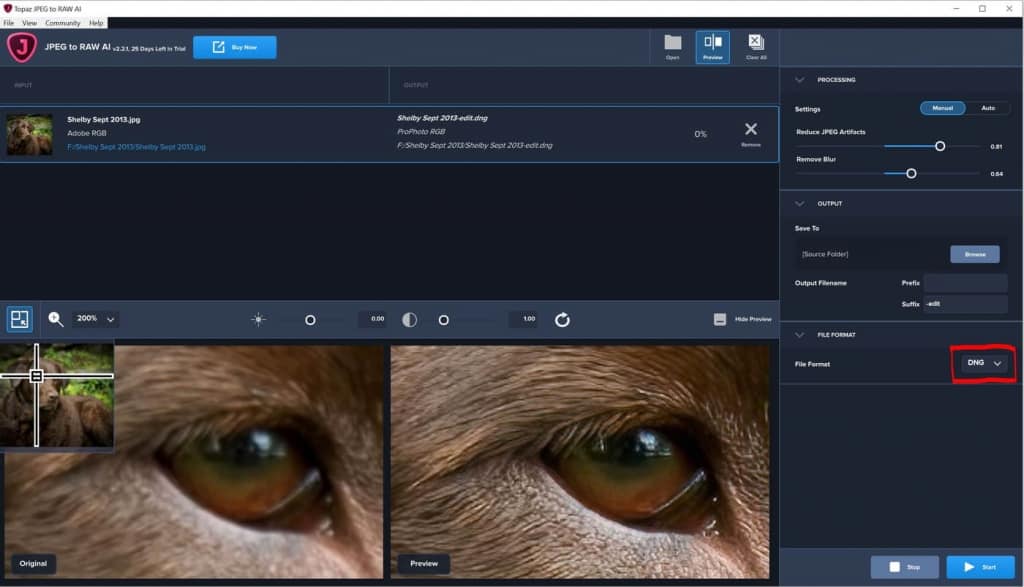
Step 1: Open Topaz JPEG to RAW AI. The interface shown below will open up and allow you to import your JPEG image. You’ll have the option to select Auto and allow the software to make its best guess at how to set those sliders. My preference is to open the image in manual mode and adjust the sliders myself which allows me to see the rendering in real time to get the best result.
Step 2: You will see two adjustable sliders on the right side of the interface. One to Reduce JPEG Artifacts and a second to Remove Blur. I recommend you view your image at 100% or 200% which will make it easier to determine how the adjustments you make are impacting your image.
Step 3: Save your image in the folder of your choosing and save it as a .DNG format. You have the option to save the image as a TIF/TIFF however you want to save it as a .DNG (Adobe Digital Negative Raw Image file) or you will not be able to move to Step 5. You can now close Topaz JPEG to RAW AI.
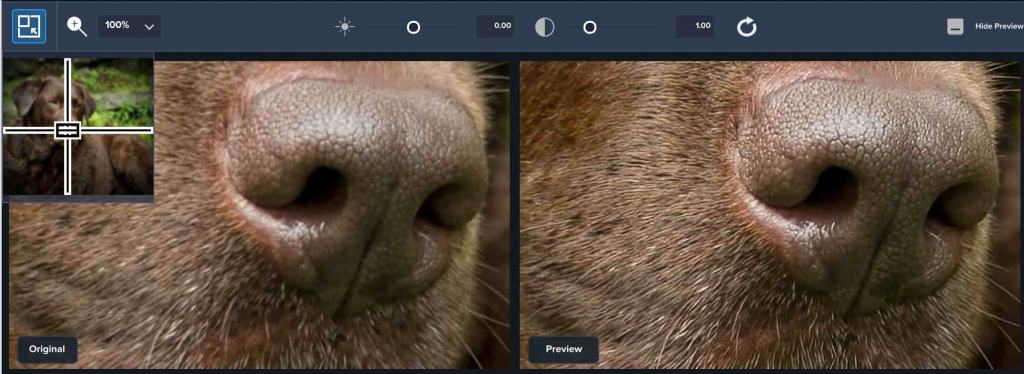
You can see from the sample images that the JPEG to RAW software definitely appears to be expanding the dynamic range, bit depth and removing JPEG artifacts. The clarity and detail at 200% in the eye and the fur around the eye is significantly enhanced. The texture and clarity being rendered in the nose is significantly better. You can click on each image to enlarge them for further inspection. (You’ll need to use your back button to get back to this page)
As amazing as the resulting image was from the JPEG to RAW conversion there is one more very exciting step in this process.
Camera Raw Conversion:
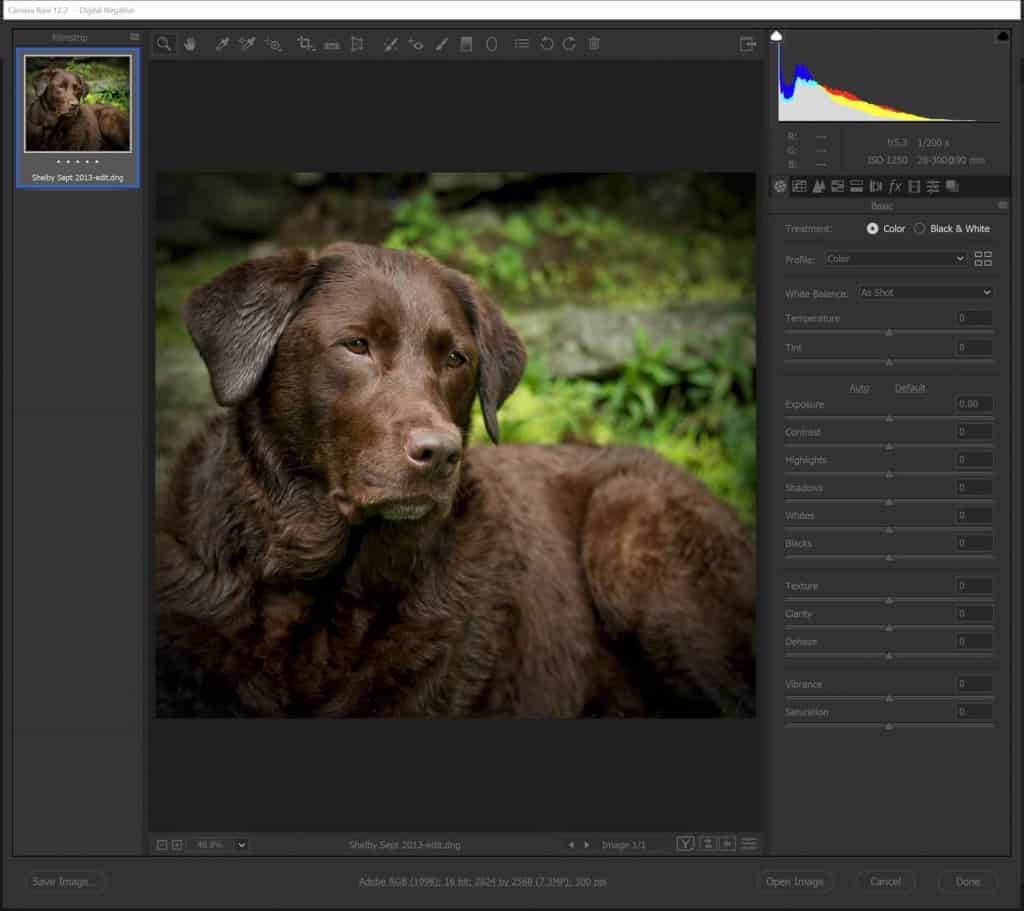
Step 5: Open the DNG file in Camera Raw.
The magic of converting your JPEG to a DNG file format is that you now have the same editing options as you would by importing a RAW image. That is a level of flexibility that you would not have had by importing a JPEG in to your editor. There are five benefits that opening your DNG file in Camera Raw brings to the table.
1/ Image Detail: Enhanced detail in your images. This will be particularly important when you begin to work with plugins like Topaz Denoise AI and Topaz Sharpen AI. The more image data these tools have to work with the better the output.
2/ Brightness: Greater levels of brightness as you can edit beyond the 256 levels of brightness captured in an 8bit JPEG.
3/ Flexibility: Allows greater flexibility to correct over/under exposed images.
4/ Image Quality: Provides the highest level of quality possible due to having greater control in the editing process.
5/ White Balance: More options to adjust white balance. With JPEG’s the white balance is set for you by the camera so you can not adjust it during the edit process.
Full Edit Capabilities: Now that you’ve got that DNG file from your JPEG to RAW conversion you can open it in Camera Raw as shown below. That means you now have full control over each of the editing sliders including the ability to change the white balance. The resulting image after I made my adjustments in Camera Raw and used Topaz Labs Sharpen AI and Denoise AI was leaps and bounds beyond the original JPEG image.
Conclusion:
The Topaz Image Quality Bundle AI has opened up a whole world of possibilities in post for every photographer, but especially wildlife photographers. From cleaning up high ISO images that were unusable in the past with Denoise to selectively sharpening just certain elements like the eyes of subject without introducing that sharpening to the background with Sharpen AI.
And now with Topaz Gigapixel AI cropping images and running large print jobs well beyond the native capabilities of the camera without any loss in detail is a reality. Finally if you shoot in JPEG or have an archive of older JPEG images JPEG to RAW brings the capabilities of RAW editing in to your workflow. In my opinion the Topaz Image Quality Bundle AI really is a required tool set that should be in every photographers post processing workflow.
Topaz Labs does offer a free 30-day trial and you can follow this link to go to the Topaz Image Quality Bundle AI page to try out any of the four products for yourself.





Comments
Topaz Labs Black Friday 2020 | 75% + With Coupon Code | Cool Wildlife
Black Friday Sales For Photography 2020 | Photographers Delight | Cool Wildlife
Comments are closed.