

Noise Killer
Topaz Denoise AI allows you to shoot in low light like never before, which I can confidently state. You can increase your ISO to levels you would not have pushed otherwise knowing you can eliminate that noise and recover crisp detail in your images in post.
I wrote this article as a response to my readers asking me what tools I use in my editing workflow, especially as it relates to removing noise and sharpening and enlarging images. Topaz Denoise AI will kick off part one of this four-part review. If you are interested in the three other photography tools that I suggest be in every photographer’s editing kit you can read those reviews at Topaz Sharpen AI, Topaz Gigapixel AI and Topaz JPEG to RAW. Each of these four products made up what Topaz Labs called their Topaz Utilty Bundle. For 2022, Topaz removed JPEG to RAW from the Utility Bundle and renamed it to the Image Quality Bundle.
For those of you thinking about purchasing any Topaz Labs product, please consider using the affiliate links provided in this post. I receive a small commission to support my content creation efforts and there is no extra cost to you.
If you prefer to go directly to the software without reading any further click on Topaz Labs Denoise AI.
PRICING TIP:
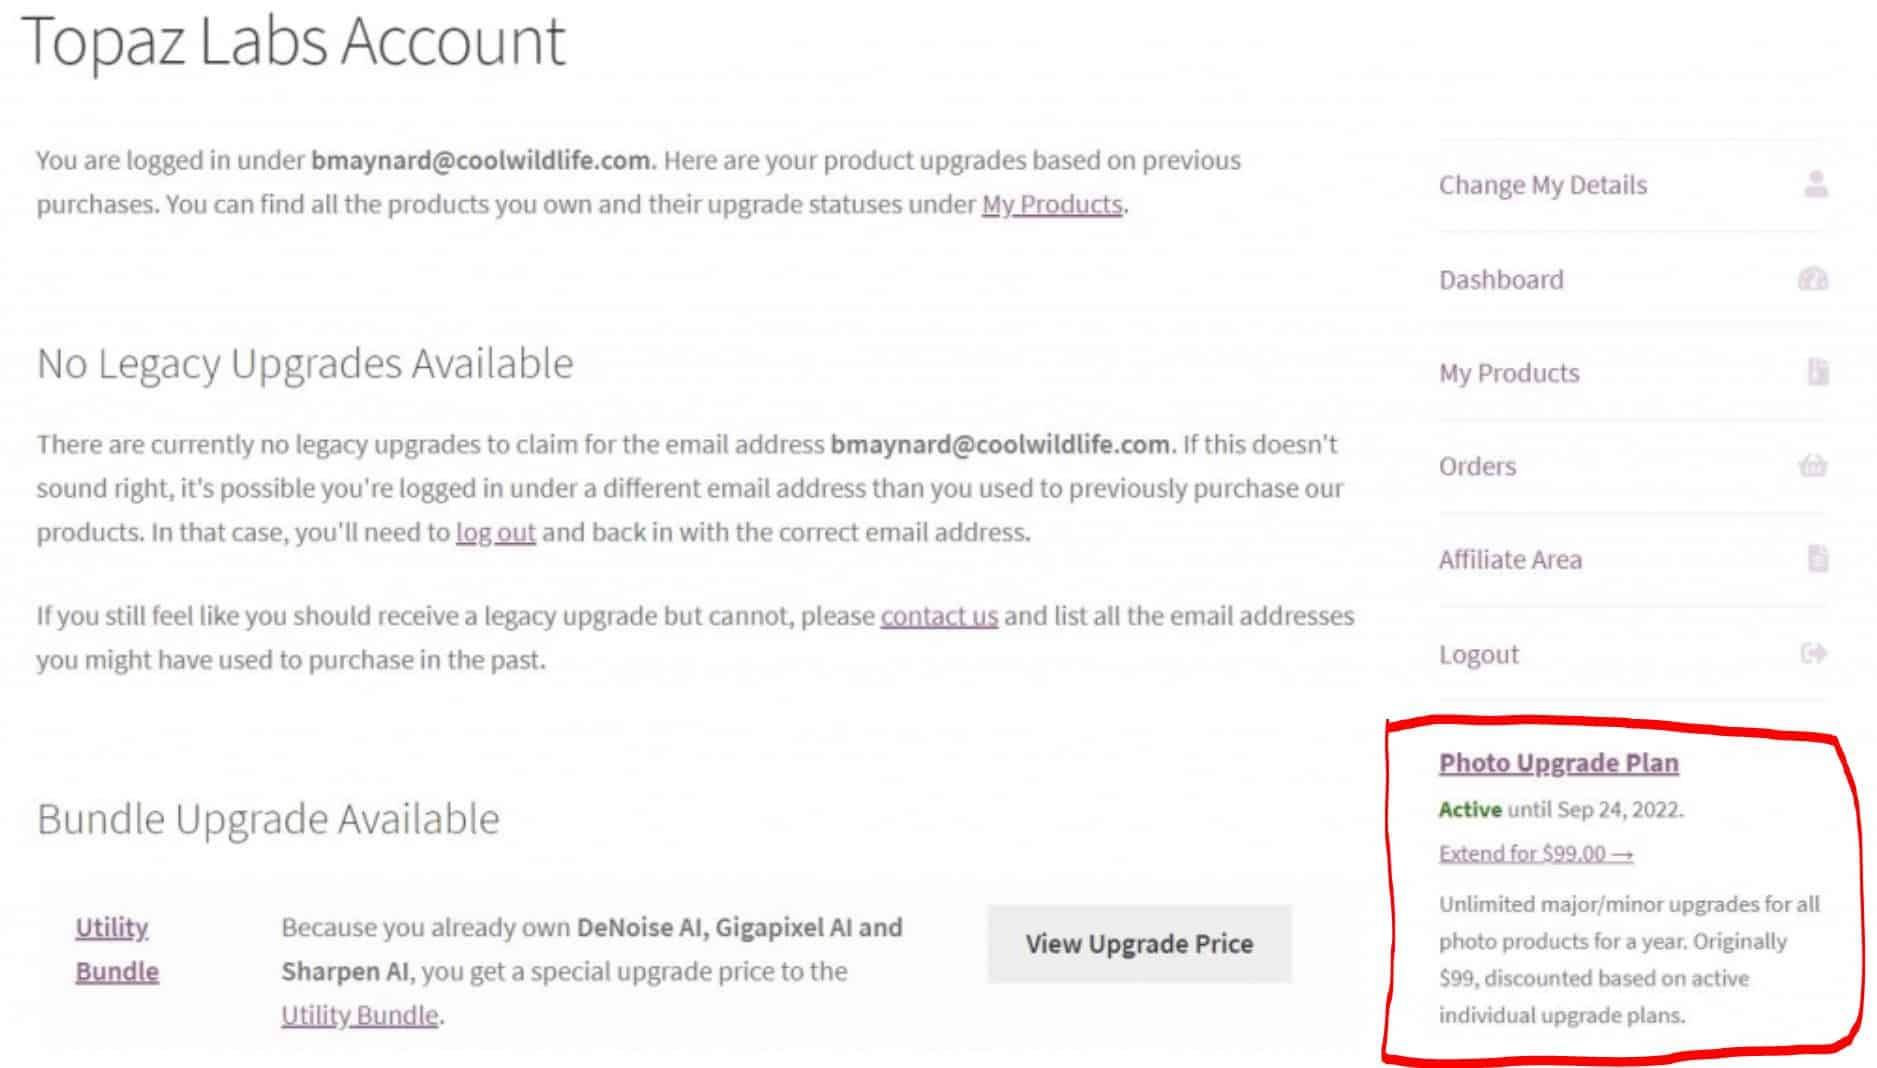
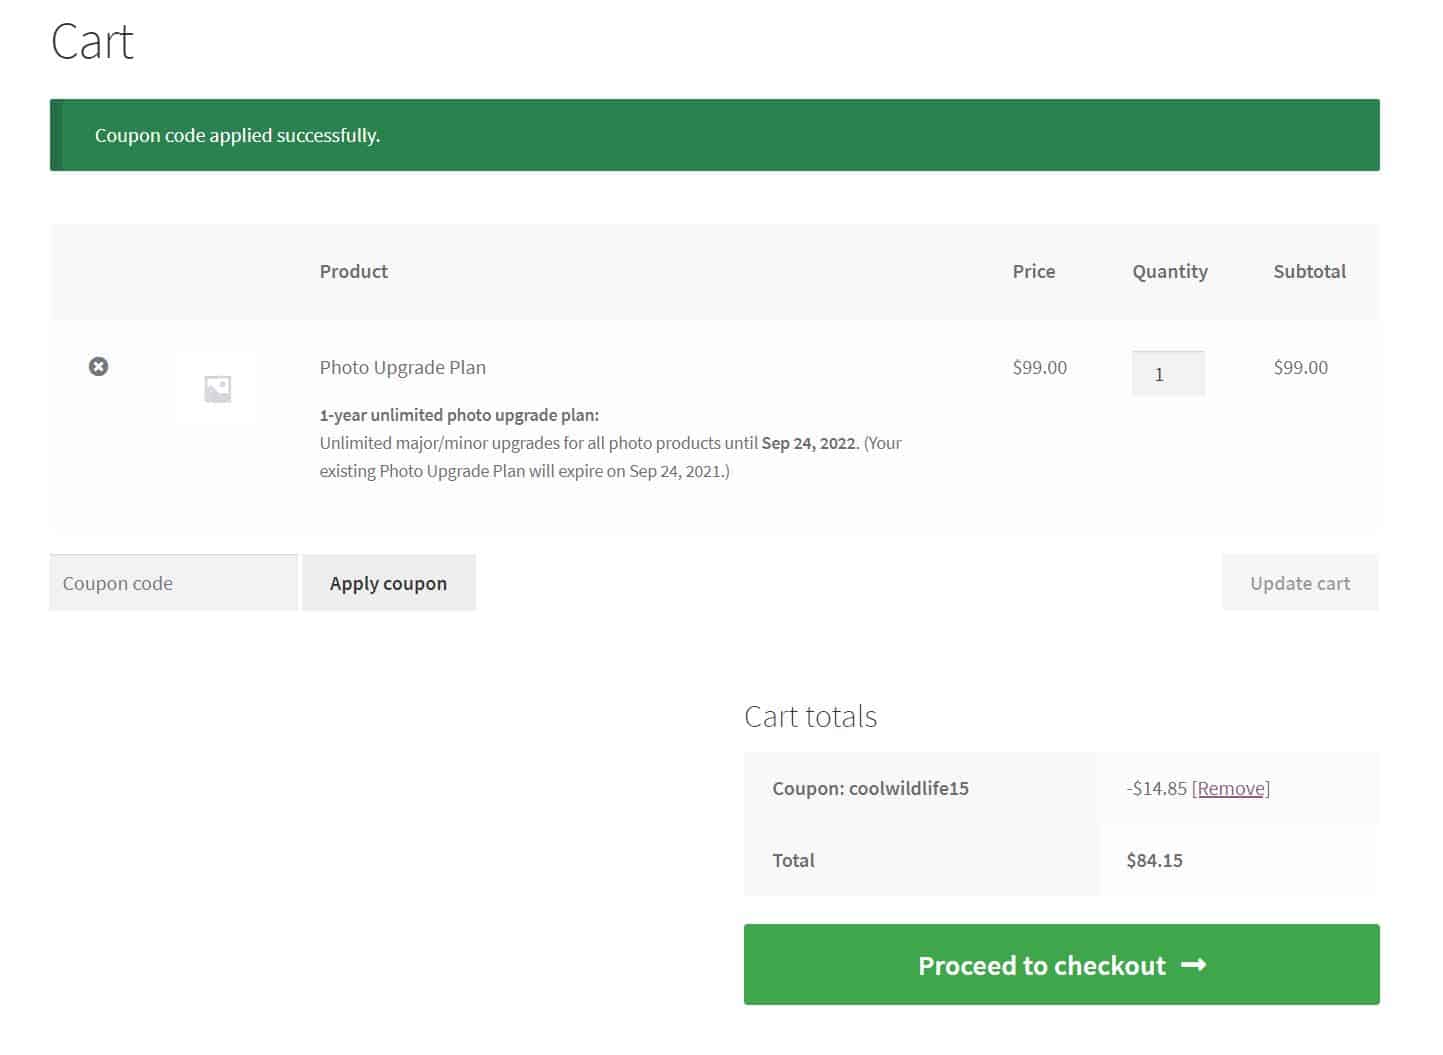
Topaz Labs now charges for upgrades to their products annually. The upgrade price is $49 USD per product. For those of you who own more than one product you will want to use the NEW Photo Upgrade Plan which is $99 USD. This allows you access to unlimited major/minor upgrades to all Topaz Labs products for a year. As the owner of every Topaz Labs product this is a huge savings for me. When you log in to to your Topaz Labs dashboard you’ll see the Photo Upgrade Plan which I have highlighted in the image below.
Before I dive in to the review, there are two basic tips I’d like to offer you so you don’t go off thinking you no longer have to pay attention to the basic photography best practices.
Tips To Avoid Noise
TIP #1 AVOID NOISE: Always shoot at the lowest possible ISO you can for any given scene and that usually translates to trying to maintain a certain shutter speed. Just know that the higher you push your ISO the more noise you will introduce in to your images. Topaz Denoise AI will do an amazing job in post, but the cleaner the image is going in to the process the better.
TIP #2: KNOW YOUR CAMERA: Every camera’s ability to handle noise varies greatly so I strongly suggest that you experiment with your camera. Take the same low light image at all ISO’s and review them at 100% in post. This will allow you to decide where you feel the maximum limit is for your camera and it is based on your tolerance for noise and how you plan to use your images. If it is a web post at 72 DPI I’d push a lot higher than if it is going to print.
For those of you who already own Topaz Denoise AI there’s some great news for you in the form of a free upgrade. And for those of you who do not yet own the product man did you show up to the party at the right time. I’m going to cover the big news first and then jump right in to the full review.
NEW!! Upgrade to New Release
May 26, 2021: Topaz Labs has been very busy adding a whole host of new features to Denoise.
The new version of Topaz Labs DeNoise AI v3.1 includes a new model called “Severe Noise”. The image of two mink is not sharp, never was, but I thought it showed what’s possible with the new “severe noise” model at removing noise from this Nikon Z7 ISO 4000 image.

ADDITIONAL FEATURES IN RECENT RELEASES
Comparison View: Now when you upload your images DeNoise AI will show you the best processing mode! With the new Comparison View located under the View options, DeNoise will show you a preview of what your image results will be with each of the three modes. I used to run each model manually which took time, now I can more easily select the model that produces the best result, so this is a huge time saver for me.
GPU optimization for NVIDIA cards: Denoise AI v2.3 gives NVIDIA card users a much appreciated speed boost. As a NVIDIA card owner myself I can attest to this one, I have noticed a significant difference in processing speed. Previously this optimization was only done for Intel cards.
Improved AI models: This includes a mode with no added sharpening which is great as I have always preferred to perform my sharpening in Topaz Sharpen AI as that product does a much better job of sharpening and has a selective adjustments feature that allows me to sharpen only where I feel it is required in my image. To use this model, use Low Light mode with 0 sharpening
General AI model improvements: I have only just begun to play with the new models but at first glance it appears the new models are an an improvement on what was already the best noise reducing software I have worked with.
May 28th, 2020 Release: Topaz Labs Denoise AI added a highly-requested feature for image noise reduction. As they recently did with Topaz Sharpen AI, Denoise AI now has a selective adjustment capability. Also included is a new model called Low Light Mode, as the name implies was created to work well with images taken in low light. This model was designed to not only reduce overall noise but also specifically address the removal of severe color noise. These new features are included in the free upgrade and can be downloaded at the following link for those who already own Topaz Denoise AI. These new features are a big deal for all photographers but especially so for wildlife photographers when it comes to the new selective adjustments feature.
Selective Adjustments
Hundreds of users made selective adjustments their #1 priority for the new release of Topaz Sharpen AI and now Topaz Denoise AI. Topaz Labs delivered in a big way for photographers with these two product enhancements. As wildlife photographers we DO NOT want to overlay image noise reduction across the entire image. If you are doing that let me suggest there is a better way, especially now with the addition of selective adjustments. You no longer have to create an image noise reduction layer in Photoshop and brush away to leave behind only the areas you want the noise to be removed in.
Here’s the biggest question I now get asked regarding the new selective adjustment feature that Topaz just released in their new version of Topaz Denoise AI.
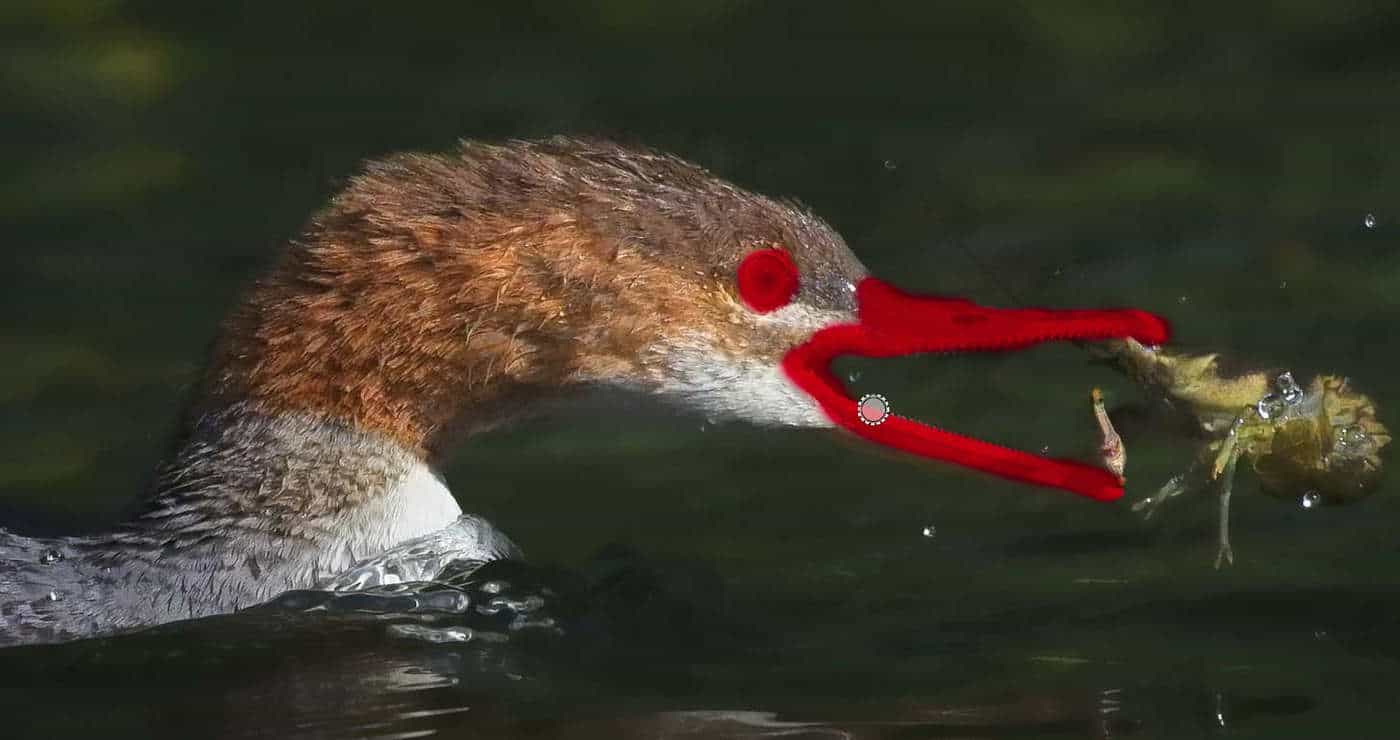
How do you use the Topaz Denoise AI Masking Tool?
- Open Topaz Denoise AI Stand Alone or Photoshop
- Drag or open your image
- Click on the Denoise Model
- Select the masking tool
- Check the box for overlay
- Change the size of your brush with radius
- Paint in where you want noise removed
- Adjust the sliders and click apply mask
The Eyes Have It
You can now do selective image noise removal within Topaz Denoise AI in a few easy steps. As wildlife photographers we obsess over details in our images starting with the eyes. That’s the first thing I look at when I review a wildlife image. If the eyes are not in focus I run the image through the three Topaz Sharpen AI modes to see if it can be recovered and if the answer is no the image is deleted. If the eyes are in focus I turn my image sharpening to details in skin, scales, fur, feathers or whatever else I feel will highlight the details of the subject that I wish to focus a viewers attention on. And now I can selectively remove image noise from those same areas where I wish to draw the viewers attention.
New Interface
Below is what the new interface looks like in Topaz Denoise AI. You’ll notice the masking icon at the top of the interface and once you click on that you will see the new masking options along the bottom of your screen. If you want to see this image in full size click on it to enlarge it. Note: You’ll have to use your back button to come back to the blog after reviewing the image.

Having tried selective adjustments now on a few images I am over the top excited with this new feature as it saves me additional steps in other tools.
Editing Tip: When performing image noise removal do not overdue it. You need to create a balance between removing noise and maintaining image detail . Please lend a critical eye to this small but important detail. As you move the Remove Noise slider to the right it removes noise but keep a close eye on how the detail in the image changes. You’ll want to blend the use of both the Sharpen and Recover Original Detail with the Remove Noise to find the perfect balance which renders the best possible image.
New Low Light Model: If you routinely embark on low light photography you’re going to really love this new night mode model. I have viewed a number of night images and not only does it do a great job removing the noise but also at drastically reducing the severe color noise that is often present in my low light images. I particularly like having the ability to selectively adjust the noise in different parts of the image. This allows me to focus on the noise in the subject differently than the background.
Topaz Labs Denoise AI – The Full Review
Best In Class
Try to imagine you’re just back from your morning shoot and you’ve captured an image of a mink you like but it looks grainy, now what? You’re either going to delete the image or turn to a photo noise removal software to see if it can recover the image to a usable state. I’ve used the noise reduction controls built into Photoshop, Lightroom, ON1 Raw and Topaz Denoise over the years and they’ve all gotten better over time with this latest AI version of Topaz Denoise being the best yet in my opinion.
The Devil’s In The Detail
Most photo noise removal software does a great job removing noise, but the best of the best do it without trading off image detail and that is what Topaz Labs Denoise AI does better than the rest. I was able take an image at ISO 4000 and upon removing the noise be left with as much detail in the subject as was present in the original. Every other noise reduction software that I have used removes the noise however the detail suffered along with it. I suspect this magic is somehow tied to the Topaz Labs AI engine.
Speed Improvement
The speed of rendering will be dependent on the performance of your computer, especially your graphics card. You can set GPU speed preferences within the software to step things up. If you get too aggressive with the noise slider you will lose detail so keep an eye on the preview at 200 and 400% and you’ll be able to find a balance where the noise is removed and the detail preserved without halos and artifacts being present. What I can tell you is this latest version of Denoise AI is significantly faster than the previous version, my rendering times and live preview times were super fast.
AI To The Rescue
This latest version of Denoise AI inspected thousands of noisy images and added Artificial Intelligence (AI) to help the software know the difference between image noise and image data. Below is a sample image from a Nikon Z7 shot at ISO 4000. I used the masking tool to only remove the noise from the area within the red box. If you click on the image to enlarge it you’ll see the magic I’m talking about. The surrounding background where I did not denoise is crazy noisy still. However you’ll will notice how clean the area within the red box is and the fur on the mink has been preserved very well.
Note: You may have to click your back button to get back to the post after enlarging this image.

Stand Alone or Plugin
Topaz Labs DeNoise AI can be used as a standalone program and inside Photoshop as a plugin. I really like the convenience of not having to leave the Photoshop interface if I was already in that GUI performing other editing.
The Workflow
Select A Model
You have two choices Denoise AI and AI Clear. Topaz Labs states that Denoise AI will be slower and will preserve more detail but may not work as well for certain types and sizes of noise. Hence the reason to provide a second alternative in AI Clear. AI Clear apparently works better for more types of noise but may preserve less detail. I’ve always stuck with the Denoise model as I am trying to preserve as much detail in my subjects as possible. I suppose it’s worth trying AI Clear if you’re not happy with the job Denoise performed just to see if it makes a difference.
Manual or Automatic
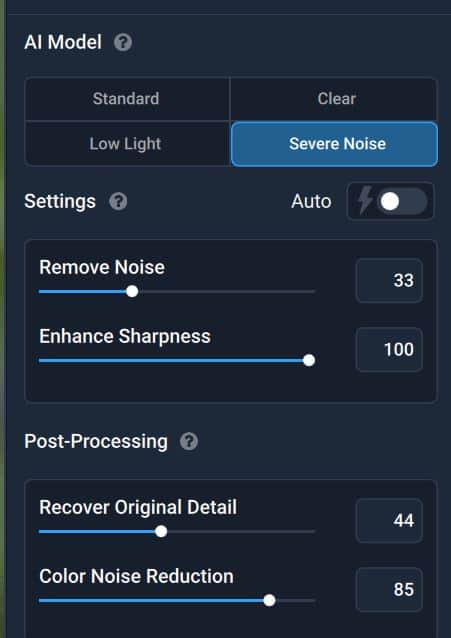
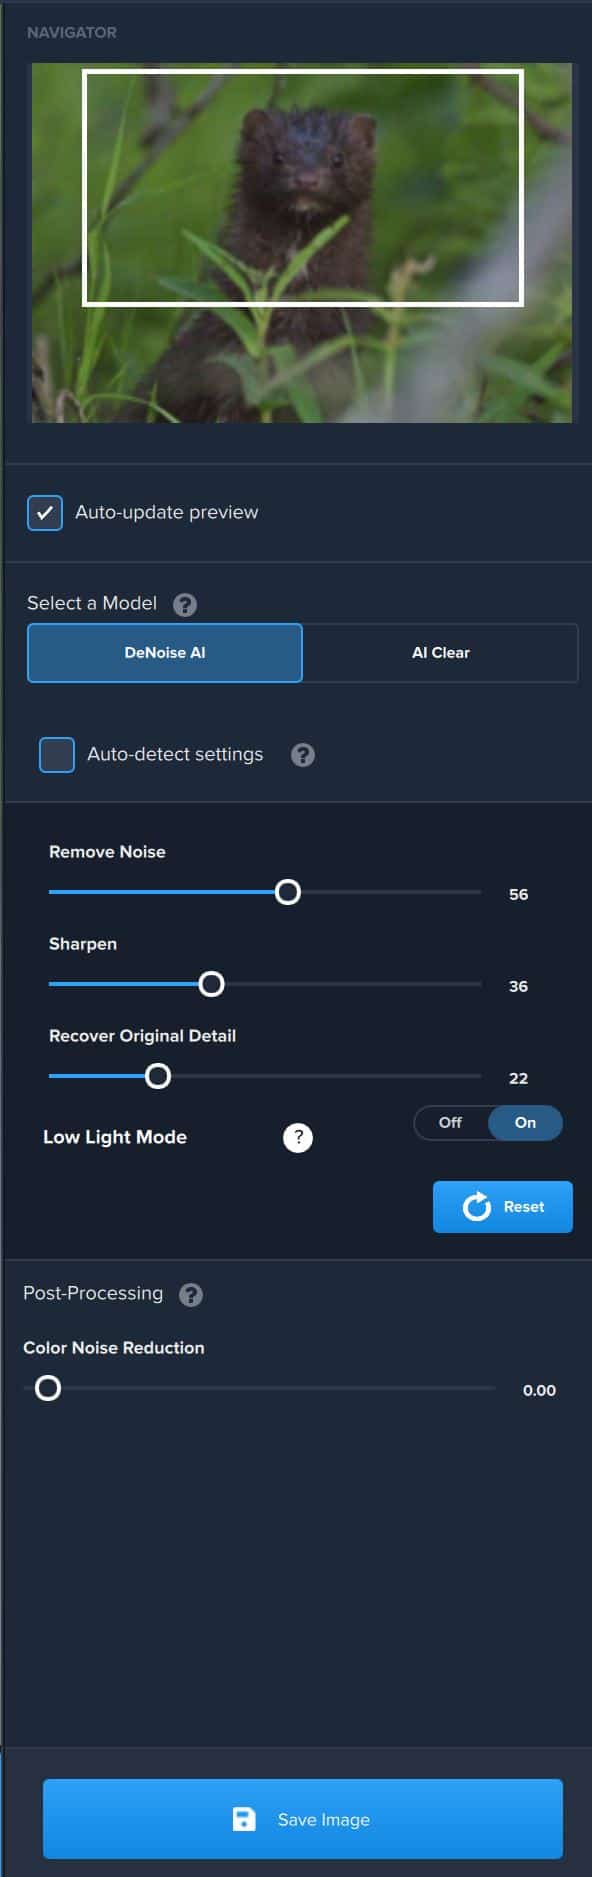
The process of noise removal can be done automatically by the software as a starting point or you can fly manually. I prefer to let the software AI engine roll in automatic to see how it recommends each slider be set. I take note of those settings and then switch over to manual and perform further tweaks. I do check the box beside the auto-update preview so I can see how my changes to each slider are impacting the image. Every wildlife photo I take is different depending on the lighting, backgrounds, the camera I’m using and so on. As such my adjustments within each of three sliders shown in the image below will vary from image to image.
The Sliders
Remove Noise
After clicking on the Denoise AI Model and selecting the check box beside Auto-detect settings you’ll see three sliders. The first slider is the Remove Noise slider. As the name implies this is used for varying the level of noise reduction in your image. This applies to the overall image or if you selected the masking tool it will only be applied to the area that you masked per the sample image I showed above.
Sharpen
The second slider is the sharpen slider. I do not use this slider in my own workflow as I prefer to sharpen my images with Topaz Sharpen AI. This link will take you to my full review where I also include a step by step video on how to use selective adjustments. For this reason alone I prefer to use Topaz Sharpen AI as it allows me to selectively sharpen just the areas of the image that I feel need sharpening. In the case of the image below this would only be the mink. The sharpen slider in the Topaz Denoise AI tool will apply sharpening to the entire image and I never want to sharpen my backgrounds.
Recover Original Detail
The third slider is Recover Original Detail and I do use that slider after I have the noise removal where I think it looks the best. This is a slide and view exercise in very small gradations so I can view how it is impacting my subjects. I pay particular attention to the eyes of my subjects as I am recovering detail and at 100 or 200%.
Color Noise Reduction
Further down in the menu below the three main sliders you will see a fourth slider called Color Noise Reduction. Images taken in low light require high ISO settings and with that comes colour noise. If you’re not familiar with colour noise, take a high ISO image and blow it up to 200%. You’ll very quickly notice that there are pixels within the noise that are of various colours. This can be reduced by using the Color Noise Reduction slider. However before you use this slider turn on the new Low Light Mode and see what impact this has on the colour noise in your image. If you still feel it needs further refinement this is when you can turn to the Color Noise Reduction slider for a few final tweaks.
Low Light Mode
This new model which was just introduced in the new version should be turned on for images that were taken in low light and have high degree of colour noise. Topaz Labs states that it works particularly well with high ISO RAW images with lots of colour noise which describes a large chunk of the images wildlife photographers take given our early start to the day before the suns up mentality.
Topaz Labs Denoise AI FAQ
Q: How do I get the upgrade price and not the regular price for a new user?
A: You must be logged into your Topaz account before trying to purchase a license renewal. Once you are logged in, the renewal price will automatically be applied. If you are not logged in first, you’ll see DeNoise AI as a first-time purchase.
Q: If I don’t upgrade does this mean I can no longer use DeNoise AI?
A: You still have full access to the previous version of DeNoise AI without any additional purchase required. You will not have access to the latest updates which contains new features and improvements, or the updates that follow it for a year, unless you purchase a one-year license renewal for $49.
Q: How long will I receive upgrades included in the license renewal?
A: You will receive access to the newest version of DeNoise AI and all updates that follow up to one year after renewal.
Q: Why is this a paid upgrade when previous upgrades were available for free?
A: Topaz announced the license renewal program at the beginning of 2020, intending for it to not be implemented until the fall to allow for a grace period and smooth transition. I’ve seen many user complaints on the forums but I honestly expected this. Every other software I have charges for upgrades annually. Topaz Labs releases many new features in all of its products throughout the year and I do not mind supporting those builds if it improves my workflow.
Pricing Tip Repeated:
Topaz Labs has introduced a 1-year Photo Upgrade Plan which allows you to upgrade every product in the Topaz Labs Suite for 1-year. I own every Topaz Labs product so this is a huge savings for me rather than spending $49 on each product upgrade separately. The price for the bundled photo upgrade plan is $99 USD. If you apply my coolwildlife15 coupon code you’ll get it for $84.15 USD.
-
Conclusion
Topaz Labs Denoise AI and earlier versions have been a part of my image editing workflow for many years. This latest release with the addition of a comparison view and speed improvements for my NVIDIA GPU along with the selective adjustments from the last release allow me to mask my wildlife subjects and only remove noise from the parts I feel require it and process it much quicker. These are features that I have now used on several images and it works very well. The addition of the Low Light model was also a welcome addition to the tool. Every serious wildlife photographer I know is up before sunrise and on location. That translates to low light shooting and high ISO’s. The ability to deal with that additional colour noise in post within the same tool saves editing time. I can’t state this any simpler, if you shoot in low light you absolutely need to add Topaz Labs Denoise AI into your workflow.
Topaz Labs has cleverly put together the Utility Bundle which offers the four products that most photographers will have in their editing kit.
Money Saving Tip
If you think you might want Topaz Denoise AI, Topaz Sharpen AI, Topaz Gigapixel AI and Topaz JPEG to RAW AI it is way cheaper to purchase them in the Utility Bundle then as individual products.
For that reason, I highly recommend that you do not purchase the Topaz Labs products individually until you have read my reviews for all of the products that make up the Topaz Utilty Bundle.
Trust me when I say you are going to want at least three of the four and you’ll save some cash by buying them in the Utility Bundle even if there is one product you don’t think you’ll use much. You can read my individual reviews for each product at Topaz Sharpen AI, Topaz Gigapixel AI and Topaz JPEG to RAW.

Free 30-Day Trial
Topaz Labs does offer a 30-day free trial of all of their products, so you can take any of these products for a test drive and judge for yourself before you purchase.. You can use the following link Topaz Denoise AI to navigate to the Topaz Labs Denoise AI page. When you are ready to make a purchase you can use Topaz Labs Coupon Code coolwildlife15 to save an additional 15% on your purchase.


Comments
Randi
Bill Maynard
Topaz Labs Sharpen AI Workflow Step By Step Guide | Cool Wildlife
Affiliate Marketing
Bill Maynard
Sage Fadely
Comments are closed.