


DXO’s PhotoLab 3 has been chosen as the best imaging software 2020 for its amazing RAW processing software. The software brings the art of creative images to a new level for photographers. Given all of the hype I thought I had better dive in to see what all of the excitement is about. If you prefer not to read this full review you can head on over to the DXO PhotoLab 3 page through this link. For the Coles notes on this review, DXO Photolab 3 does everything you can do in Photoshop without the monthly subscription fees. Buy it once and you own it for life. Then you decide as new features come along when to purchase upgrades.
Last week, DxO announced its newest creation, the Nik Collection 3, an update of a series of plugins the company had acquired from Google in 2017. This was the most expansive update of those plugins yet. If you wish to read that review you can check it at Nik Collection 3. For this review we’ll be talking about another DxO product, PhotoLab 3.
This review is part of a four part series where I will be reviewing the four best RAW editors on the market. DXO PhotoLab 3 is a very strong contender in this space along with ON1 Photo Raw 2020, Luminar 4 and ACDSee Photo Studio Ultimate 2020.
If you land on Luminar 4 as your RAW editor you can use the coupon code COOLWILDLIFE to save $10 on your purchase.
Deciding which RAW editor best suites your workflow is not an easy decision to make. The intent of these four reviews is to provide you with enough information to make an informed decision. All four vendors offer a full functioning trial for 30 days so you can really dive in and see which one is right for you.
Whereas Nik Collection 3 just dropped, PhotoLab 3 has been out since October. Still, I assume you’re probably exploring DxO’s range of image editing tools since my review last week, so you may be curious about PhotoLab 3 and whether it’s the right addition to your suite of photo editing tools.
For those of you looking to craft your most creative images DxO PhotoLab3 is a tool that needs to make your short list for sure. You can adjust lighting, repair damaged parts of images, make masks, apply filters, and denoise your images all with one tool. There’s no need to bounce between multiple photo editing applications to complete your edits.
I’m not going to leave you in suspense any longer. Let’s dive right into DxO’s PhotoLab 3 and the wealth of features it contains.
DxO PhotoLab 3 Features
Impressive, Convenient Workflow
Part of what makes any photo editing program worthwhile is undoubtedly the workflow. I’ve talked on this blog many a time about how you can lose so much time editing your photos if you’re not careful.
The DxO family of products and the PhotoLab 3 especially will allow you to reclaim your time. The PhotoLab 3 workflow is designed for ease of use and convenience. Within the workflow are features that, once you begin using them, will make you never want to go back to the old ways of doing things.
Here’s an overview of DXO PhotoLab 3 workflow:
- Manual and semi-automatic red eye removal: It doesn’t matter if you’re photographing a human or animal subject, red eyes will mar your photo fast. Within PhotoLab 3’s workflow is an intelligent red-eye removal tool. You can choose between manual or semi-automatic red eye correction if you have a face within profile view. Otherwise, PhotoLab 3 will always clear up red eye automatically.
- Seamless switching to Adobe Lightroom: Are you a dedicated Adobe Lightroom user? You can easily and quickly swap from DxO PhotoLab to Adobe Lightroom and back with PhotoLab 3 so your workflow never has to slow down or be interrupted.
- Direct access to your files: Need one of your photos right now but it’s not on your computer’s hard drive anymore? No problem. You can open your photos in PhotoLab 3 from a USB plugged into your computer, your hard drive, or even another device.
- Removal of artifacts: Grids and patterns on clothing often develop moire when photographed, which are unwanted artifacts. PhotoLab 3 cleans these up within the workflow too.
- Customize your interface: If you’re not in love with the PhotoLab 3 interface when you first launch the program, that’s okay. You can personalize and customize your workflow as you need it right away, adding more screens or taking these away. However you work best is possible to recreate.
- Fullscreen mode: When you activate fullscreen mode, you can see all the images in your photo library but maintain the EXIF data display. You’ll use fullscreen mode most when editing and exporting your images. You can even set keyboard shortcuts to choose which photos you want to view in fullscreen. Talk about saving time!
- One-click editing: DxO makes it easy to choose the parameters you’d like to use for your creative images. Whether you want to choose single-image HDR, black and white, landscapes, portraits, or any other parameters, filters, or presets, all it takes is one click to select and apply your edit of choice.
- Color protection: When you embrace saturation in your photography, you may find that some photo editors try to wash it out. Not DxO’s PhotoLab 3. In the workflow, you can use color protection to preserve that jaw-dropping color.
- Export lots of file formats: You probably don’t always work in one file format. In PhotoLab 3, you can export files in all sorts of formats using one click. You can also conveniently send your photos to Flickr, Facebook, and other social media platforms when you’re ready to share your work with the world.
- ICC profiles: With ICC profiles, your prints don’t miss any of the painstaking details you added to your image edits.
PhotoLibrary
Have you been involved with photography for a while? If so, then your computer is probably a lot like mine: folder after folder with hundreds of images in each. You don’t even want to count the thousands of photos your computer’s hard drive holds overall, not to mention all those images floating around on a handful of USB hard drives.
When you want to find that one specific image of a heron splashing through the water, you have to take the time to go through each and every one of those folders. That’s not even to mention you have to filter through every similar photo of herons until you get to the one you wanted in the first place.
Whew! It took so much time to track down the photo you wanted that you might hardly be in the mood to spend hours editing the photo now. Your whole day is gone by then.
Not with DxO PhotoLab 3’s PhotoLibrary. This new feature is designed to make finding even that elusive photo much simpler.
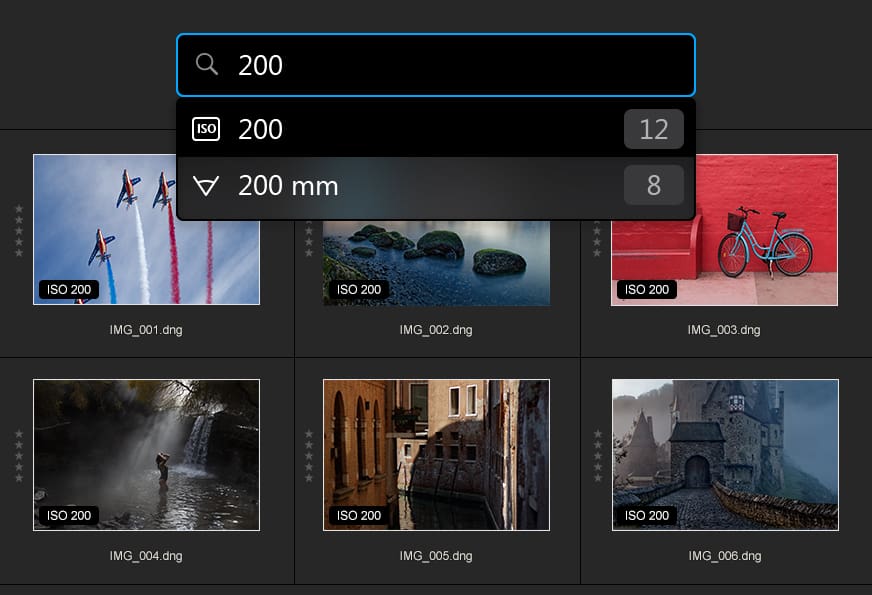
How? Well, for one, when you’re in the File Explorer tab and your mouse is on an image (but you don’t click it), you will see tooltips that show relevant photo keywords. You can also search for your keywords in the Metadata palette.
If you don’t like the keywords available to you, you have the freedom to change them, delete them, or add more keywords any time you want. You can also choose which image batches receive specific keywords. So, using the example of a heron that you wanted, you might use keywords like “heron” “water,” or “splashing” to find what you need more quickly next time.
It’s also easy to import your photos over from other programs to PhotoLabs 3, even if they use keywords assigned from different software, including XMP-format programs. Imports are automatic, which already makes your life far easier. Further, all your keywords transfer over so you don’t have to go crazy looking for a photo you sent over from another program.
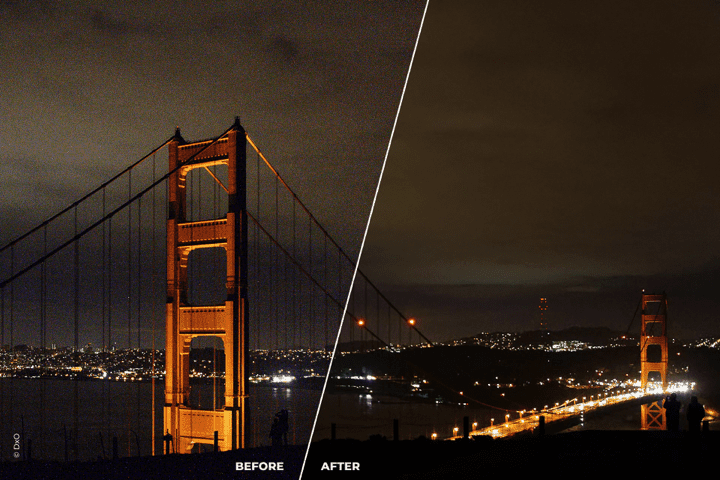
Smart Lighting
Have you ever been awake and at a shoot at the crack of dawn to capture that exquisite sunrise? The lighting isn’t super great yet, but you know those warm dawn colors will more than make up for it.
Well, then you load your sunrise image into a photo editor, and you’re less than thrilled with what you see. The sky looks pretty good, but the animals you photographed? Hardly visible. The rest of the details? Washed out. Blah. Dark.
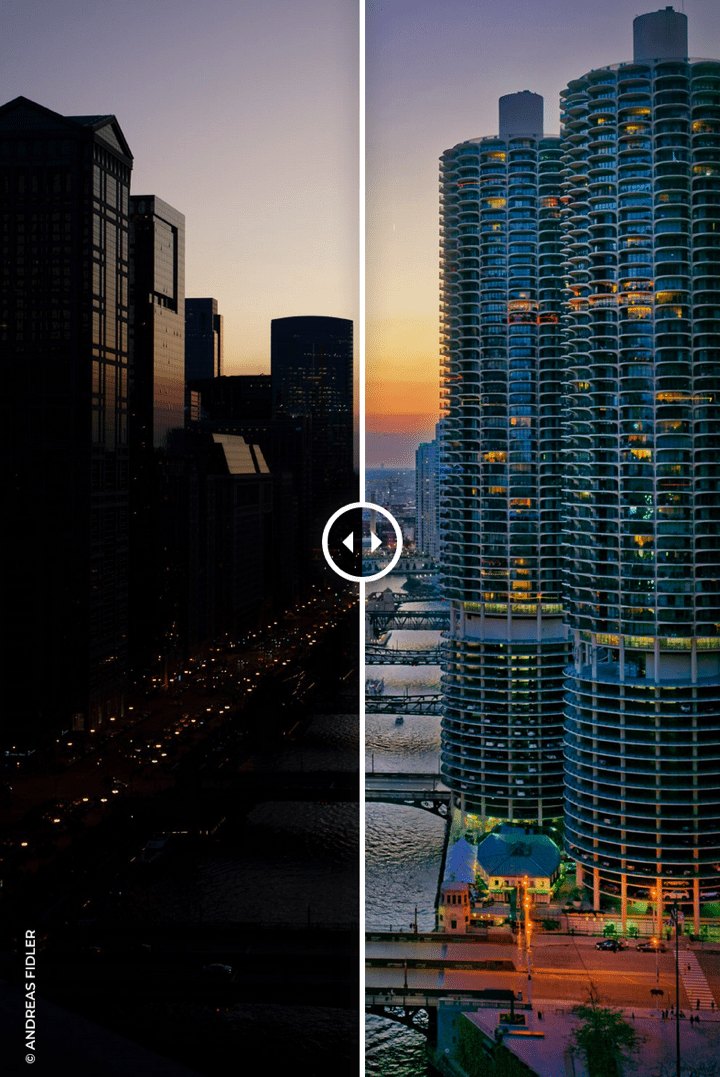
Smart Lighting in PhotoLab 3 can take your RAW file’s overexposed or underexposed portions and light them to the degree they should have been in the first place. You could have an overabundance of backlighting but little to no foreground lighting and Smart Lighting will still create that dark and light balance you wanted. It’s called Smart Lighting for a reason, after all!
Within the Smart Lighting feature is a Selective Tone tool. This allows you to sit in the driver’s seat when it comes to setting the lighting of your images. You can choose brightness and darkness levels at a range, adding as much precision or blanket improvements as you feel are appropriate.
Spot Weighted Corrections are another great feature in the Smart Lighting tool. These let you make changes in lighting based on the subject. For instance, if you don’t want the face of that bear to be covered in sunlight but you don’t mind if their body is brightened by the glow, you can fix it. The result, especially in backlit images, is completely natural.
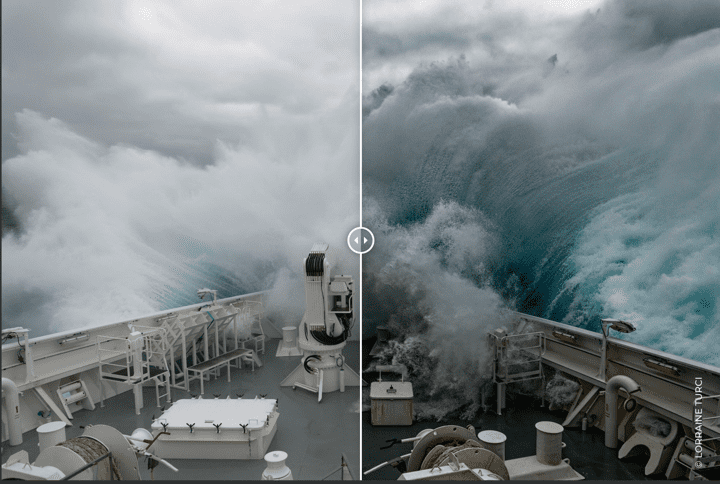
Repair Tool + Clone Mode
If you have by chance used DxO PhotoLab before, then you’ll hardly recognize the Repair Tool once you see the new improvements DxO made to it. They redesigned the Repair Tool from the ground up with PhotoLab 3, especially when in Repair Mode.
Now you can go into Repair Mode and use a retouching brush to clean up quickly and precisely. PhotoLab 3 takes pixels from your actual photo and then uses them intelligently when repairing or reconstructing another part of your image. The pixels will automatically be adjusted for lightness and color so they blend in seamlessly with the part of the photo you’re repairing, no added effort on your part.
In wildlife photography especially, photo shoots can be unpredictable. If I’m photographing a clear sky with a wolf prowling nearby and a bird shoots across the landscape, that can really ruin an otherwise perfectly good photo. The Repair Tool is designed to correct imperfections like the unwanted bird.
I also have to talk about the Clone Mode, as it’s a brand-new feature that I think many photographers will find useful. As the name suggests, with Clone Mode, you can copy portions of your image and then place that portion elsewhere. This goes really well in conjunction with the Repair Tool.
Within Clone Mode are Feather and Opacity settings for a natural cleanup that doesn’t take someone’s eye away from your great photography.
U Point Technology
If you remember one thing from my DxO Nik Collection 3 review, I’m sure it’s the discussion of U Point technology. This feature appeared in seven out of eight plugins in the Nik Collection 3 because it’s just that good.
In case you need a refresher, U Point technology, or “you point,” was created by Nik Software’s CTO and founder, Nils Kokemohr. He came up with the concept sometime in the 2000’s but has really refined it recently.
When you use U Point technology, you can mask and select certain parts of your photo and make small refinements or larger changes that transform the whole image. These include adjustments to saturation, contrast, brightness, detail extraction, and more.
Each part of the photo you grab is known as a Control Point. You can have more than one Control Point active at the same time. What’s even better is you don’t need to be a photo editing wizard to make the most out of U Point technology. If you’re new to editing your photos, U Point is easy to navigate and figure out, giving you great confidence in your work. You’ll feel like a master!
In DxO PhotoLab 3, U Point technology works as an equalizer interface with a slew of settings.
The Inverts Adjustment Masks feature is a new one that’s part of the Local Adjustment Masks Manager. With Inverts Adjustment Masks, you can do non-destructive editing using DxO’s fresh new Opacity slider and more. If you want to adjust any of your photo’s inversions, you can do so with a single click.
Within the Local Adjustments Mask Manager, you have palette lists that track every change and adjustment you make to your image. If you want to reapply these edits to a different photo or even make tweaks to your adjustments, you can within the manager.
Other U Point technology features within DXO PhotoLab 3 are the Brush Tool for making a retouching mask and Graduated Filters for blurring, darkening, and adding exposure to your image.
Lens Profiles and Optical Corrections
Two new really cool features in DxO PhotoLab 3 are Lens Profiles and Optical Corrections. Let’s start by talking about the Lens Profiles.
DxO, besides making great photo editing software, has also spent decades researching camera and lens combinations. I’m not just talking a couple, either, but more than 42,000 such combinations. This makes DxO the expert on how lens profiles can transform an image.
Now you get to reap those benefits with PhotoLab 3’s Lens Profiles. Switch from one lens combo to another to find exactly the one that frames your photo the best.
Besides the Lens Profiles, PhotoLab 3 also has Optical Corrections. These can scrub all distortions, chromatic issues, vignetting, and blurriness from your photography. The corrections are automatically applied, saving you much more time when editing your photos.
DxO PRIME
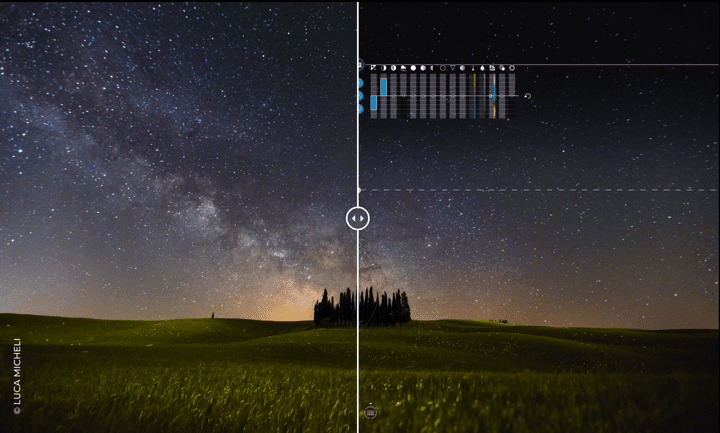
Ah, photo noise. No one wants it, but it seems to be an unavoidable side effect of photographing at night or early in the morning, right? Not necessarily. PhotoLab 3, besides the features I’ve already discussed, has included a very effective photo noise reduction software they call DxO PRIME.
This primo denoiser will clean up any noisy scene, from ducks on a nighttime lake illuminated by a glowing cityscape to an early morning foggy shot of a bear catching salmon out of a waterfall. You can shoot in high ISO and DxO Prime will still get rid of all traces of noise while retaining all original colors and details. As I’ve discussed in previous blogs this does not mean you should blindly crank up your ISO without consideration for noise. As good as DXO Prime is, I will still always shoot in the lowest possible ISO that I can to render a quality image. You should experiment with your specific camera and know how high you can push your ISO before quality suffers and set that as your outer threshold.
RAW photographers, you’ll also find there’s something for you with DxO PRIME. DxO optimized this feature so with sensitive photos especially, you notice quick, spectacular effects when applying the denoiser.
DxO says its DxO PRIME denoiser is one of the best of its kind for several reasons, especially for RAW images. Here’s why.
- Instead of taking photo data from a patch that’s like it and averaging it, DxO makes a complex model of the image. This is because not all image models are constant throughout, which can cause detail loss when denoising using other programs.
- DxO PRIME will look at a big portion of the image for similar patches, since scanning a larger area increases the chances of finding such patches. This allows for your denoising to have much greater accuracy.
- DxO PRIME uses two steps in its denoising. The first denoiser produces Oracle (C), then the second denoiser takes patches from Oracle (C).
That last bullet went over my head but I can tell you that DXO prime’s noise reduction rivals the Topaz Labs Denoise AI software and that in itself is impressive.
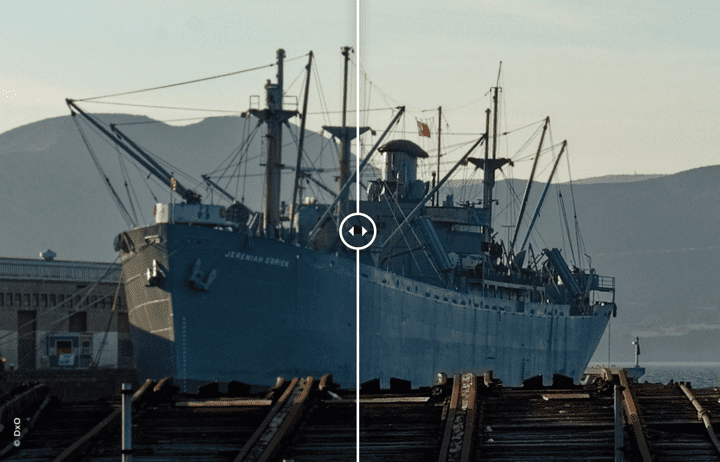
DxO ClearView Plus + Local Contrast Optimization
I’m not done talking about cool and useful tools in PhotoLab 3 yet, not at all. Next, there’s DxO ClearView Plus with Local Contrast Optimization.
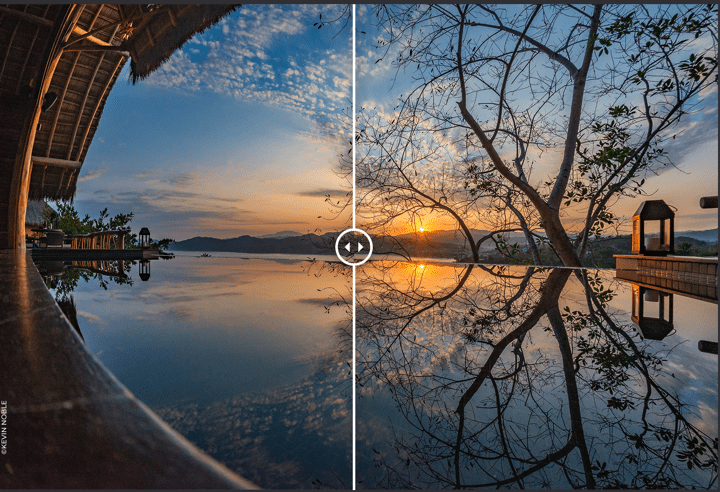
If you are an early-morning wildlife photographer especially or one who favors shooting images of animals after a humid rain, then this is the feature for you. DxO ClearView Plus removes all that smog and fog so the details underneath can come to light.
Dehazing, as DxO calls it, takes the minimal properties of your photograph and sets them to zero locally. This makes up for any illumination diffusion. Then, the feature amplifies the signal for that lack of light from diffusion.
This requires that DxO ClearView Plus knows the illumination properties of your image, such as by brightening up the pixels or running an image content analysis. Then, the tool takes away the right color veil while leaving the other hues untouched.
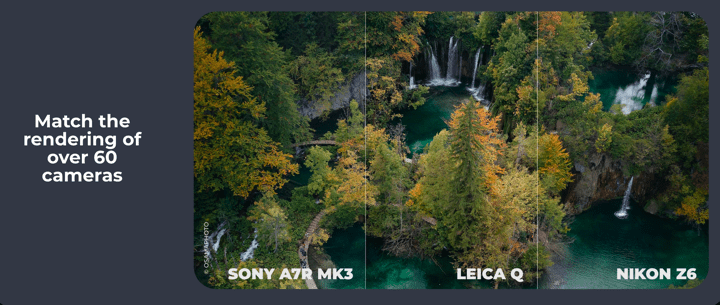
Camera Rendering
Do you wish you could render in a different camera than the one you currently own? That normally means saving up some money and buying another camera in a store or online. Then, if you ever wish to render in yet a different camera, you would have to buy yet another one.
This can get expensive fast, but if you want to vary up your photos, you might feel like you have no other way. You do, and it’s by using DxO PhotoLab 3’s camera rendering. You have more than 60 camera renders to choose from, including the Nikon Z6, the Leica Q, and the Sony A7R MK3.
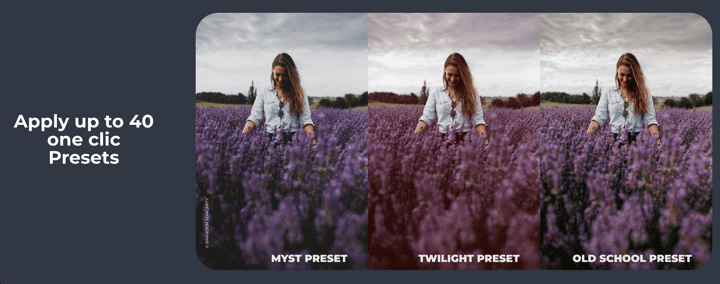
One-Click Presets Aplenty
I talked earlier about how the DxO PhotoLab 3 has a workflow that will speed up your editing time, partly through presets. Whether you want to activate presets like old school, twilight, mist, or nearly 40 others, it takes just a single click!
HSL Tool
The last feature I want to talk about that’s included with the PhotoLab 3 is also a new one, the HSL Tool. HSL stands for hue, saturation, and luminance. With this tool, you can make creative images with bright, electric colors that never veer towards the unnatural.
The HSL Tool includes the new DxO ColorWheel. With this, you can adjust your colors many ways to create the most precise hues around. You have your pick among eight color range channels, from red to purple, green to blue, and orange to yellow.
If you already have a color you sort of like, then use the DxO ColorWheel to adjust your color’s values, change the tint, tweak a transition, or introduce replacement colors. Within the DxO ColorWheel are the Luminance Slider, Saturation Slider, and the Uniformity Slider as well.
With the Luminance Slider, you can brighten or darken your image while the Saturation Slider can bring out those colors even more. The Uniformity Slider, the new addition to PhotoLab 3, lets you choose a color variation as part of a range, standardizing your colors. You can use all three sliders at once but independently.
Pricing
If you’ve used the DxO PhotoLab before, there’s a lot to come back to in PhotoLab 3. Even if you’re new to DxO’s products and you’re here because of my review for DxO Nik Collection 3, you can simplify so much of your editing and make much more creative images with PhotoLab 3.
That has you curious about pricing. Like DxO’s other products, you can download PhotoLab 3 free for a 30-day trial. None of the features are off-limits here, so have fun to your heart’s content clicking around presets and filters or enjoying new features such as the HSL Tool or exclusives like DxO ClearViewPlus, DxO PRIME, Lens Profiles, and Optical Corrections.
If you do already have DxO PhotoLab 2, you can upgrade to PhotoLab 3 for $69. Otherwise, to buy DxO PhotoLab 3 without having previously owned PhotoLab, it’s $129.
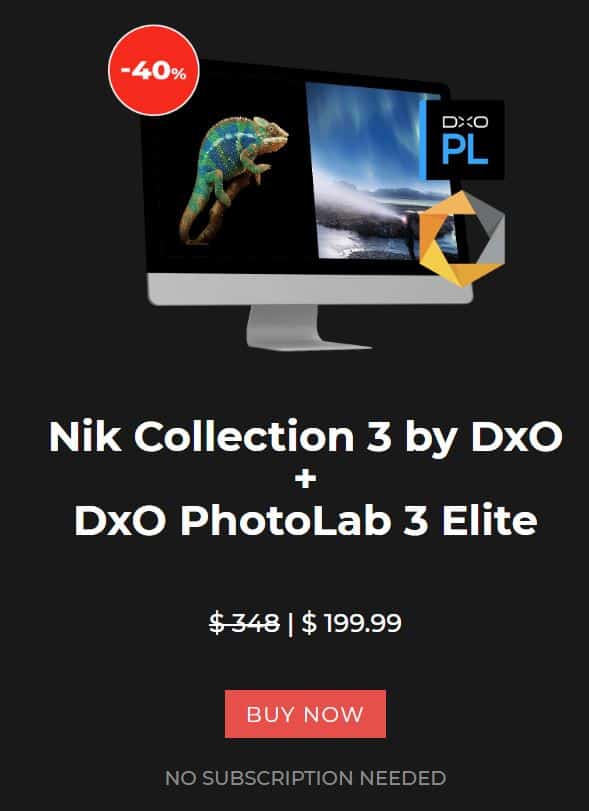
As part of the launch of its Nik Collection 3, DxO is temporarily offering discounts on all DXO products including PhotoLab 3. You can get the PhotoLab 3 upgrade for $49.99 or buy the whole program for $99.99. This is a limited-time offer until June 30th, so if you’re interested, you’ll want to make the jump soon.
If you’re going to make the jump to DXO as your image editor, I would absolutely encourage you to consider pairing PhotoLab 3 with Nik Collection 3 for the additional tool set. Nik Collection 3 integrates beautifully with the PhotoLab 3 interface and together you’ll have every creative tooling you could ever need. Currently, if you bundle PhotoLab 3 with Nik Collection 3 you’ll save 40%, but only until June 30th. You’ll can find all DXO pricing at the DXO Shop
Conclusion
DXO PhotoLab 3 is an update to PhotoLab 2 that came out in October 2019. It’s another big change DxO has made to its programs and plugins, as it just updated the Nik Collection 3 this June.
You’ll find enough improvements in PhotoLab 3 that it’s worth upgrading if you’re still using PhotoLab 2 or another, earlier version of DxO PhotoLab. If you’re new to PhotoLab altogether, I think you’ll agree that a lot of the features in the new DXO PhotoLab 3 are worth adding to your photo editing suite.
The smart tools within the workflow make importing, exporting, labeling, and processing photos a breeze, even if you’re using different file formats. PhotoLibrary also simplifies the effort of finding the photo you want through keywords you can assign or those that are automatically assigned.
The bulk of PhotoLab 3 is its tools and presets. With DxO Smart Lighting, you can make a photo taken at nighttime look like it was shot in the middle of a sunny afternoon. The Repair Tool has been enhanced, and now it has Clone Mode for easier, more accurate photo cleanups.
U Point technology, a staple of DxO products, boasts Local Adjustment Masks for non-destructive editing. With Lens Profiles, your photos look like they were shot with any camera lens. DxO PRIME technology, a standout in PhotoLab 3, is one of the best denoisers on the market.
You could purchase PhotoLab 3 as a stand alone tool however when paired with DXO’s Nik Collection 3 it’s a killer image editing duo that can’t be beat in my opinion. Oh and did I mention that there are no monthly subscription fees:))


Comments
How To Become A Wildlife Photographer | Cool Wildlife
Comments are closed.