

Luminar 4 adds the power of AI in one easy to use, do it all photo app. Skylum’s buy it once, own it model puts an end to monthly subscription fees. Free 30 day trial. And you can save an additional $10 off your purchase by using the Luminar coupon code COOLWILDLIFE.
Over the past couple of weeks, I’ve reviewed DXO’s PhotoLab 3 as well as ON1 Photo RAW 2020. These reviews are part of a four part series of market leading RAW photo editing tools. This week we will be discussing the third product is the series, Luminar 4. I’ve since added the fourth and final solution and that is ACDSee Photo Studio Ultimate 2020.
Before I get to the review, Skylum the maker’s of Luminar 4, have offered two exclusive bundles for Coolwildlife readers looking to buy Luminar 4. With the first Sky Collection Bundle, you get two sky collections (Morning Freshness and California Sunsets) with Luminar 4 for the low price of $74 USD. The second Aurora HDR Bundle includes Aurora HDR and Luminar 4 for $109 USD. Aurora HDR is an HDR photo editor from the same company that brings you Luminar 4, Skylum.
To reiterate, these bundles are exclusive to coolwildlife readers, so if after reviewing all four editors you land on Luminar 4 as your choice for a RAW editor you’ll want to take advantage of this offer. You can also use my referral code COOLWILDLIFE to save an additional $10 off your order.
Okay, so what is Luminar 4? This software is produced by Skylum, a Bellevue, Washington-based software development company that was once known as Macphun. Luminar and Aurora HDR are Skylum’s two bestsellers it’s one of the top RAW photo editors on the market.
Luminar has a history dating back to 2016. In those four short years, we’ve gotten four versions of the Luminar software, with Luminar 4 being the latest addition. Luminar 2018, which actually came out in late 2017, was the first iteration of this photo-editing software with a RAW develop module.
If you’re not quite sure if DXO’s PhotoLab 3 or ON1 Photo RAW 2020 are the right additions for your workflow, or if you’d like to try those two tools as well as Luminar 4 to decide for yourself which you like best, I think you’ll get a lot out of this review. Luminar has made a splash for years now, and with Luminar 4, this may be Skylum’s most impactful version yet.
The Features of Luminar 4
More Than 10 Language Translation Options
Not everyone is exclusively an English speaker. If you feel more comfortable working with a photo-editing software that’s written in your native tongue, then Luminar 4 and ON1 Photo RAW 2020 will win some brownie points with you. Both ON1 Photo RAW 2020 and Luminar 4 support more than 10 languages each whereas DXO PhotoLab 3 is more limited in its language offering.
With Luminar 4 and On1 Photo RAw 2020 you get language translations including Russian, Portuguese, Dutch, Korean, Chinese, Japanese, Italian, French, Estonian, and English.
Use It on Its Own or as a Plug-In
It’s always very annoying when you download new software and it acts like it’s the only software you’ve ever used for editing your images. Maybe you don’t want to completely retire what’s in your workflow at current, but this new program doesn’t play well with others. Loading two separate programs and swapping your work between one and another is time-consuming when RAW photo editing already takes up enough of your time.
Luminar 4 won’t hijack your other software. If you want to make the switch exclusively to Luminar 4 as a standalone, that’s one option you have. You can also just as easily integrate it as a plug-in so it opens up within the photo-editing software you already use. Luminar 4 is compatible with Adobe Lightroom Classic, Adobe Photoshop, Adobe Photoshop Elements, and Photos for macOS as a plugin.
Detail Enhancement
Your RAW files undergo minimal processing immediately after you photograph your subject, so editing your RAW images in post is a given. You’re going to want to give Luminar 4’s detail enhancement slider a try. It can bring all that rich, thrilling level of detail back that you remember was present when you took the image.
Each slider has a number value so you can make ultra-precise changes that you don’t always get with other sliders. The sharpener, which you can see in the image below, will make those blue skies lifelike, the blades of grass on the ground individualized, and each feather on that bird distinct.

There are no broad changes with Luminar 4’s detail enhancer, either. You can select whether you’d like to fine tune the small, medium, or large details, so the changes you make aren’t applied over the entire image. This is especially handy if the quality of the smaller details got lost when processing your photo and you’d like to restore them, or there’s a large animal in the background that you’d like to enhance.
Non-Destructive Editing
As a photographer, I’m always envisioning how things will look in my head before I ever grab my camera. You’re probably the same way. Yet what I find is that sometimes what I imagine in my head isn’t exactly what happens in reality.
It’s frustrating to spend hours working on editing a photo in your favorite software only to discover the edits you made just aren’t going to work. Maybe too much of the original spirit has been lost, or the saturation doesn’t look as good as you had hoped.
So, you do what we’ve all done, click the undo button. And click and click and click. If your software’s undo feature only goes back so far or god forbid you deleted the RAW source file and you’ve saved the image already in another format, then your original is gone for good.
Luckily, Luminar 4 uses non-destructive editing in all its applications throughout the software. The History tab keeps track of each change and edit you’ve made and allows you to undo them all the way back to the beginning. Now you’re free to start your edits again until they make your picture more in-line with your vision.
Awesome File Format Support
One of the fun parts about photography is how you can establish totally disparate moods and atmospheres solely by picking up two different cameras even if you’re photographing the same subject. No matter which type of camera you bring with you on your adventures, Luminar 4 should be able to support it.
This Skylum software is compatible with more than 1,000 cameras in every sort of file format. These include the standards like PDFs, TIFFs, PNGs, and JPGs as well as RAW file formats such as RAF, ORF for Olympus digital cameras, NEF, CR2, and CR3.
Denoiser
Don’t discard that noisy photo you shot in a dark environment! It’s possible to save it in Luminar 4. Even better, you can do it primarily through two sliders, the Color Denoise and Luminosity Denoise sliders.
Chromatic noise can cause certain pixels to look discolored, which can quickly ruin your photo if the distortion is noticeable enough. Luminar 4 will clear away color noise while keeping true to your image’s original color palette through Color Denoise
The Luminance Slider is for those nighttime images that are badly marred by noise. The graininess of your image vanishes with this slider, even if your photos have long exposure times or you’re shooting with high ISO. Despite how good Luminar 4 is I still find myself opening Topaz Denoise AI for my denoising due to their recent upgrade which allows me to remove noise in just the portions of the image that I feel requires it. That may be unique to my wildlife shooting where I often denoise the background much more than the subject.

Looks
Many of the RAW photo editors I’ve reviewed lately have a collection of styles or presets, and that’s true of Luminar 4 as well. These signature Looks were chosen and assembled by beloved photo artists for sleek, cutting-edge visualization that will improve the overall feel of your photos.
You get over 70 Looks and counting. If you somehow find that’s not enough, you can always pay extra via the Luminar Marketplace for Signature Looks. These premium Looks, as well as the standard Looks, are all customizable, meaning you can adjust each filter with a slider.
Through the Luminar Looks Collection, you can search for Look styles you might want to use as well as save a list of your favorites. Now it’s easy to come back to those go-to Looks anytime your photos need some sprucing up in a jiffy.
Skip the Importing with the Library Module
Another pain when it comes to switching photo editors is how you have to take the time to import all those photos from one software to another. You could read a book by the time this task is done. Okay, not really, but it sure feels like it.
Skylum understands the pain of waiting for photo importing all too well. That’s why Luminar 4 cuts out the need to import. This occurs through the Library Module, which you can find on the right-hand side of the program.
When the photos are added to your Luminar Photo Library, you can access the Shortcuts to see all your photos in Luminar 4 categorized by year. If you happen to take a lot of photos (like me) and you have hundreds, even thousands of images per yearly folder, you can easily look through them all, as shown in the example below.
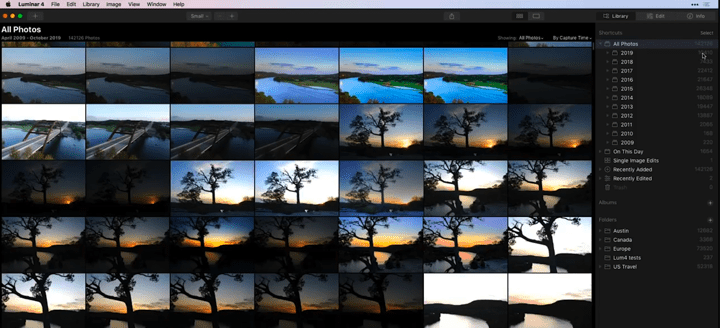
That’s far from your only option within the Library Module. You can also toggle Lost Edits, photos you put in the trash, Recently Edited images, Recently Added images, Single Edit Images, and your favorites.
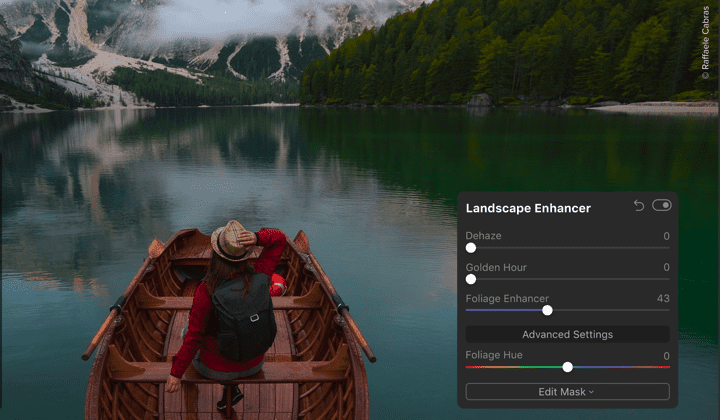
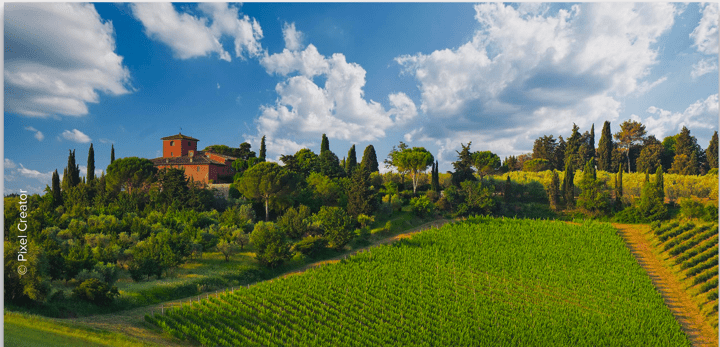
Landscape Enhancer
As a wildlife photographer, here’s a feature of Luminar 4 that’s especially exciting, the Landscape Enhancer.
Within the Landscape Enhancer toolset are three sliders: Dehaze, Golden Hour, and Foliage Enhancer.
Dehaze can renew the color and depth present in your image, restoring both to breathtaking effect. With the Golden Hour slider, you can make any image look like it was photographed in that perfect orange-yellow light of sunset, even if you were shooting in the middle of the morning.
The Foliage Enhancer slider, which you can see in action in the image below, will make your flowers, trees, and plants pop. After all, even though your foreground subject is the focus of your photos, that doesn’t mean the background has to look lifeless.
Professional Lookup Tables
Who’s a fan of one-click editing? I mean, that’s practically a rhetorical question, as who doesn’t want to save time when editing their work? Any photographer would, and that’s why one-click features in RAW photo editors like Luminar 4 are so very appreciated.
Luminar’s Professional Lookup Tables or LUTs use mapping so you can select from a rainbow of colors for a fresh style your photo was always missing. From natural hues to neutral ones and of course, the bright and fantastical, all are available to change and apply using just one click.
This color grading, which can be sepia-toned or monochromatic if that’s what suits you, plays especially well with Luminar 4’s Looks feature.
Batch Processing
Another handy time-saver in Luminar 4 is its batch processing. If you took three great photos with only subtle differences between them, you usually pick your favorite out of the three and then work with only that one, right? Otherwise, by editing each photo one by one, it’s hard to ensure you’ll make the same edits on each so they have a uniform look.
Enter Luminar 4’s batch processing. By uploading several images together, you can make the same adjustments to each image at once. They’ll all have the same saturation, denoise, sharpening, and enhancements so you can select the one you like best post edit without the need to edit all three separately.
Erase Tool
The Erase Tool is not necessarily a new Luminar feature, but it has been upgraded for Luminar 4 to be even more intuitive. So how does it work? When using the Erase Tool, you make a broad line over the object you want to be erased. These lines don’t have to be ultra-precise, so you can make quick but effective changes to your photos.

As you can see here, the boats on the water were selected for removal. The Erase Tool will take care of the rest, giving you a result such as this.
Bye-bye boats, as well as the wake they leave behind on the water. Skylum says that even if your images are riddled with sensor dust spots or gradients, or even if the background is complex and detailed, Luminar 4 is smart enough to decipher what’s what and remove only the parts of your photos that should be gone.
Smart Contrast Tool
Any ol’ photo editor can slap some contrast on your image and call it a day. Luckily, Luminar 4 is anything but any ol’ photo editor. With this Skylum software, you get the Smart Contrast Tool. This holds onto the precious details and colors of your image, giving both a natural boost with amazing texturing that in my experience is never unrealistic.
AI-Driven Tools
Artificial intelligence is in so much of what we do these days, as I’ve written about on this blog before. When you visit a website and engage in the text chat, it could be a bot you’re speaking to.
AI also makes an appearance in Luminar 4 with five impressive tools.
AI Accent Tool
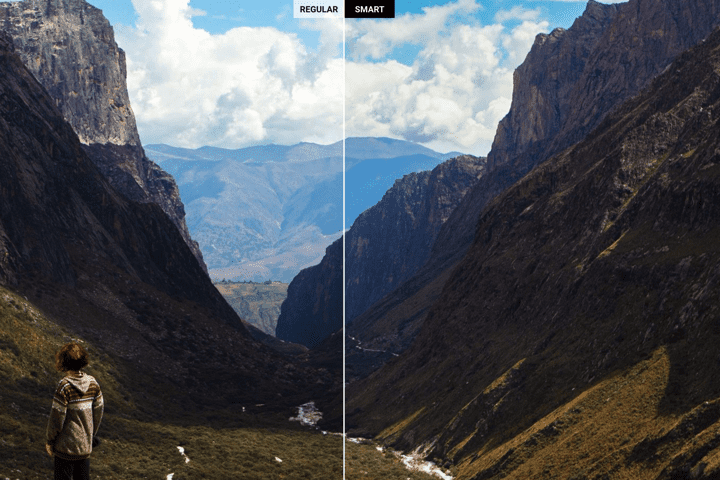
The first is the AI Accent Tool utilizes more than a dozen controls and applies them at once for a very different image than what you started with. Once more, a thorough analysis of the elements in your image is performed before any changes are made. Some of the adjustments the AI Accent Tool will perform are enhancing or lessening details, exposure, saturation, tone, contrast, highlights, and shadows.
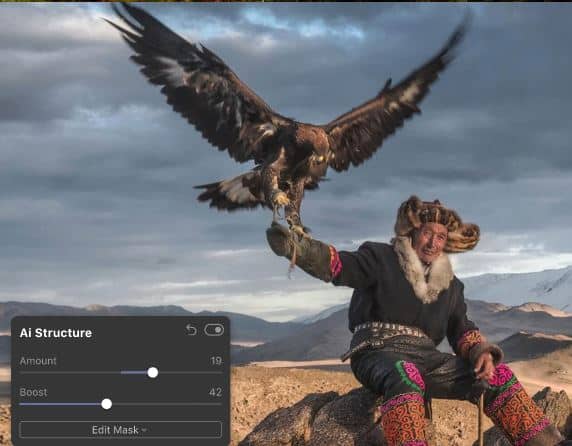
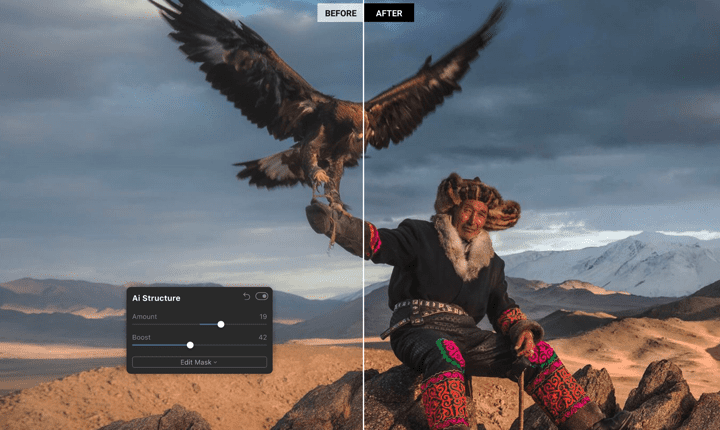
AI Structure
The second Luminar 4 AI-driven tool is AI Structure. With content awareness, AI Structure will scan your entire image with the goal of searching for certain areas that could use more enhancing or richness. Then, it will give these parts of your photo a boost, leaving people’s skin and faces undamaged.
AI Augmented Sky
AI Augmented Sky is another standout. Do you see that rocket ship in this image of a bustling cityscape at sunset? It wasn’t originally in the photo, but with AI Augmented Sky, you can naturally insert objects such as clouds, the moon, and yes, a rocket ship into your image.
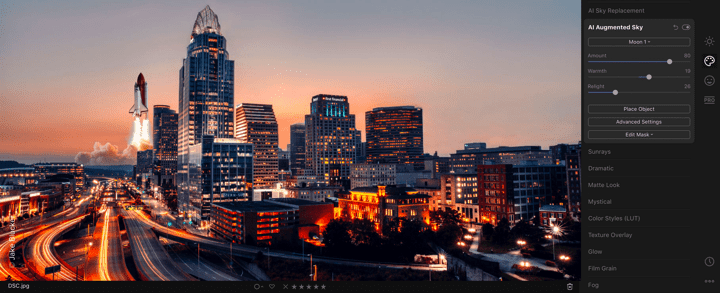
You probably would have never guessed that rocket wasn’t originally in the shot if I didn’t tell you, which is a true testament to the natural results you get with this AI-guided tool. Oh, and even better is you can add any pre-installed elements and objects (of which there are dozens to pick from) with one click! As I have said many times in previous articles I do not perform composite editing on my wildlife images and if you are entering photo contests this is mot permitted. Having said that, I expect many of you reading this article will appreciate the level of creativity that is possible with Luminar 4.
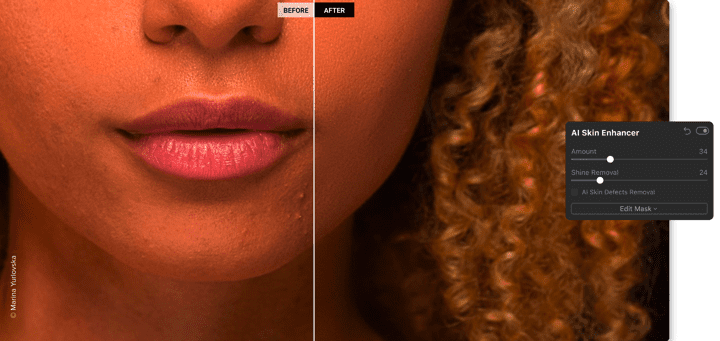
AI Skin Enhancer
Although I’m a wildlife photographer, even I can appreciate the level of detail included in Luminar 4’s AI Skin Enhancer. If your subject has blemishes (and hey, that’s normal!), you don’t have to Photoshop their face into oblivion in post. Instead, you can apply the AI Skin Enhancer.
The built-in AI assesses where the skin blemishes are and changes those only, leaving skin texture and pores untouched so your photos have a more natural feel. The AI won’t ever alter a subject’s hair, either.
This-one click AI tool has a slider so you can make the effects stronger or more subtle.
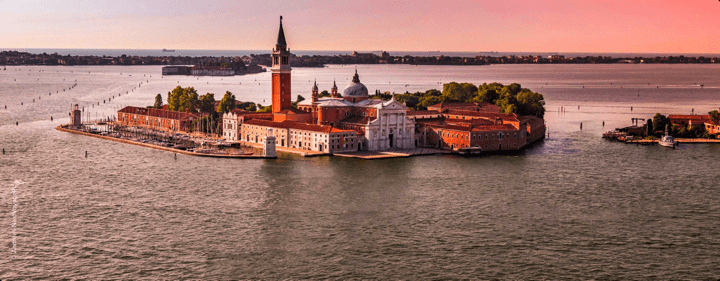
AI Sky Replacement Tool
The last AI tool in Luminar 4 is possibly among the most impressive. It’s the AI Sky Replacement Tool.

Take a look at those two images. Those are the exact same picture, but with sky changes courtesy of the AI Sky Replacement Tool. No matter which kind of sky you want to go for, such as a dreamy pastel sunset like the first example or a pristine blue sky as in the second example, you just select the sky and the AI Sky Replacement Tool does the rest.
Since it’s an AI tool, this feature in Luminar 4 doesn’t just cut out the old sky and put the new one in its place. Using its built-in smarts, this tool detects where the sky is located in your images, then enriches the color and detail in both the clouds and the sky itself. If you happen to have a few blown-out highlights in your afternoon sky photo, this AI can erase those too.
The AI Sky Replacement Tool will also adjust the lighting of the photo’s location so the sky changes look natural.
To analyze what’s the sky in your photo and what isn’t, Luminar 4’s AI uses sky tones and textures, edge defining, and foreground object analysis. Each type of sky gets a different treatment, so if you want to bring out the foreboding of a stormy sky or make a morning sky super pink, you can. All this with a single slider swipe.
Not that I’d ever suggest using AI to replace an 4:30 am alarm but you just might be able to capture that perfect sunrise look through the power of AI. For those of you who are not early risers give the AI Sky Replacement Tool a try and you just might be amazed at how well it renders that early morning sunrise look.
Sunrays
Although it’s not an AI tool, Sunrays complements the AI Sky Replacement Tool quite well. This tool lets you select where from your photo you want the rays of the sun peeking out, such as the center or the sides. You can also choose the length of the sunrays, their strength, the amount of sun, and the overall look.

Shine Removal and Slim Face 2.0
Another serious perk for those who enjoy photographing people is the Shine Removal and Slim Face 2.0 tools in Luminar 4. These are both new features in this software, and they’re quite handy to boot.
With Shine Removal, you can clear away the natural shine that some people’s faces have without being left with a blurry, smudged result.

You can also slim a face so it’s more flattering without the unnatural warping you can get in tools like Photoshop when someone goes a little too buck wild. Editing people’s faces doesn’t have to make you sweat anymore when you can produce such appealing, natural results using Luminar 4.
Pricing
If you’re captivated by the wealth of tools included in Luminar 4., you’re bound to be curious about the pricing. Luminar 4 costs $80, which is pretty affordable for RAW photo-editing software. For that price, you get Luminar 4 as both a plugin and standalone program as well as a license for two computers.
For the Fourth of July 2020 holiday, Skylum is running a deal on the price of Luminar 4. Instead of paying $80 for the software, you can now get it for $64. That still includes the standalone and plugin use and the licenses for two computers.
You can also get a deal on the additional bonus products. Caribbean Skies with 25 tropical skies and Enchanting Twilight with 25 twilight skies are both $12.50 during this sale when they usually cost $25 each. You can also buy Albert Dros’ Captivating Cityscapes for $9.50 for the Fourth of July discount. Fireworks by Mathew Bronte, with 44 fireworks effects, is on sale for $19.59 (usual price $30), Cinematic Looks are discounted to $12 (usually $24), and you can even get the Aurora HDR app with bonus looks for $54.50. That usually costs $109.
Of course, the Fourth of July won’t last forever. When that deal runs out, don’t forget you can get two great discounted bundles courtesy of Cool Wildlife. The first is Aurora HDR bundled with Luminar 4 for $109. The other bundle includes the Morning Freshness and California Sunsets sky collections and Luminar 4 for the low price of $74. These are exclusive bundles that won’t be around forever, so don’t wait. You can also use my code COOLWILDLIFE to slash $10 off your purchase.
If you want to try before you buy, you can download Luminar 4 for a free trial on their website.
Conclusion
Luminar 4 by Skylum is another great RAW photo editor I’d suggest for both budding and experienced photographers. For discreet or overarching changes and enhancement made to RAW image files, Luminar 4 is one of the best in its class.
It has a slew of AI tools that make editing your photos more intuitive than ever. These one-click tools can improve skin texture without removing pores, take away foreground or background objects and leave behind no trace, and add in items like the moon or a rocket without anyone blinking an eye. You can just as easily change the entire mood of your photo by altering the sky in one click using Luminar 4’s AI tools.
This Skylum software is about a lot more than AI. It’s got all the standards you would hope to have in a RAW photo editor, such as a non-destructive workflow, batch editing, file support for all sorts of cameras and file types, and even language translations in more than 10 languages. Searching for and saving just the right photo is easy and import-free in Luminar 4, adding more time to your schedule.
The Looks are also designed just for saving time, as you can quickly morph your photo depending on your mood. Smart contrasting, denoising, and–one of my favorites–the Landscape Enhancer are also great features.
Now you have a hard decision to make, choosing between Skylum’s Luminar 4, DXO’s PhotoLab 3 or ON1 Photo RAW 2020. My hope is with the reviews in my RAW photo editor series, you’ll have the knowledge required to feel confident about your choice.