ACDSee Photo Studio Ultimate 2020 offers photographers an all-in-one software that includes Digital Asset Management, Photo Editing, RAW Image Processing, Layer Based Editing, Facial Recognition, HDR and Focus Stacking. And best of all ACDSee offers a no subscription payment model so you can buy it once and own it for life. You decide when an upgrade is warranted based on newly added features that will benefit your workflow. If you prefer a subscription model they offer that option as well.
ACDSee Photo Studio 2020 is the fourth product to be reviewed in our RAW Editor series. Over the past couple of weeks, I’ve reviewed DXO’s PhotoLab 3,ON1 Photo RAW 2020 and Luminar 4. These reviews are part of a four part series of market leading RAW photo editing tools. This week we will be discussing the last product is the series, ACDSee’s Photo Studio 2020 Suite.
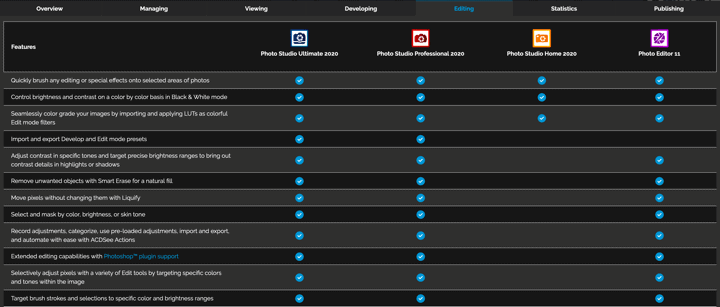
ACDSee’s Photo Studio comes in four flavors to suit the needs of photographers of all kinds. If you’re new to photography and learning your way around RAW editing, the Photo Studio Home 2020 software may be a great choice for you. For the more advanced editors, you have your pick between Photo Studio Ultimate 2020 or Photo Studio Professional 2020. Oh, and ACDSee didn’t forget Mac users, for you they created Photo Studio for Mac 6. The four products are built on the same foundation, so the only differences are the number of features tat are enabled in each solution. The table at the bottom of this article provides you with a side by side comparison of the versions so you can decide which version best suits your needs.
Photographers come in all shapes, sizes, and skill levels. Yet sometimes software companies forget that and produce only one high-level photo editor that requires advanced knowledge of sliders and brushes. The four groups of software within the ACDSee family encompass and embrace both the beginner photographer and the pro alike no matter your operating system.
If you’re not familiar, ACDSee is a suite of software products produced by ACD Systems International Inc. Most of their programs feature geotagging, keywords and ratings, metadata editing, image batch processing, and lossless RAW file editing and encoding.
The last builds of these 2020 Photo Studio tools came out in December 2019. If you’ve used ACDSee Photo Studio in the past then, enough new features are included across Photo Studio Ultimate and, by extension, some in Photo Studio Professional, Photo Studio Home and Photo Studio for Mac 6 that this suite of programs is worth diving back into.
If this is the first you’ve heard of ACDSee Photo Studio 2020, then you’ll certainly want to check out this review. With four platforms to choose from you can simplify your workflow and edit according to your experience and comfort level, something you don’t always find in other similar software.
I’m sure you’re eager to see the new and returning features in ACDSee Photo Studio 2020, so let’s begin!
ACDSee Photo Studio Ultimate 2020 Features
The first of the four ACDSee Photo Studio 2020 products is Photo Studio Ultimate 2020, which is their premium offering including every editing feature that ACDSee Photo Studio 2020 has to offer. Boasting Lightroom migration, RAW and HDR support, focus stacking, facial recognition as well as a boatload of new features. As the name suggests, this is the ultimate photo editing solution for those of you who want the most feature rich editor you can get.
Here are the features of ACDSee Photo Studio Ultimate 2020.
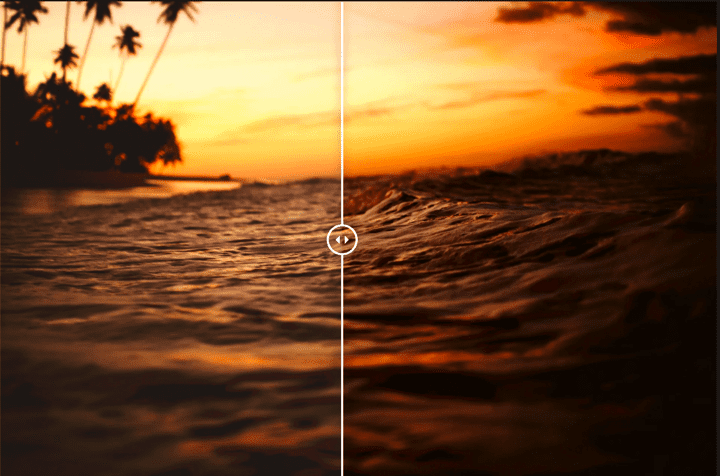
ACDSee Light EQ
The way the light hits the waves at sunset, or how the sun glistens off a hardened snowfall in the middle of a wintry afternoon. You and I alike know that light moves differently in all sorts of scenarios, so isn’t it time your photo editor accommodates for it as well?
ACDSee Light EQ technology can alter the lighting in one or several ways, using Auto EQ to add a natural exposure boost to your lighting source. The commitment-free changes of this feature allow you to preview your edits before well, committing to them, and all without having to go into Edit mode. You’ll be done toggling with your lighting in no time using ACDSee Light EQ.
ACDSee Mobile Sync
You’re in the middle of editing your photo when a friend calls and asks you to help out with a photo shoot of theirs. You decide to bring your camera along, but you figure your own editing has to wait until later.
Not with ACDSee Mobile Sync. This useful feature in Photo Studio Ultimate 2020 lets you transfer your in-progress photos straight to your Android or iPhone smartphone and/or tablet. The accompanying ACDSee Mobile Sync app will manage what you’ve sent and when so you never lose photos when you’re on the go.
Photo Location Mapping
If you’re a well-traveled photographer, you never have to forget your globetrotting adventures with the Photo Location Mapping feature in Photo Studio Ultimate. By adding your photo locations to the software via a handy map, you can group photos taken together at that same spot and otherwise simplify your workflow by tidying up your flow of photos. No more will you be trying to remember where you were when you took any particular shot.
Soft Focus Tool
The Soft Focus Tool is another standout in Photo Studio Ultimate 2020. This tool works as a diffusion lens filter would, bringing out the intensity of your image’s colors, lessening sharp lines, and blurring your image to beautiful effect. You can also trust in the Soft Focus Tool for restoring clarity, contrast, fill lights, and highlights or to change the exposure of your image.
Digital Asset Management
Creating a workflow that’s suitable to you is so important in streamlining your editing and preventing wasted time. With Photo Studio Ultimate’s digital asset management (DAM) software, you can share, organize, move, and sort photos via location data, categories, and keywords. The color labels are customizable, and you get visual tags as well for your most neatened digital catalog workflow yet!
New Features Galore
The 2020 label on this latest release of ACDSee Photo Studio Ultimate is there with good reason. The program is now loaded with a host of fresh, convenient features. When I say loaded, I’m not using that word lightly, by the way. Here’s an overview of what you can expect with this latest version of Photo Studio Ultimate 2020.
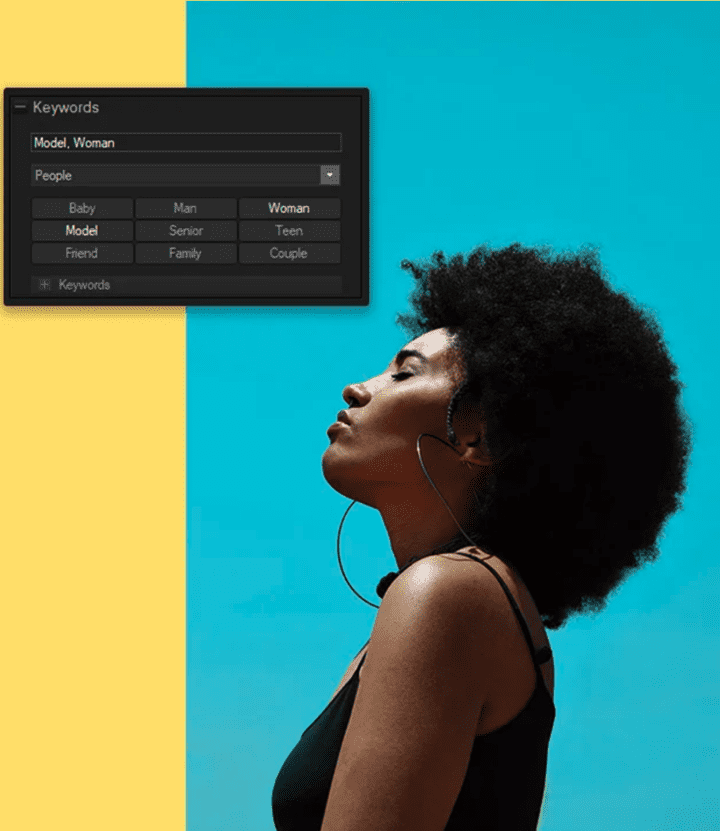
Preloaded keyword sets: Can’t think of the right keyword to use to tag and organize your photos? With the preloaded keyword sets in Photo Studio Ultimate 2020, you can choose among a variety of common keywords. You can also use this feature to export your own list of keywords. Share your list with other photographers to save them time searching their own library and vice-versa!
Batch conversion upgrade: A single dialog is all it takes to convert large quantities of files to many other formats. With less load times, you can get to the editing faster.
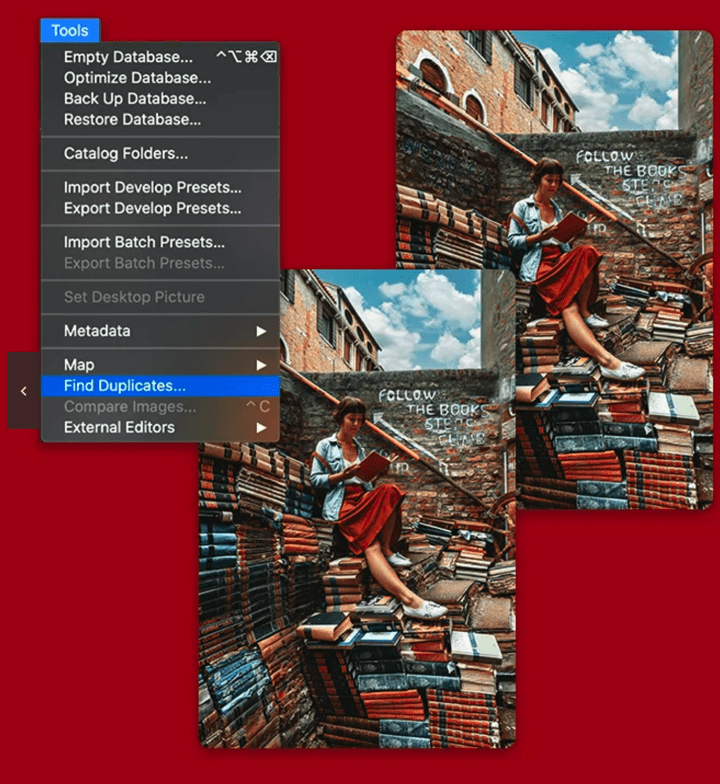
Duplicate finder: ACDSee has refined their Duplicate Finder in Photo Studio Ultimate 2020 so it can pick up on those duplicate photos you have, even if they’re in folders on your computer that you’ve long since forgotten about. If you want to keep a duplicate of the photo, you can rename it or just dump it straight to the trash, and all within the Duplicate Finder.
Multiple image baskets: Use five image baskets at a time to collect media files and images. Then, share or edit your baskets.
OneDrive and Dropbox support: In Manage mode, you can access many handy features. For instance, you can sync root drives in the cloud, create a backup of your photo edits, or send your work to OneDrive and Dropbox where you can share it with others.
Advanced LUT features: With Photo Studio Ultimate’s adjustment layers, you can make LUTs your way. Color grade the LUTs non-destructively with parametric color.
Layers pane: Working with layers has never been so easy. You can take one image or several photo groups and move them to the Layers Pane to work with single or multiple layers. You even get layer auto-blending and auto-aligning!
Blended cloning: The new Blended Clone Tool lets you clone with efficiency. First, choose a target area. Then, the tool selects pixels in that area, runs an analysis, and creates a pixel blend that looks natural and clean.
Snapping: If your photo imperfections are more of a geometric nature, the snapping within Photo Studio Ultimate 2020 can bring images, text, and objects just where you want them. Snap them towards your canvas’ corners, the sides, the bottom, or the top using a precision grid. You can even snap on resized canvases.
Custom rulers: You can also take advantage of the new custom guidelines and rulers for aligning objects, text, and even layers in Photo Studio Ultimate.
Facial Recognition + Face Detection
If you’re a people photographer, then you’re going to love the advanced Facial Recognition and Face Detection tools ACDSee has introduced in their software. The tech in these tools identifies your photo subjects based on their unique facial features and even suggests a name for who the tool thinks these people are. Sometimes you get suggested matches that you can use to narrow down your options. I haven’t tried this on grizzly bear photo’s yet, but every one of those bears in Katmai has a name so I’ll let you know.:))
Focus Stacking
Have you taken a series of images and some of them have different focal distances than others? All are good photos in their own way, but individually, you can’t really do much with them. Luckily, Photo Studio Ultimate 2020 comes with a built in ability to focus stack
Focus Stacking will take your photo group and adjust the focal distance so the depth of field is rendered across the entire subject. If you are not familiar with focus stacking let me give you an example. Let’s say you are out doing macro photography of a tree frog that is the size of your thumbnail. The best way to achieve full focus on the frog from front to back is to take multiple images changing the focal point on each successive capture as you move from front to back. Of course, hoping all the while that the frog does not move while you capture these images. Many camera’s today have focus stacking as a feature so this task can be accomplished quickly in an automated fashion. You get much better results shooting this way than sticking with a single exposure. With focus stacking the back end of this frog could be rendered in focus but this little dude was not hanging around long enough for focus stacking to happen.
Photo Credit: Robert Carleton
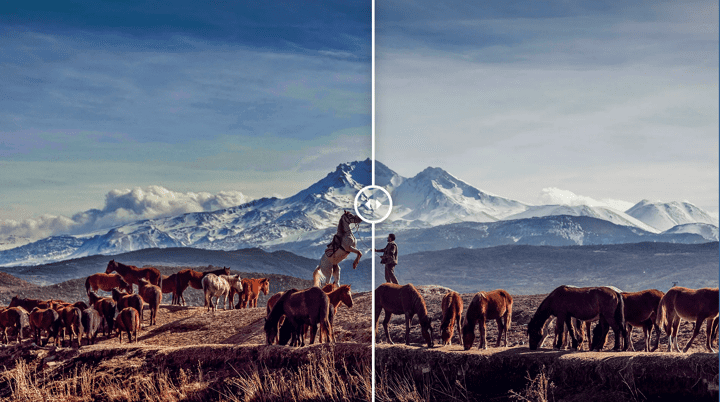
HDR Tool
Speaking of working with several images at once, the HDR Tool in Photo Studio Ultimate will create beauty, balance, and harmony in your images by introducing more details of the highlights and shadow. Take a look!
Digital Asset Management
View Mode
View Mode is a major feature you’ll rely on often when using Photo Studio Ultimate 2020. When you’re in this mode, you can assign photo subject names, use facial detection, play your audio and video files, and watch your collection of images go by one by one slideshow-style.
Photo Mode
In Photo Mode, you’re free to review every last photo in your vast catalog of images. The photos are organized by their EXIF data, which tells Photo Studio Ultimate which date the photo was taken. It’s sort of like organizing your images by date, but a little better.
Manage Mode
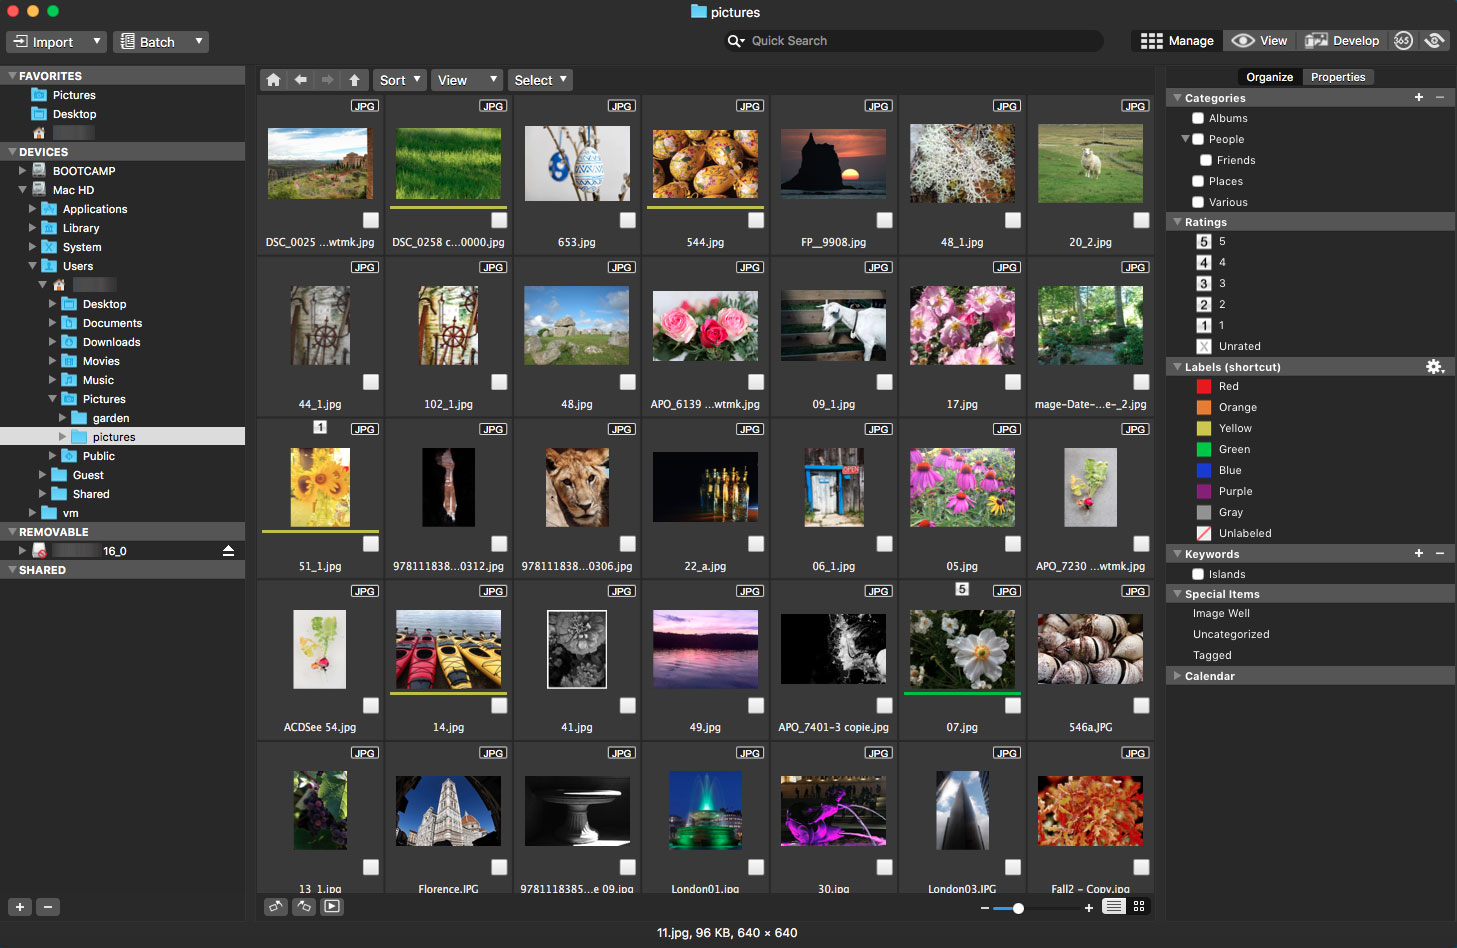
Given Manage mode is the first mode that ACDSee Photo Studio opens to upon launch and the one I use most often I’m going to do a deeper dive. It is the main browsing and managing interface, chocked full of organizational tools for finding and sorting and moving your images.
ACDSee Photo Studio is constantly adding the images you browse to its database in order to increase the browsing speed. This catalog that is created also helps to store file information to assist with organizing, searching, filtering, etc. This eliminates the need to waste time executing a cataloging process. There is also no copying and storing of your photo’s so extra space is not taken up on your storage drives.
Within Manage mode you will see three main panes:
The Folders pane, on the left, displays the folders on your computer, which you can use to navigate through and find what you’re looking for. It also displays removable drives, including iOS devices and shared drives.
The File List pane, in the middle, displays the contents of whatever folder you have selected in the Folders pane. You have the option to select multiple folders at once and see their amassed content in the File List pane.
It will also display the results of searches and images that fit certain criteria, such as images with a 5 star rating or a keyword like wolf.
The Organize pane, on the right is where you will rate, label, add keywords, categorize, and find your photos based on date. You can also manage your categories and keywords in this pane.
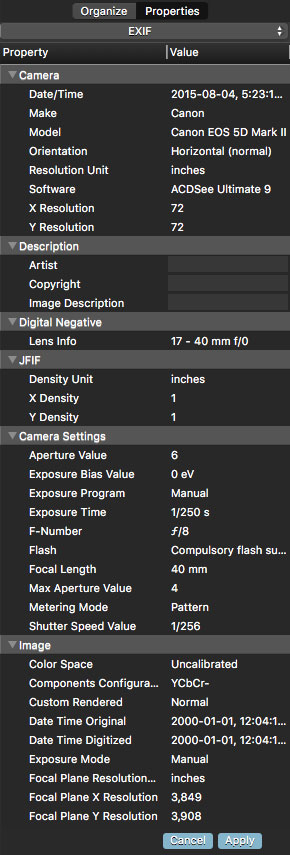
The organize pane is also displayed with the Properties pane, which you can access via the tab at the top of the pane. The Properties pane is for viewing the EXIF and IPTC information of the selected photo, as well as adding your own. I use this when I am submitting wildlife images to magazines and contests as they very often request the camera information for the image.
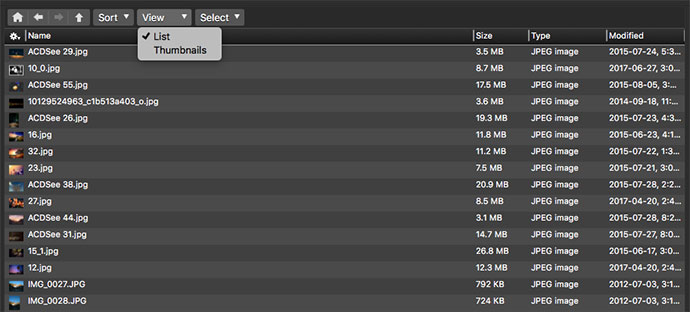
At the top of the File List pane, you will see right and left arrows that you can use to navigate through your browsing history, and an up arrow for navigating up the folder tree, as well as the Sort, View, and Select drop-down menus.
You can use the Sort menu to order images in the File List pane by their file properties, such as name, their size, type, date, rating, or dimensions, etc. You can also rearrange the order of your files by dragging and dropping in the File List pane to create a “custom sort”.
Use the View menu to toggle between viewing your images in the File List pane as thumbnails or in a list.
Use the Select menu to quickly select large groups of images for mass actions, such as selecting all tagged images so that you can move, rename them, etc.
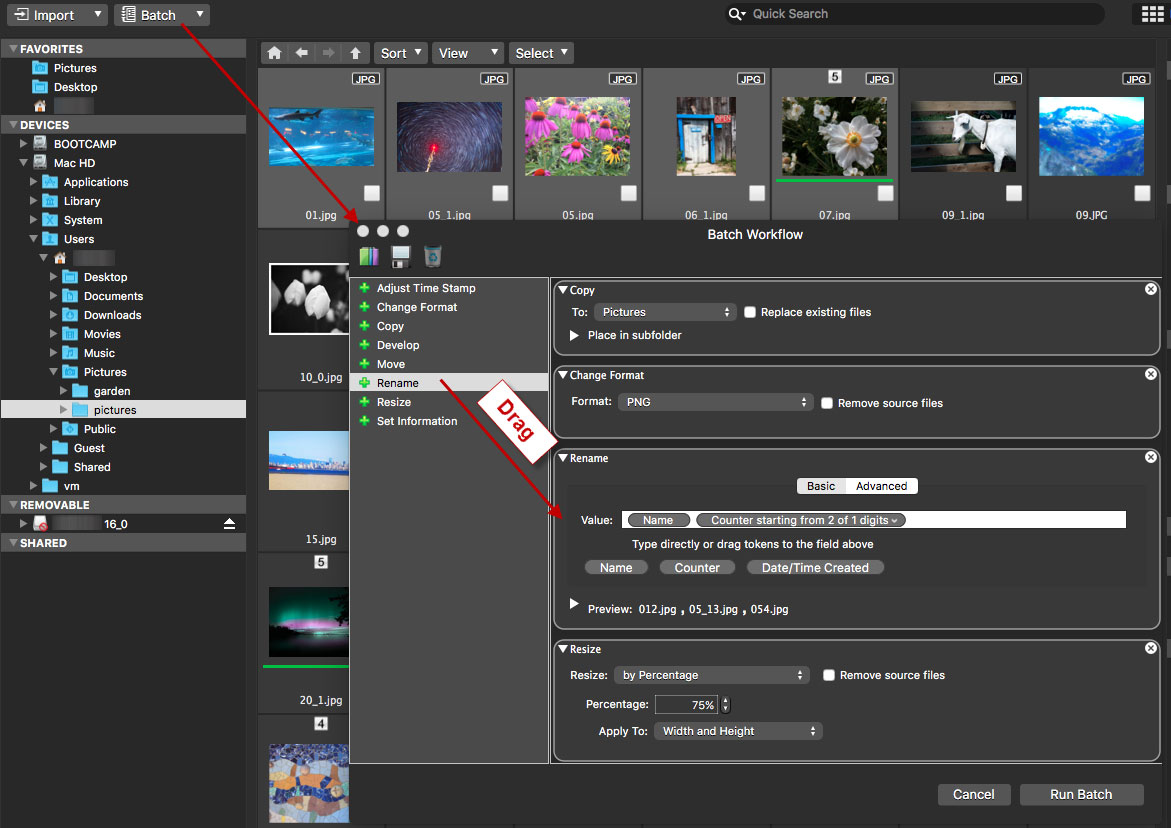
Above the Folders pane, you will find the Import and Batch drop-down menus.
The Batch menu is one that gets used a lot as it allows you to perform edits across multiple images at once which is a huge time saver for many genres of photography. It provides you access to actions you can apply to multiple images at once. You can also use batch tools to perform multiple actions to a single image at once. When you have selected an item from the menu, the Batch Workflow dialog box will open where you can customize the options for that action. In the dialog box, simply drag items from the left menu to the main area.
The Import menu will allow you to import photos and videos directly off a connected device. Note, you do not actually need to import these files into ACDSee Photo Studio unless you wish to do so. ACDSee Photo Studio reads the images directly off your device, so there is no need to move them into Photo Studio. So why have an import function? If you want to perform some actions en masse that you know you’re going to need to do anyways while they’re being copied from your device, such as renaming or applying a batch preset, using import may be more efficient. My method is to move the images to a labelled folder on my hard drive and then I access the images through manage mode by displayed that folder that I created.
RAW Support
As is the case with Luminar 4, ON1 Photo RAW 2020, and DxO PhotoLab 3.A all four of the ACDSee products support RAW Editing. Each of these products have features and a graphical interface that make them unique in some way. If you are planning to make a move away from Photoshop or Lightroom to get away from subscription fees you are not alone. But with so many RAW Editors to choose from I’m going to suggest you give each one a try via a 30 day free trial so you can decide which solution best fits your workflow. You’re going to want to choose an interface that you can get comfortable with quickly. If you hate test drives and just want to buy the car, I will tell you that of the four RAW Editors I found that Photo Studio Ultimate 2020 was the most intuitive of the bunch having used Photoshop CC.
You’ll also be glad to know that Photo Studio supports more than 500 different cameras, giving you nearly unrivaled versatility. These include cameras from:
Sony
Leaf
Sinar
Konika
Ricoh
Imacon
FujiFilm
Samsung
Pentax
Hasselblad
Kodak
Phase One
Nikon
Adobe
Panasonic
Epson
Olympus
Contax
Casio
Leica
Mamiya
If you do not see your camera on the list above you can submit a RAW file format for inclusion in a future release of Photo Studio.
Photo Editing Tools
The selection of tools and brushes found within Photo Studio Ultimate 2020 is hugely expansive. Here’s what you can use for your most targeted, impressive photo editing yet:
Polygon Selection Tool: The Polygon Selection Tool lets you select even strange shapes and edges easily so no part of your picture is off-limits to edit.
Pixel Targeting: With Pixel Targeting, you can set a mask based on color and brightness to highlight specific pixels.
Luminosity Selection: How bright is your image? Luminosity Selection will make different changes to your photos with a lighter versus a darker pixel, letting you set the brightness your way.
Develop Mode Brush: The Develop Mode Brush gives you the freedom to edit your photo using radial or linear gradients or by selecting just portions of the photo.
Noise: The denoiser in Photo Studio Ultimate 2020 clears noise without erasing the details of your original photo. It rivals many other denoisers on the market.
Color EQ: The Color EQ tool can toggle between your photo’s brightness, contrast, saturation, and hue. Make adjustments per each individual color in your image using advanced tools. Now you can make certain shades pop or mute them for a more placid effect. The choice is yours.
Dodge & Burn: Do you wish the sun looked brighter in your photo of birds flying across the sky? Perhaps you want to enhance the dimly-lit moon so your lone wolf looks more forlorn. Dodge & Burn can bring out darker or lighter areas to treat overexposure and underexposure.
Liquify: The Liquify tool moves your pixels rather than edits them outright, opening up many new possibilities for working on your photos.
Lens Correction: Kiss pincushion and barrel distortion goodbye when you apply the Lens Correction feature. This tool will calibrate the changes it makes to your photo based on the level of distortion present.
Add Grain Tool: Introduce natural-looking, nostalgic grain with the Add Grain Tool. This tool is perfect for establishing mood in your photography.
Special Effects: Swap from watercolors to collages, pencil drawings, and more in the Special Effects tool. You’ll look like a pro painter and photographer in one!
Add Watermark: It’s your photo, and you want everyone to know it. With the Add Watermark tool, you can. Your distinct watermark will protect what’s your when posting your photos online.
Skin Tune: Smooth and brighten skin without the overdone quality of Photoshop using the Skin Tune tool in Photo Studio Ultimate. You can also bring back a lost glow in your human subjects and even out their skin tone without wiping out pores and other fine details.
Smart Erase: That pile of sticks is really taking away from your photo of a bear running along a stream. With Smart Erase, dump the unwanted features using a brush. The tool will remove all traces of those sticks, that trashcan, or even a stormy cloud. Then the area left behind by the removed object gets filled right in without looking unnatural or obvious.
HEIF Decoding
Do you use high-efficiency media container formats, aka HEIF files? If so, then it’s not always easy to track down a photo editor that works in such a format. Photo Studio will decode these files effortlessly, again making your workflow the easiest yet.
Preloaded Actions
For those of you who have worked in Photoshop you’ll be familiar with the concept of Actions. In ACDSee’s Photo Studio Ultimate 2020, you can work with Actions as well. These recordings of your edits harness the power of saving time, as you can repeat the same Action over again to several of your photos so you’re done much faster. You can also browse a library of more than 100 preset Actions within Photo Studio Ultimate so you can do even less work. This is also a great feature for finding a distinct photo editing style if you don’t already have one.
Straightening
Oh no! You didn’t realize it at the time, but your photo turned out crooked, blurry, or well, a little dull. Hey, it happens to the best of us, and with the Straighten feature, you can quickly treat all three problems at once.
When Straighten is activated in Photo Studio Ultimate, the feature will change the line orientation so it’s perfect after you draw the line where you want it. This tool will also sharpen up those blurry features with you at the helm so you can determine how many sharpened pixels are around the edges. The Straighten feature can even reduce noise and maintain fine or coarser details.
Photoshop Plugin Compatibility
Not quite ready to part ways with Photoshop? You don’t have to. Photo Studio Ultimate 2020 works as a standalone product or as a Photoshop plugin so you can use both tools at once!
ACDSee Photo Studio Professional 2020 Features
Photo Studio Professional 2020 is a professional-level photo editor for parsing down your workflow, enhancing your images, and organizing your photo library. You can work in HDR and RAW with this software.
If you want all the features ACDSee Photo Studio 2020 has to offer, then Photo Studio Ultimate 2020 is the solution for you. The next most inclusive solution is Photo Studio Professional. This has some of same new features you’ll find in Photo Studio Ultimate, among them batch converting, new sliders, cloud access, the Duplicate Finder, keyword management, Face Detection, and Facial Recognition.
What Photo Studio Professional 2020 brings to the table is the addition of PDF support. You can open, access, and print off PDFs within this software. If you use PDFs often, you can rank them based on your own criteria. When your PDF library gets full, send your old PDFs to the cloud or the trash. Easy and done.
ACDSee Photo Studio Home 2020 Features
Photo Studio Home 2020 is designed for beginner photographers who want to get a leg up on others of their same skill level. The digital asset management that’s included in Photo Studio Home is the same as what’s found in Photo Studio Ultimate. In this application, it’s especially handy for beginners since you tend to take a lot of photos until you get your subject just right. Organizing these images is usually a nightmare, but no longer.
If you branch out into RAW photography, you get support in Photo Studio Home 2020 as well as keyword management and batch converting. There are fewer features in Photo Studio Home compared to Photo Studio Ultimate and even Photo Studio Professional, but enough features that beginners can get a feel for the ACDSee software and think about upgrading sooner than later.
The main difference in Photo Studio Home compared to the other versions of Photo Studio 2020 is that the Facial Recognition and Face Detection features are 64-bit this time. That’s likely to accompany the latest build of Photo Studio Home 2020, which is also 64-bit.
ACDSee Photo Studio for Mac 6 Features
As a Mac user, you’re often limited when it comes to the programs and software you can use. Most software developers seem to be Windows-focused, often leaving you in the dust, as Windows programs rarely play nice on a Mac.
With ACDSee Photo Studio for Mac 6, you’re finally a part of the gang. Your RAW files are supported, you can edit in the Map Pane, and you may even preview PDFs using Quick Look. Oh, and did I mention you get a Mac-centric version of ACDSee Photo Studio 2020’s digital asset management feature?
Several other additions are exclusive to the Mac version of Photo Studio 2020. For instance, ACDSee mentions that it’s sped up the searching, scrolling, browsing, and launching speeds in Photo Studio Mac.
ACDSee also makes it easier to copy and paste in Photo Studio Mac, even if you need to copy over metadata between your files. Further, the Instant Special Item Searches let you browse your Mac photo database for videos and photos that don’t have keywords or haven’t yet been embedded. This one-click feature is again meant to make photo editing on the Mac as efficient–if not more so–than using a Windows computer.
Pricing
In my opinion the old adage that you get what you pay for applies with ACDSee Photo Studio 2020. Below is the list pricing for each of the four ACDSee Photo Studio suites:
I use Photo Studio Ultimate 2020 and quite honestly for the difference in price between the suites there’s no reason not to buy Photo Studio Ultimate and have access to every feature in the tool kit whether you need it now or not.
Ahead of your purchase, you can try any of the four Photo Studio 2020 products for free by following this link to the free trial of ACDSee Ultimate. As previously stated, I’d recommend downloading the Ultimate package and not bother with the others unless of course you’re a Mac user and you’ll find that trial download at Photo Studio for Mac 6.
Conclusion
The ACDSee Photo Studio 2020 suite is a serious competitor in the RAW Editor space. It competes with the best of them and is priced to be a very attractive offering for those who do not want to spend a fortune or are looking for a way to move away from software with monthly subscription fees. The Ultimate Photo Studio 2020 offers photographers every feature you could want including Digital Asset Management, Photo Editing, RAW Image Processing, Layer Based Editing, Facial Recognition, HDR, Focus Stacking and so much more.
It’s worth repeating one more time, if you’re on a windows platform the smart choice is to purchase Photo Studio Ultimate 2020. It offers photographers an all-in-one software that includes Digital Asset Management, Photo Editing, RAW Image Processing, Layer Based Editing, Facial Recognition, HDR and Focus Stacking and so much more for not much more money.
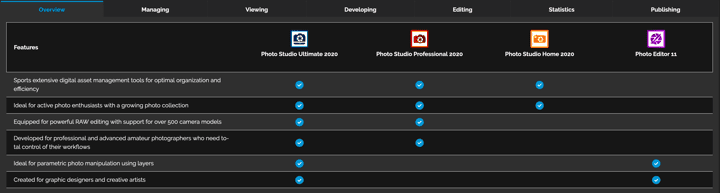
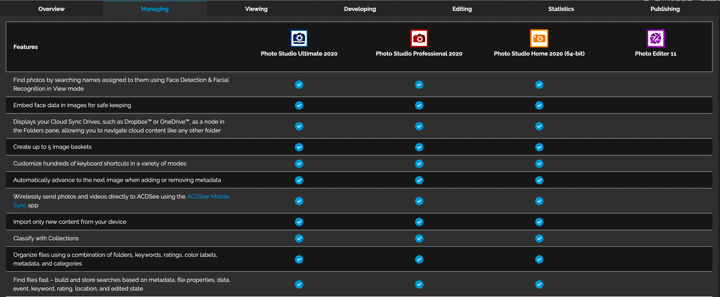
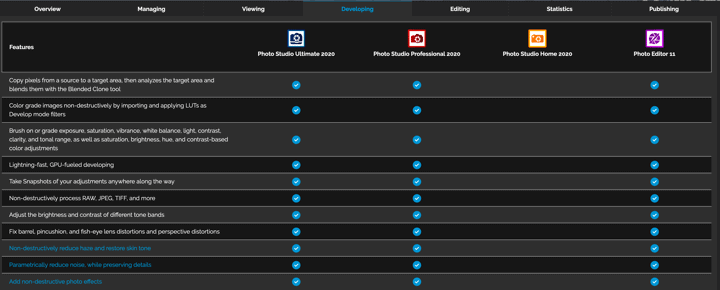
Having said that if you really want to compare the features between the Ultimate, Professional and Home solutions ACDSee the tables below will allow you quickly see what you’d be missing. The tables below show a feature comparison between each product in the Photo Studio 2020 suite including Overview, Managing, Viewing, Developing, Editing, Statistics and Publishing. ACDSee also has a Competitive Analysis so you can see how Photo Studio Ultimate stacks up against the competition to save yourself a little research time.
Even if you’re still a green photographer, I would highly recommend you choose Photo Studio Ultimate 2020. It has more options so you can grow into it. Sure, you might not use every last feature right away, especially if you are still adjusting to photo editing software, but that’s okay. It’s always better to have than have not, and Photo Studio Ultimate has the most.
This gives you the chance to grow into the software. As you acclimate to your camera and find your knack for photography, you’ll be glad for more features, not fewer. Plus, if you plan on seriously pursuing photography as a hobby you’re future-proofed. You’ll know you have one of the leading photo editing tools on the market with none of the features missing.
Related Posts
There’s more to discover — explore these related posts.
Best AI Image Background Remover: Hands-On Review 2025
Explore why Aiarty Image Matting is the best AI Image background remover for clean, precise masking of wildlife even in complex natural scenes. As a wildlife photographer, capturing the essence[…]
Topaz Denoise AI allows you to shoot at high ISO’s in low light with the confidence of knowing you can eliminate that noise while retaining crisp detail in your images[…]