Nikon Mirrorless Camera Slow to Turn On – Fix It Now
Nikon mirrorless camera’s are slow to turn on by default but that can fixed in a few ways. Fix it now and never miss another shot. So let’s answer the[…]
Read the post.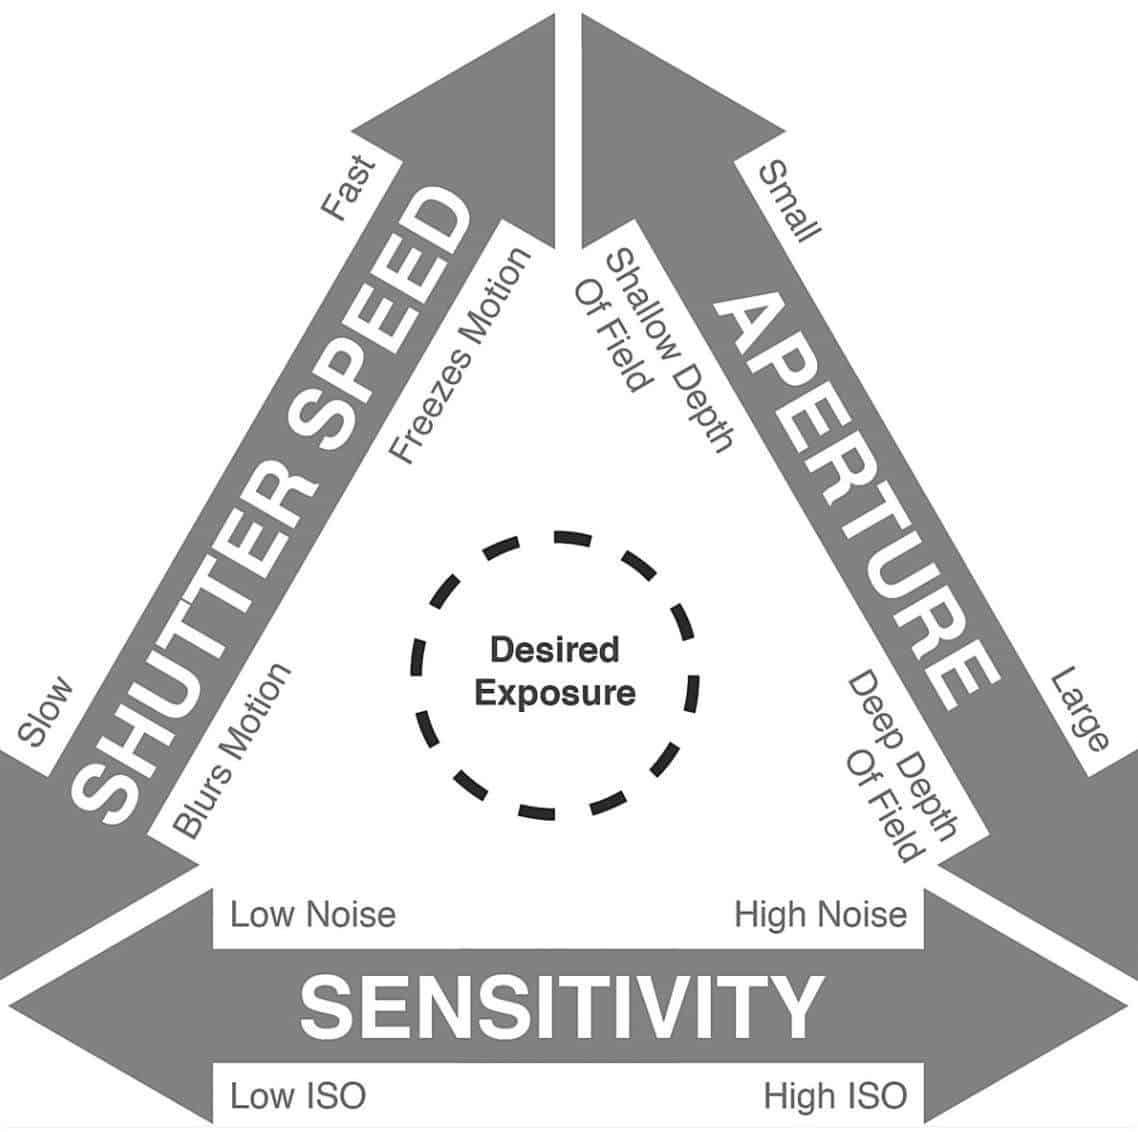
Simply put ISO in camera is a setting that will help you capture images in low light by making your photo brighter but it has a downside by introducing noise so it needs to be applied thoughtfully. To make your photo’s brighter you can simply increase the ISO number but you should be mindful of your aperture and shutter speeds. In most camera’s ISO starts at 64 or 100 and goes up to ridiculous numbers in the 100’s of thousands which are not usable in real life situations and can do more harm than good.
My first plan of attack when the light is low is not to increase ISO. To expose the image correctly I first give thought to opening up the aperture (the lower the aperture number the more light) or decreasing the shutter speed (the lower the shutter speed the more light) wherever possible to minimize the noise I introduce into my images. Having said that, it’s better to capture a sharp image with noise that can be corrected during the edit process than a blurry image that needs to be deleted.
Let’s jump right in by answering the question what does ISO stand for and what is ISO in photography?
ISO, short for International Organization for Standardization, is a film speed setting that affects sensitivity to light. From a 20,000 foot view all you need to know right now is the higher you set your ISO the brighter your photograph and the more noise you introduce into your image.
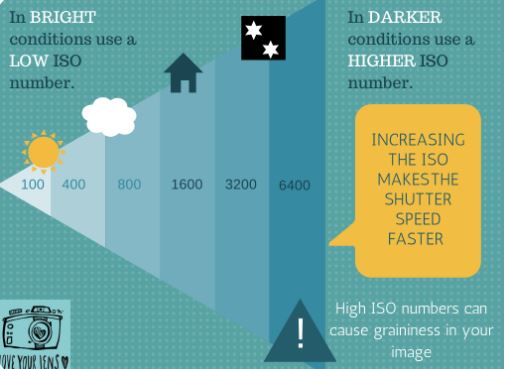
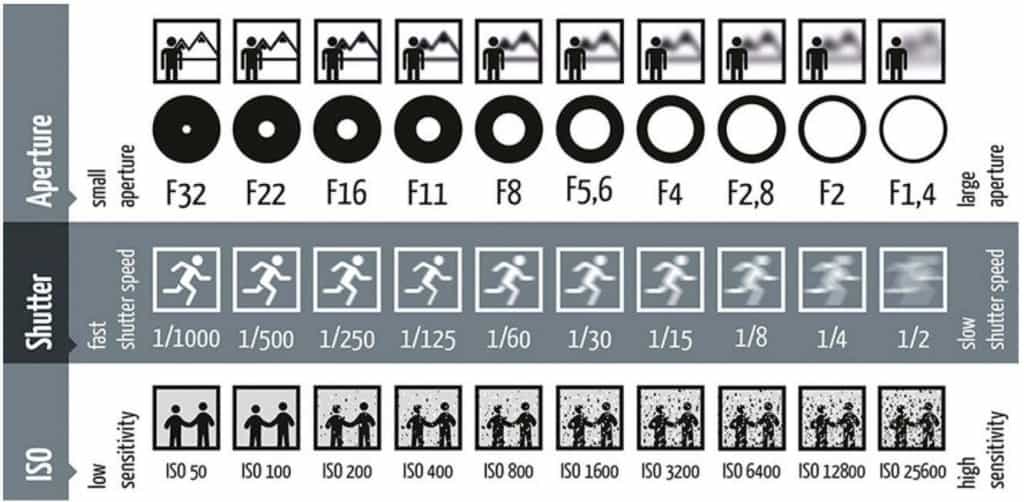
In this post I’ll discuss ISO in much more detail, including ISO values, how ISO relates to shutter speed, and how to choose the right ISO setting for the image you are trying to create. For those of you who are just looking for a quick visual overview the chart below will help you understand the concepts that I will be discussing in greater detail below.
When combined with my article on The Rule of Thirds | Make It or Break It, I hope these posts will help photography beginners be educated enough to confidently pick up the camera and take some amazing shots!
Okay, so what the heck is ISO anyway? Forgive me for the techno babble below but I thought it important to help you understand the concept of ISO and how it has evolved which is why we still speak about film speeds in this digital age. If you’re not interested in the evolution and science behind ISO jump to the next section.
Those of you who grew up shooting film will recall that film has ISO values of 200, 400, 800, etc, and digital photography is not any different.
ISO is both a standards group known as the International Organization for Standardization and it’s also a measure of film speed as determined by that organization.
Believe it or not, film speed measurement systems have existed since the 1880s. Gauging film speed began with Leon Warneke, who pioneered the eponymously-named Warneke sensitometer.
In the centuries since, many other film speed measurement systems have come and gone. These include Hurter & Driffield, Scheiner, DIN (short for Deutsches Institut fur Normung), BSI (the British Standards Institution), ASA (the American Standards Association), and GOST. Taking elements of DIN and ASA standards, ISO has been the standard for film speed since 1974.
What exactly is film speed? When you press the shutter on your camera, the film speed is one factor that influences the film’s light sensitivity. The ISO standards are backed by numerical scales and sensitometry for accuracy.
If a film is deemed more sensitive, then it means the film needs less light to produce image density. Insensitive film, which is also known as slow film, won’t reach the same image density as sensitive or fast film without a great deal more light.
Of course, most cameras don’t use film anymore, in which case, the light sensitivity occurs in the image sensor, also known as the imager. This sensor relies on light wave attenuation that becomes signals that tell the sensor how much light is coming through.
Camera ISO has been around a long time and while it has its foundation in analog film cameras it is very much alive and well in the digital photography.
There will come times when you may need more light sensitivity or light insensitivity. Today’s digital cameras easily allow you to adjust the ISO settings between a variety of different values.
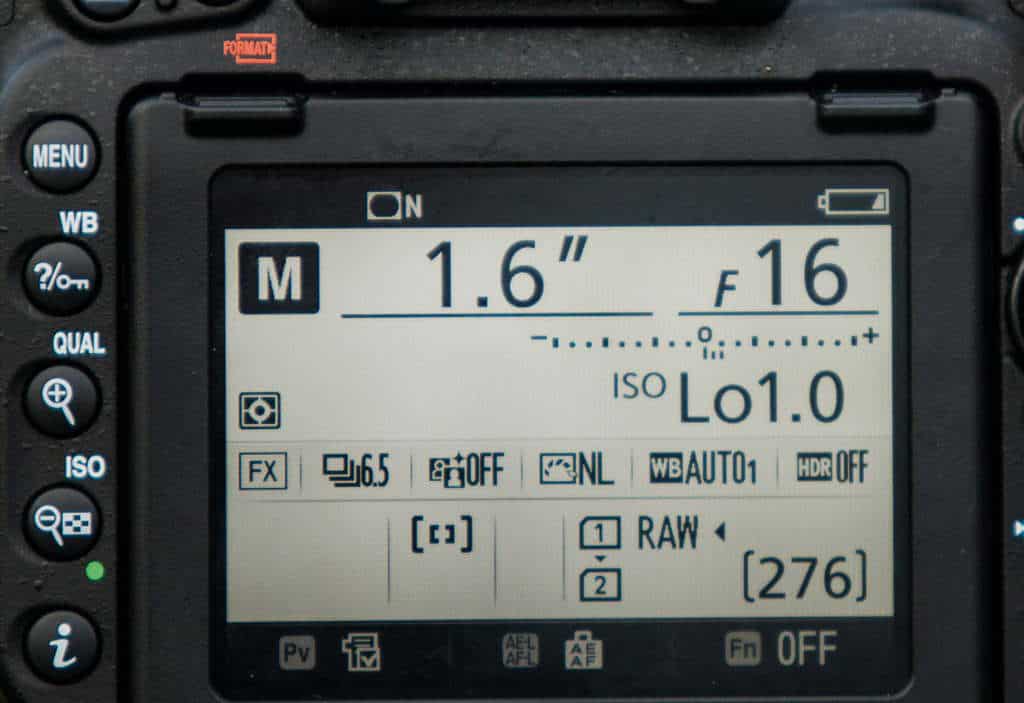
The lowest value, usually ISO 64 or 100, is also known as the base ISO. That means it’s the default setting. Camera manufacturers will usually adjust your camera’s ISO to the base ISO because that’s how you get the highest-quality photos with the least amount of noise. Many manufacturers including Nikon use Lo settings on many models, with different ISO ranges. For instance, the D5/500/600/750/800/7500 share the Lo-1.0 (ISO50) to Lo-0.3 (ISO80) options, while the Df/D300/700 have Lo-1.0 (ISO100) to Lo-0.3 (ISO160). The D810 (but not the 810A) even goes from Lo-1.0 (ISO32) to Lo-0.3 (ISO50). The issue introduced with the Lo settings is that contrast is higher than normal thus I prefer not to drop below the base ISO with my shooting.
If your digital camera isn’t brand-spankin’ new, then ISO 200, the next highest setting, may be the base ISO.
From there, the values jump to ISO 400, ISO 800, ISO 1600, ISO 3200, and so on.
Each time you incrementally boost the ISO, you’re adding brightness at twice the rate since the ISO speed is increasing by two times as well.
Now that you have a better grasp on the ISO basics, I want to introduce two other related concepts: shutter speed and F-stop.
If you’re new to these concepts then the table below is one that you should study and place into memory. It’s is likely the most important thing you’ll take away from this post and the relationship between these three variables is critical to your success as a photographer.
Shutter speed, also known as exposure time, is how long your camera’s digital sensor or film is exposed to the light when you open the shutter. As you can guess then, shutter speed and film speed or ISO are closely related.
The longer the light exposure lasts for your camera’s sensor or film, the more light it’s exposed to, increasing its sensitivity. Even infinitesimally brief shutter opening times will affect how much light gets in. For instance, if your shutter is open for 1/250th of a second versus 1/500th of a second, you get two times the light with that prolonged shutter opening.
In wildlife photography and any other areas of photography where your subject can move at any time, shutter speed is incredibly important. Reduced shutter speed when capturing an object or animal in motion will blur your photo for one of several reasons.
It could be that when you pressed the camera’s shutter button, the vibrations reached the camera at a faster rate than the shutter could open. The opening and closing of the shutter itself can also cause vibrations to travel down the lens causing motion blur.
That’s why using the proper technique, especially with long lenses is so important. For more tips on how to avoid blurry images read my blog post entitled, “Why Are My Photo’s Blurry?”
The F-number or F-stop relates to camera’s aperture. If you’re not sure what aperture is, allow me to explain. Aperture is the size of an opening or hole where light passes through. For instance, when your camera lens opens, depending on how open it is, you get a different aperture.
In the first seconds when the lens is open just a hair, the aperture is the least, whereas when the lens is fully open, the aperture is greatest. The F-number represents this level of openness in a ratio. That ratio is the system diameter’s focal length to the aperture or entrance pupil. That’s what the F in F-stop stands for, by the way: focal length.
You may see such F-stop settings on your digital camera such as f/2.8, f/4, f/5.6, f/8, f/11, etc. however this is determined by your lens. Other camera models might represent the F-stop as something like f2.8 or f.8 without the slashes. Either way, it means the same thing.
The larger the F-stop or aperture, the brighter your photo because you’re letting in more light. Also, your depth of field will change. Items in the foreground may be crisp and clean, but those in the background will be blurry as shown in the table above.
By increasing the F-stop or aperture, the depth of field is bigger however you’re also introducing less light, producing darker photos.
Interestingly, by narrowing or widening the aperture and adjusting the shutter speed, you can equalize the light exposure. For instance, if your aperture is narrow and your shutter speed is slow or your aperture is wide and your shutter speed is fast, in both instances, the camera sensor or film gets the same amount of light.
The reason it’s so important to know your camera’s ISO setting as well it’s relationship to the F-stop and shutter speed is because these factors all play a role in the quality of your images.
If you take a photo at ISO 100 versus even ISO 800, you’ll notice the difference. Those differences are only magnified all the more as you increase your ISO. Here’s an example for you.
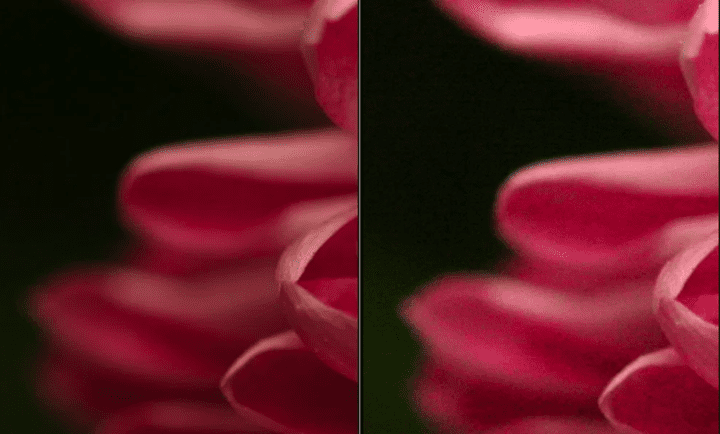 Image courtesy of Digital Photography School
This image of a flower is the same from shot A to shot B, with the only difference being the ISO value. In the first image, the photographer stuck to the base ISO setting of ISO 100.
On the right, they ratcheted up the ISO value to ISO 3200, which for many cameras is close to the highest you would want to go.
The results, I’d say, speak for themselves. The photo on the left is darker, yes, but all the crisp, clean parts of the image are intact. You can see where the delicate pink flower petals fold in as well as the details on those petals.
Compare that to the photo on the right. It’s a good deal brighter than the one shot in ISO 100, but to the point of distortion. You can see visible noise throughout the photo, even in the blurry flower petals in the back.
Now, you’re used to noise when taking photos in the dark, not the light, but noise is the main side effect of boosting the ISO too much.
Here’s another example to show you what I mean.
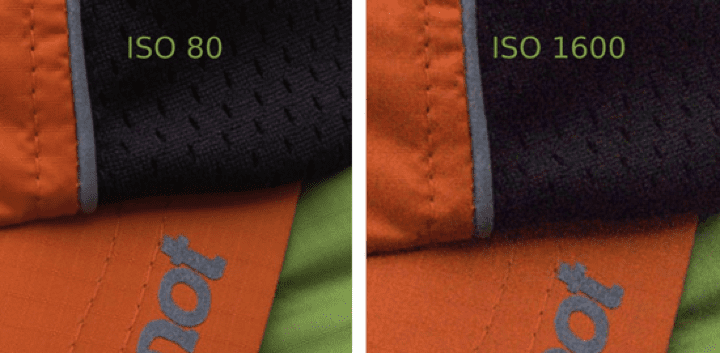
Photo courtesy of ImageMaven.com
You lose a lot of the quality even in an indoor photo of a hat by jumping from ISO 80 to ISO 1600.
In some situations, such a huge jump in ISO value is warranted. As I stated earlier, it’s better to have a sharp image with noise which can be corrected in the edit process than a blurry image with less noise that has to be deleted. If you’re not familiar with the process of removing noise from your images you’ll want to read my review of Topaz Denoise AI.
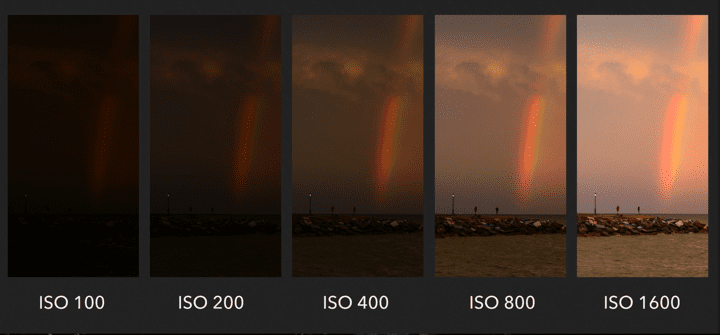
Image courtesy of Photography Life
This image had its ISO value changed four times. Starting at the base ISO 100 was way too dark but this is a great example to demonstrate how the brightness of an image is affected as you increase your ISO. That’s why understanding what ISO is in Photography is so important.
Boosting the ISO value by only 100 to ISO 200 doesn’t do much to improve the quality of the image. The rainbow comes through ever so slightly more clearly now, but it’s still a very dark photo, and most of the details are lost.
By increasing the light exposure by 200 to ISO 400, this photo still isn’t in its best shape. Finally, we can see the rocks on the shoreline and some details of the water, but everything is just so dark.
At ISO 800, all the details are clear and semi-bright. It still looks like you took this photo on a very cloudy day though, so it’s not very appealing. Only at ISO 1600 does the photo look like it was shot in daylight with all the details intact.
Now if you want to test yourself, think about the two other ways you could have made this image brighter without adjusting your ISO and introducing noise to your image. I always ask myself this question in the field because I want to capture the best image I can with the least amount of noise. That means thinking about the relationship between shutter speed, F-stop as well as ISO.
If you answered larger aperture and/or slower shutter speed you’re correct.
You’re ready to begin using ISO the right way in your photography. The next time you pick up your camera, how do you set the ISO?
As I mentioned before, most digital cameras these days will preset your ISO at the base value. There’s rarely any need to do this yourself. That said, you may opt to increase or decrease your ISO when shooting. I’ll talk in the next section about the right times and conditions for a higher ISO versus a lower ISO, but do know you’ll likely use both.
If you have an inexpensive, basic DSLR camera then you may have to access ISO through your menu settings. Auto settings will likely maintain the base ISO value, so you’ll probably have to manually input the ISO you want or select from a dropdown depending on your camera model.
If your camera is a bit more old school, then it could have an external ISO wheel. This is a fun way to set the ISO without going through digital menus, as you can just turn the wheel to increase or decrease light sensitivity. The ISO values should be printed on the side of the wheel so setting your ISO is a breeze.
More expensive camera’s will come equipped with a dedicated ISO button as well as a front and back wheel. You’ll have to simultaneously turn the wheel while pressing your ISO button to boost the ISO settings or turn them back down.
Knowing how to change your ISO is the easy part, the million dollar question is this:
The right answer depends on the camera you’re shooting with and your personal tolerance for noise. My recommendation is that you experiment with a low light situation and shoot through the range of ISO possibilities. Set your camera to manual mode and select a shutter speed and F-Stop that you will keep consistent throughout.
Now shoot the exact same subject matter at base ISO, 200,400,800, 1600,3200, 6400 and 12,800 and everything in between that your camera has to offer. Open those photographs on your monitor at home, zoom in to 100% and check the noise in the image. Pay particular attention to the darker parts of the image and the shadows.
Next take those images that are at your outer limit of your tolerance and place them into a denoise software like Topaz Denoise AI. Remove the noise and review the image again. This experiment will allow you to decide how high you can push your ISO before the noise is just too much to render a quality image. As an example, I will not push my ISO past 3200 on my Nikon D850 but with my Nikon D5 I will go to ISO 6400 and on rare occasions as high as 10,000 if it means capturing an image vs not.
ISO Sensitivity control is a setting in your shooting menu that allows the camera to automatically control the ISO up to the limits that you set. That little experiment you just performed is going to come in real handy here if you’re a wildlife or sports action photographer. In both of these genres of photography the action happens fast, so fast that even a professional does not often have the time to be adjusting ISO on the fly to render a proper exposure.
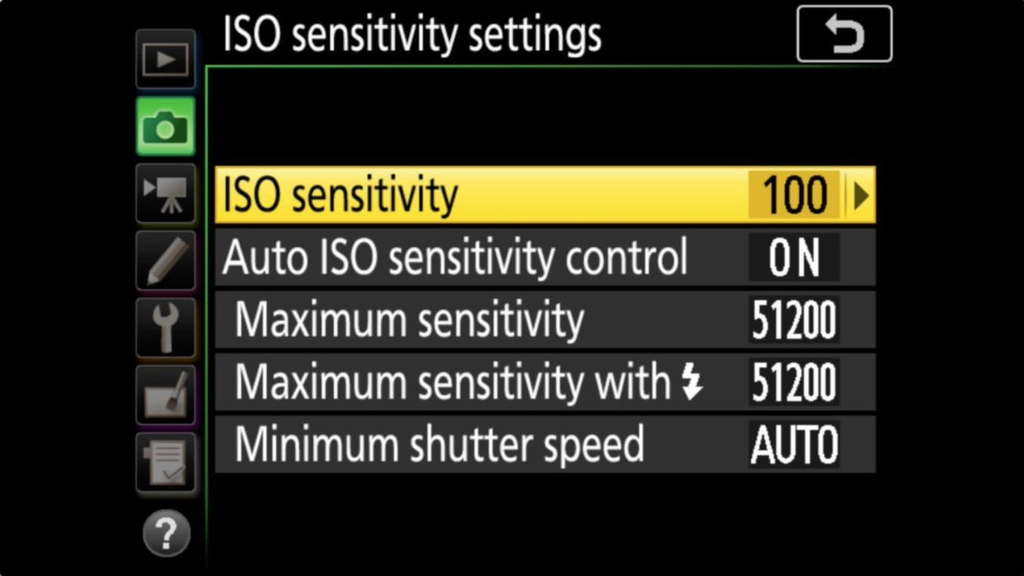
By allowing the camera to adjust the ISO automatically through the ISO Sensitivity Setting in your shooting menu all you need to be concerned with is the correct shutter speed and F-Stop to render the image the way you wish it to look. The ISO will adjust according to the available light up to the limit you set to render a properly exposed image.
You should set the maximum sensitivity to the highest ISO value that you decided on during your experiment. You can also set your minimum shutter speed, again this would be dependent on how you wish the final image to look. The slower the shutter speed the more motion you introduce into your image conversely the higher the shutter speed the more you freeze the action. I refer you back to the table above for a visual representation of what I am referring to here.
To better understand how the Auto ISO setting works in each shooting mode I’ve detailed that below for you. I generally shoot in manual mode however many of you will prefer to shoot in the other available modes.
In Manual mode, the aperture and shutter speed values are fixed by the user. ISO Auto will change the ISO when the light levels change. When using the ISO Auto function in manual exposure mode the electronic analog exposure display of the camera will continue to indicate correct shutter speed and aperture settings when light levels change within a four-stop range. The ISO Auto system increases or decreases the ISO value to maintain the correct shutter speed and aperture value the user has chosen up to the maximum sensitivity that the user has set.
In Shutter Priority mode the shutter speed is set by the user and the aperture is determined by the camera system. If light levels change, the aperture will change as determined by the camera system. When the aperture determined to achieve the correct exposure is beyond the aperture range of the lens used, then ISO Auto will increase the sensitivity value.
In Aperture Priority, the aperture value is set by the user and the shutter speed value is determined by the camera system. If light levels change and the shutter speed required to achieve the correct exposure is beyond the shutter speed range of the camera, ISO Auto will increase the sensitivity.
In Program, Auto modes the aperture and shutter speed values are determined by the camera system. As light levels change, the camera will alter shutter speed and aperture values to ensure the correct exposure. When the shutter speed required to achieve the correct exposure is beyond the shutter speed range of the camera and the aperture cannot be adjusted any further by the camera system, ISO Auto will increase the sensitivity.
Program mode is a great option for beginners however it does not allow the user to determine how the image will be rendered. Example, freezing the action, creating intentional motion blur or rendering a blurry or in focus background. As you get further along in your photography learning I strongly encourage you to begin exploring modes other than Program.
Alright, I said I’d get back to it, so I want to wrap up by discussing when you’ll want more light in your photos with a higher ISO and when less light is more appropriate with a lower ISO.
The natural noise and graininess that comes from shooting with higher ISO values can give some photos a more vintage feel. It absolutely depends on your photo subject and what kind of mood you’re going for whether you’ll want such a vintage look.
If you do prefer vintage photography, you don’t always have to crank up your camera’s ISO to achieve it. You can just as easily apply filters when editing your photos after the shoot.
What’s the lighting situation like where you’re photographing? Is it a bright, sunny day? Then you can afford a lower, even the lowest ISO. Are you surrounded by artificial light? Again, a lower ISO is best. Are the lights dimmed or is it sunset? You might want to increase the ISO a little, but I wouldn’t boost it as high as it can go unless you’re ready for the consequences (lots of noise).
Remember that photo of the rainbow over the sea from earlier in this article? Those images are small and if all you want to do with your photo’s is present them on the web at 72 dpi then even with the ISO value set to 1600, you won’t see a lot of visible distortion and noise. However if you plan to display your images in larger sizes that digital noise will become very apparent.
If the type of photography you’re shooting allows for the use of a tripod you should consider it. The reason being that mounting your camera to a stable platform like a tripod allows you to use shutter speeds that are slower than if you were hand holding. And because that lower shutter speed allows more light to hit the sensor you can keep your ISO at a lower setting and thereby reduce noise.
Wildlife and sports photographers may want their cameras set to a higher ISO in low light situations. This will permit faster shutter speeds to freeze the action and avoid unwanted blurriness in motion shots as we talked about previously. If you’re taking a photo of an immobile object or people for a portrait then there’s no need for such a high ISO.
Do keep in mind that ISO noise isn’t always as evident on your camera’s digital display as it is when the photo is in full-size. Thus, you might think you took a photo successfully without noise only to realize later that’s not the case.
Noise can quickly wreck an otherwise phenomenal photo, as I’ve discussed many times on this blog. If your too-high ISO setting left your image a noisy mess, what are your options?
During your post-production editing, make sure you use a photo editing software with a denoiser. This software feature can detect the noise in your image and then help to remove it while maintaining image detail so your photo is bright and noise-free.
Which photo editing software includes a denoiser? I’ve reviewed a lot of great ones to try in the past few months, such as:
Between those four awesome options, I’m sure you can find a photo editing software with a denoiser that’s in your budget.
In my opinion using a software like Topaz Labs Denoise AI 2020 which can operate as a stand alone product or a plugin for Photoshop does the best job. Again, only really necessary if you plan to present your images in a larger scale.
The ISO or film speed in cameras determines how sensitive your film or camera sensor is to light which translates to how bright your final photo will be. Increasing your ISO introduces grain or noise which may make your image unusable if pushed too far so take the time to experiment with your camera.
ISO plays along side shutter speed and F-stop and you should take the time to learn the relationship between these three variables. Give deliberate thought when taking a photograph to the exposure triangle as the shutter speed and f-stop you choose will define how your final image is rendered. Use the lowest possible ISO you can for any given situation.
You’re now ready to begin experimenting with ISO values in your own photography so your photos are not only visually impressive, but bright and noise-free too. Best of luck!
Nikon mirrorless camera’s are slow to turn on by default but that can fixed in a few ways. Fix it now and never miss another shot. So let’s answer the[…]
Read the post.
Your guide to field tested Nikon Z6II autofocus settings for birds in flight. Never miss another shot. I’ve learned a thing or three having used the Nikon Z6II shooting birds[…]
Read the post.