


DXO has released DXO PhotoLab 4 with many new features like DeepPRIME and intuitive image synchronization but is it worth the upgrade?
A few months back, I reviewed DxO PhotoLab 3, which at the time was the newest version of PhotoLab. Now DxO PhotoLab 4 has rolled out complete with artificial intelligence and bundled with loads of cool features. I am most excited to check out DeepPRIME. DxO claims they have introduced a groundbreaking artificial intelligence (AI) technology into DxO DeepPRIME. It apparently has the capability to reduce digital noise at the same time as it demosaics your photographs. I’ve always been a fan of DxO’s denoising, it’s one of the best denoising tools I’ve used, that and Topaz Labs Denoise AI, so I am curious to see how much they have improved things.
What’s New in DxO PhotoLab 4?
DxO PhotoLab 4 contains the following new features:
- DeepPRIME
- DxO Instant Watermarking
- Intuitive Image Synchronization
- Advanced History
- Batch File Renaming
- DxO Smart Workspace
I had very good things to say about DxO PhotoLab 3 in my review, as you’ll remember (and if you missed that review, check it out!). I even called it a worthy contender to Photoshop because you could do everything in PhotoLab 3 that you can in Photoshop but skip the subscription fees every month.
If you’re an avid PhotoLab 3 user, you might wonder if upgrading to PhotoLab 4 is within your best interest. You might also be curious if you’re using another photo editing software, maybe something like Photoshop, if you should try PhotoLab 4.
In today’s detailed review, I want to answer all your most burning questions about DxO PhotoLab 4 so you can decide whether it’s worth buying new or upgrading. I’ve put my own wildlife photography to the test, using my images in the various new features of PhotoLab 4 to see what happens.
What Is DxO PhotoLab 4?
For the sake of exposition, I want to briefly discuss the PhotoLab 4 product itself before taking a deep dive into its myriad of new features.
PhotoLab software is one of DxO’s most popular products. PhotoLab is designed to remove image distortion and other aberrations while improving both the color rendering and lighting of your photos.
DxO PhotoLab 4, the newest PhotoLab edition as of this writing, includes all the features you’ve come to expect from previous versions of the software. These features include smart editing tools, photo management, a preset workflow for fast editing, and the brand’s own U Point Technology.
If you haven’t used any PhotoLab products in a while, it’s worth my taking a moment to refresh you on U Point Technology, as it’s the backbone of PhotoLab.
With U Point Technology, you create a Control Point or a reference pixel and then begin naturally editing and adjusting your photo from there. If you wanted a bigger or smaller adjustments radius, you’d use the size slider to set it.
The U Point informs the brightness, saturation, color channels, and texture neighborhood of your image and it works.
The New Features in DxO PhotoLab 4 In Detail
I know what you’re here for, and that’s the new features in PhotoLab 4, of which there are many. I listed them in the intro and now I want to cover each one in extensive detail with before and after edits of my own wildlife photography to highlight what’s included in PhotoLab 4.
DeepPRIME
Here’s the real star of the show, the feature that makes PhotoLab 4 as newsworthy as it is. DeepPRIME is a brand-spankin’ new DxO feature utilizing AI to erase RAW digital noise.
According to DxO themselves, to create DeepPRIME, the team developed convolutional neural network structures like in the field of neuroscience. These advancements gave this new tool behavior that mimics that of our brains. Yes, a human brain.
As you use DeepPRIME, its neural network system will use deep learning to improve its editing abilities and discover relevant values. In other words, the DxO team has assessed millions upon millions of different photos, which are then fed to the AI within DeepPRIME. The tool uses its intelligence to demosaic and denoise your photos.
If you’ve used other photo editors, you know that denoising and demosaicing are typically not done in tandem. Not with DeepPRIME. Its AI can take care of both tasks at once, maintaining the details and colors of your image while making everything look clearer. Your image’s ISO sensitivity may double in value compared to denoising with DxO PRIME.
What does this mean for you, the photographer? It means we have the ability to push the boundaries of our camera’s ISO just a little bit further than we could previously knowing we can clean up the noise in post. DeepPRIME will take care of the rest. DxO says that even for lower ISO images and images from older cameras, this AI feature still works beautifully.
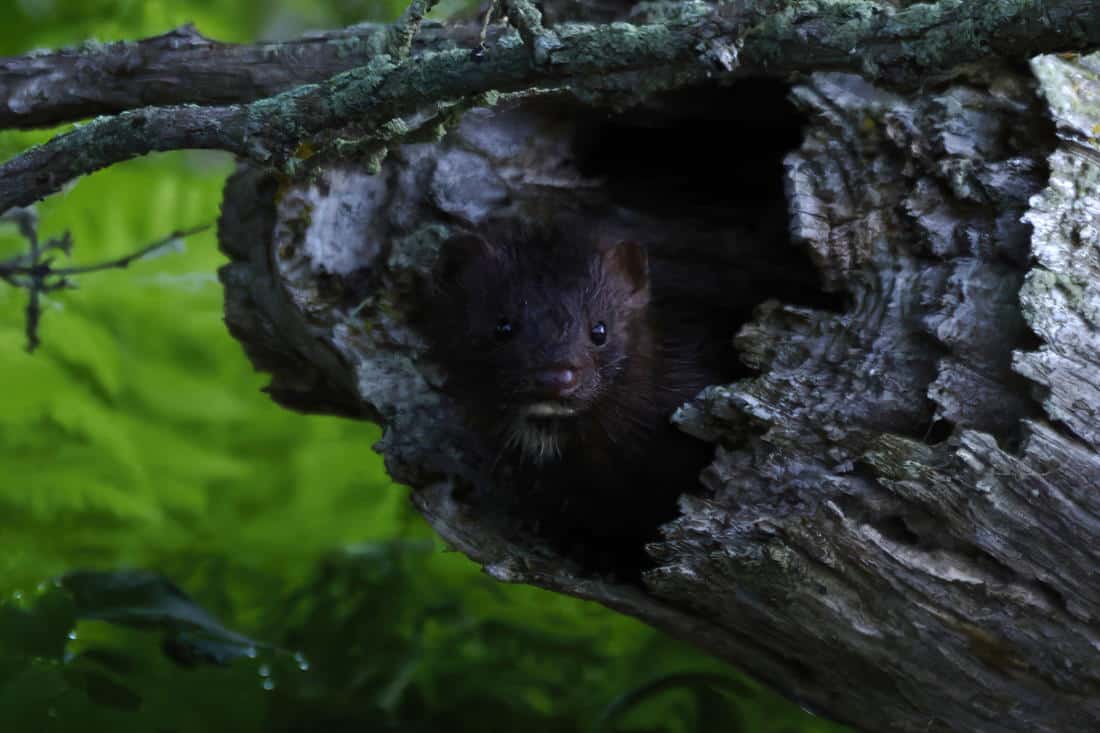
So less talk, more action, right? I took one of my very early morning mink images shot on a Nikon Z7 at ISO 4000 and brought it in to DeepPRIME to see what it could do.
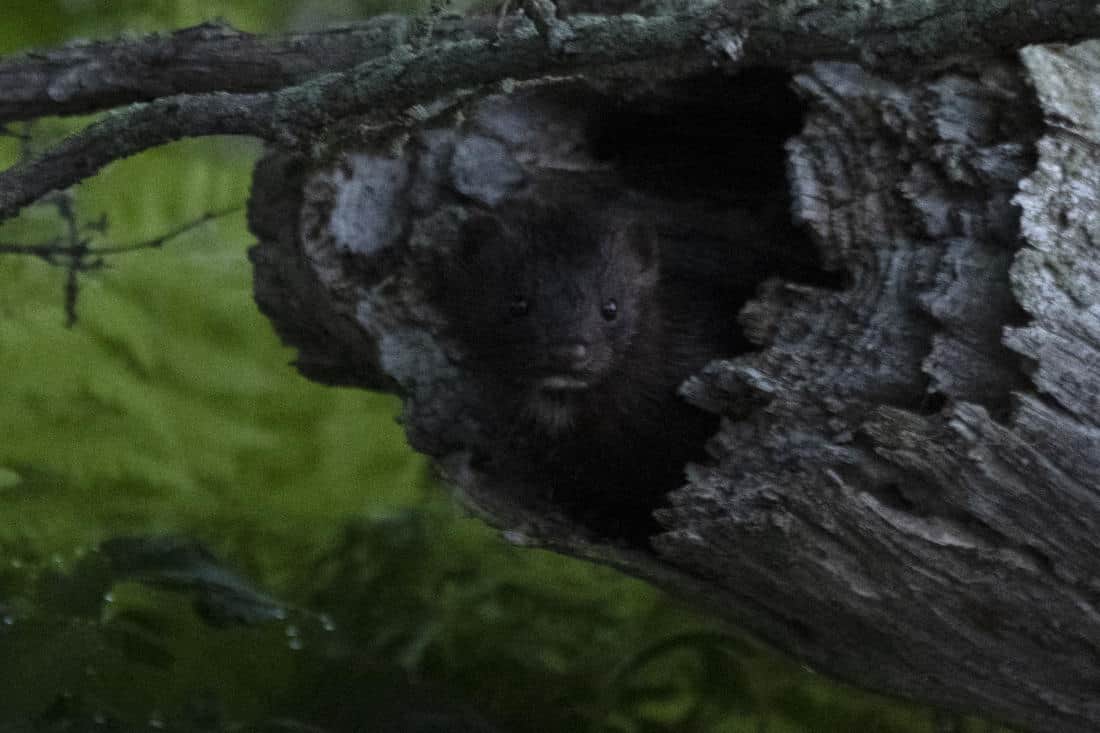
Here’s what it looks like after I ran the image through DeepPRIME. The change is incredible! Note, I did add a degree of sharpening to see if I could bring out the detail in the eyes. For the purpose of this exercise however pay close attention to the reduction in noise which is most apparent in the green foliage in the bottom left corner. The difference between the two images is amazing.
DxO Instant Watermarking
If you’ve read my posts about adding a signature logo to your photographs, I’ve talked about the importance of a good watermark. Image thieves are all too common in today’s day and age. When all you have to do is right click and save a photo, it’s very simple for anyone to say the image is their own, especially an image without a watermark. Yes they can simply remove it with a good image editing tool like Photolab 4, but at the very least it is a deterrent. The real value of a watermark from my perspective is the polish it adds to your images and the building of your brand as a photographer.
Yet watermarking your photos is usually a time-consuming process. You have to choose the image you wish to add your logo to, then build a layer, pull your logo into the layer and position it where you want it. Then you flatten the layers and save.
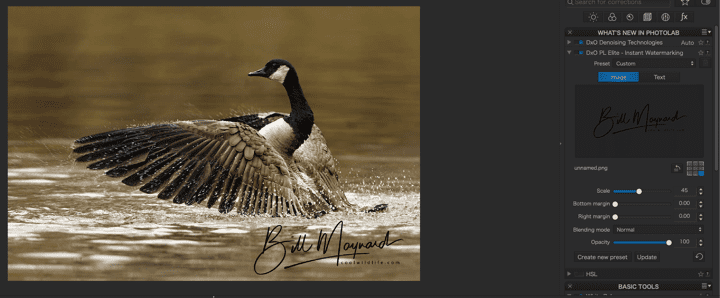
DxO PhotoLab 4 now includes an Instant Watermarking, a really handy and quick feature. You upload the photo you want, upload your watermark, and then you can tinker with it, adjusting the scale, bottom and right margins, and opacity of the watermark. It is also the only tool on the market to offer seven blend modes to accommodate background lighting variations and ensure your photography signature logo is visible but to overpowering.
If you’d rather make a text watermark (which is truly better than nothing), you can add that as well. Take a look at how I watermarked my photo of a Canada goose. Here’s the before, with no watermark.
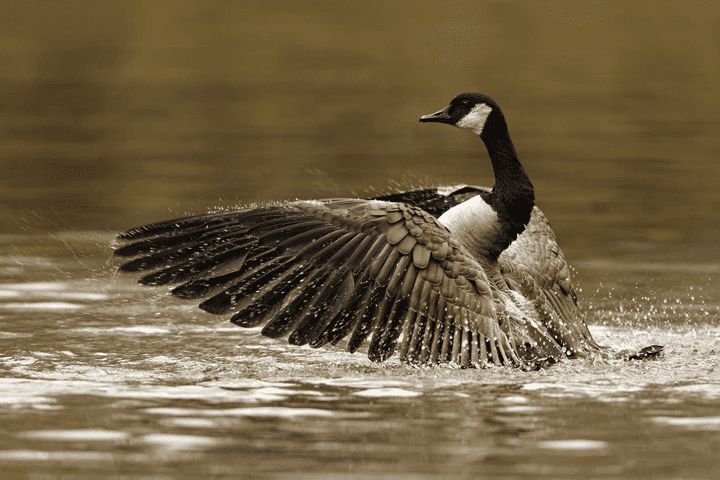
Here’s the watermark I quickly whipped up in PhotoLab 4 in about a minute. Although after looking at it now I think it would look better in the top left corner, but that’s easily changed with this new feature.
Intuitive Image Synchronization
If you’re like me you spend as much time in front of your computer editing your images as you do out in the field shooting them. If the images are part of the same shoot with consistent lighting, you want consistency from one image to the next. That often means remembering exactly which filters or edits you made and the precise numbers you set, like +64 sharpening and -8 saturation.
Yeah, that’s no fun. DxO knows that, which is why PhotoLab 4 comes with Intuitive Image Synchronization. Once you edit one photo, you synchronize those settings. Then you can open your next image, right click it, and apply the edits from the first photo!
It’ll be easier to concentrate on your image edits when you don’t have to remember the number values for your edit settings. You can also speed up your workflow with this handy feature, and which photographer wouldn’t want to do that?
DxO Advanced History
Granted, if it did turn out that you had to edit multiple photos the hard way, that’s not such a headache in PhotoLab 4. DxO has made it easier than ever to dig back through your history of edits–from the sweeping changes to the minute ones–and review what you did through DxO Advanced History.
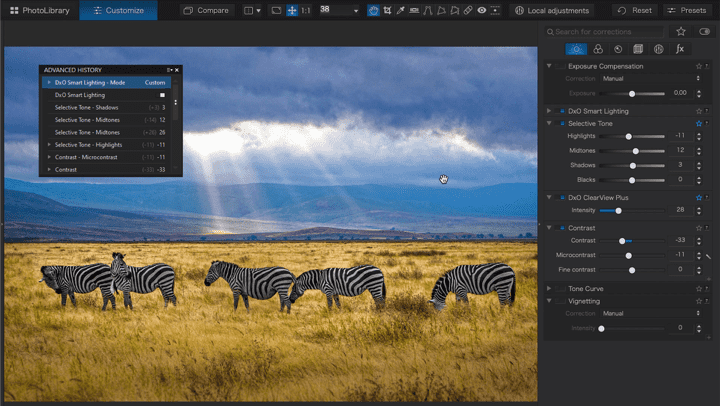
This screencap (not my work this time) shows the precision and detail of PhotoLab 4’s Advanced History. This feature remembers those numerical values of edits like contrast, highlights, and shadows so you don’t have to.
Batch File Renaming
Here’s yet another handy feature if you’re one to work with a lot of photos at the same time. The new and improved Batch File Renaming tool lets you change the name of a group of images using one click. Maybe when you first uploaded those pictures of a snowy owl you took, you labeled them as snowy owl but then you decided you wanted them renamed to Snowy Owl Nov 2020. That’s now easily accomplished with the updated Batch File Renaming tool.
That’s not all that’s included with this new feature set. You can also number your image files, search for file text, and change searched file text. If you’ve ever lost a really good photo because it didn’t get grouped in with the others, then you know that organizing and categorizing your images is a smart idea.
DxO Smart Workspace
The DxO Smart Workspace isn’t just named that for marketing purposes, this thing goes really in-depth. What’s even better is you can customize and personalize your experience using the workspace. Here’s what I mean by that.
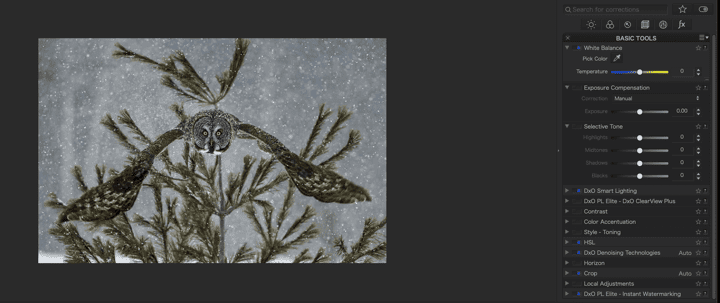
Look at all the cool edits and changes I can make to this photo of my Great Grey Owl. I have a lot of the new features activated by default, such as denoising, Smart Lighting, HSL, and Instant Watermarking. Some of these features are applied automatically, like Smart Lighting, while for others, you have to manually go in and do the editing yourself, such as with Instant Watermarking.
That’s just what’s available in Basic Mode, by the way. By switching to an advanced workflow, here’s a list of the features you can activate or deactivate:
- Focusing distance
- Focal length
- Red eye
- Unsharp mask
- Repair
- Chromatic aberration
- Lens sharpness
- Style toning
- Color rendering
- Color accentuation
- White balance
- Vignetting
- Tone curve
- Contrast
- Selective tone
- Exposure compensation
Yes, that’s a pretty exhaustive list! When you find a tool or feature you like, hit the little star icon to make it easier to access next time you open PhotoLab 4.
Other Great Features of DxO PhotoLab 4
The new features in DxO PhotoLab 4 are pretty awesome, right? I also want to discuss some key features that are back but have been improved upon from PhotoLab 3 to PhotoLab 4.
HSL
If you haven’t used an edition of PhotoLab since before PhotoLab 3, then HSL will be new to you. This tool’s abbreviation stands for hue, saturation, and lamination. You can change all three at once using a channeled color wheel.
You go color by color, tweaking the hues that already exist in your image or introducing new ones. I’ll use my photo of a Great Gray Owl again to show you how HSL works in PhotoLab 4.
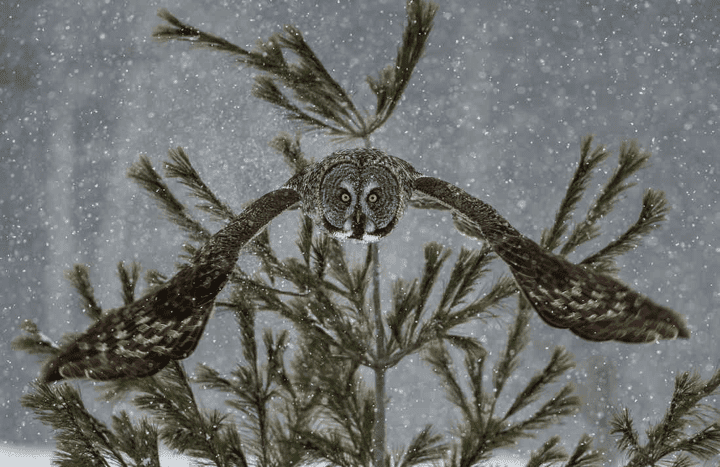
There’s the before image. Keep that in mind.
Here’s the after, where I tweaked with the colors of the trees to add a little more green to the pine needles. The possibilities are endless with this tool.
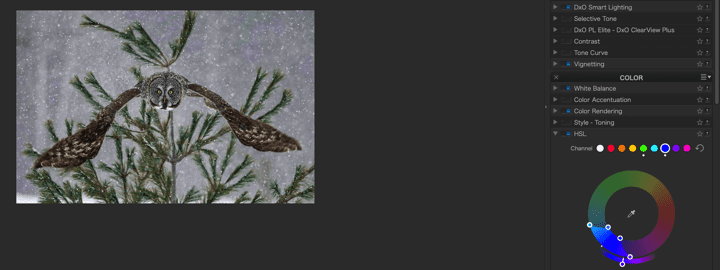
Here’s how to use HSL. You choose a color channel, such as green in the above image, and then begin rotating the color wheel. By sticking within the green part of the wheel, I can lighten or deepen the shade of green of the trees in my image. By swapping to a different color on the wheel, the trees then change to shades of that corresponding color.
It’s an intuitive little tool that I’m glad to see make a return in PhotoLab 4.
Image Presets
We all have those days when we want to quickly and appealingly edit a photo without putting in a lot of time or effort. Most of the time, you’re stuck working for a little while and then picking back up tomorrow.
If you need that little push to get into an editing mindset, PhotoLab 4 comes with 40 varied image presets you can apply to dramatically change the mood and appearance of your image.
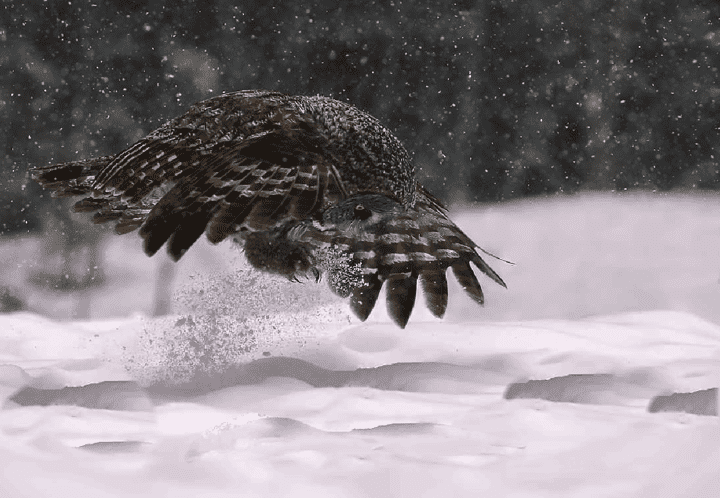
For instance, it would have taken me a few minutes to otherwise make my Great Grey Owl image monochrome. Instead, I just chose one of the many black and white image presets PhotoLab 4 offers and voila, my picture looks dark and dramatic in just one click. Although for those of you who also own Nik Collection 3 you’ll probably head into that tool to perform your monochrome work. DXO bought Nik from Google a few years back so the new Nik Collection 3 suite of tools is fully integrated into PhotoLab 4 without ever leaving the PhotoLab 4 UI.

ClearView Plus
You now have DeepPRIME for denoising, but what if it’s a case of haze instead? You need ClearView Plus, another returning feature in PhotoLab 4. Although it works best with landscape images, I still think applying ClearView Plus on my goose photo produced an interesting effect. As with any feature I apply it and then make tweeks to see if I like the outcome. Sometimes I do, sometime I don’t but it’s very easy to undo an effect if you don’t like it.
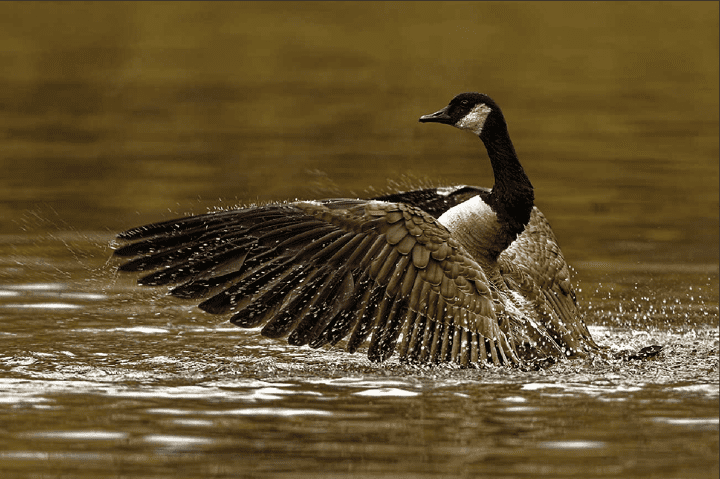
In ClearView Plus, you can reintroduce the radiance of your image that the haze may have taken away, but without any wonky contrast changes or that unwanted halo-y look that really detracts from a photo. PhotoLab 4 will also auto-sharpen your image with this feature.
Repair
The Repair tool is yet another returning key feature in DxO Photo Lab 4 that I think deserves a mention. This tool can act as both a cloner and a repair tool, erasing imperfections that you highlight. I would say that highlight is really the best word, as you loosely outline what you want to remove or clone and then apply it. For those of you who are familiar with Photoshop it would be the equivalent of their content aware fill feature.
I repeated some hills in this photo of my Great Grey Owl to show you how the Repair tool works. I found this feature very quick and easy to use, which is in line with the rest of the tools in DxO PhotoLab 4. To be clear, this type of photo editing in NOT acceptable if you are entering an image into a photo contest.
How Much Does DxO PhotoLab 4 Cost?
I’m sure you’re eager to know how much DxO PhotoLab 4 costs, right? The answer to that depends on whether you own a previous version of PhotoLab or if you’re a first time user.
If you’re buying DxO PhotoLab 4 for the first time, the software costs $129 to start. As an upgrade from PhotoLab 3, you’d pay $69 for the upgrade, although at the time of this writing it was on sale for $49.
Next, you have to decide if you want the Essential or Elite Edition of PhotoLab 4. The Essential Edition includes these features:
- Creative and analog renderings with the DxO Filmpack plugin
- Geometrical corrections with the DxO Viewpoint plugin
- Adobe Lightroom interaction
- Integrated exports
- Fullscreen mode
- Customizable workspaces
- Photo library
- DxO Advanced History
- DxO Smart Lighting
- Batch Processing
- Built-in presets
- Keyword management
- Optical corrections
- Selective copy/paste
- DxO Lens Sharpness
- DxO Colorwheel and HSL
- Repair tool and Local Adjustments
- U Point Technology with Control Points
- DxO Smart Workspaces, but only the categories feature
- Two activations
By upgrading to the Elite Edition, your version of PhotoLab 4 includes all the above as well as:
- Batch renaming
- Presets editor
- Multiple exports
- ICC and DCP profile support
- DxO Instant Watermarking
- Anti-Moire Tool
- DxO ClearView Plus
- DeepPRIME
- Prime Denoising
- DxO Smart Workspace (in full)
- Three activations
The Elite Edition of DxO PhotoLab 4 costs $149.99. Before you commit, you can download a free trial of PhotoLab 4, including access to all features, to see which version of the software you’d most integrate into your workflow.
DxO PhotoLab 4 – Is It Worth the Upgrade?
By this point, you know all there is to know about DxO PhotoLab 4. If you’re already using DxO PhotoLab 3, is it really worth the upgrade to PhotoLab 4?
It’s a case of only you can decide but as a wildlife photographer who shoots a lot in low light quite often DeepPRIME alone is worth the upgrade for me. For those of you still trying to decide here’s a recap on why I think DxO PhotoLab 4 is a great piece of software to have in your toolkit.
Your Favorite Features Plus More
PhotoLab 4 has many fantastic new features in its own right, but you’re not sacrificing the features you already know and love from PhotoLab 3 just for those features. The same key features that have made PhotoLab 3 such a success are a part of PhotoLab 4. These features include full screen, ICC profile support, Smart Lighting, Repair tool and Clone tool, U Point Technology, and HSL.
Plus, now you’d also have DeepPRIME for RAW images, Batch File Renaming, DxO Advanced History, and more.
Editing and Organizing Your Photo Library Is Easier Than Ever
Speaking of Batch File Renaming and Advanced History, the way you can organize both your photo library and your workflow in PhotoLab 4 is another consideration. I was pretty blown away by just how much the Advanced History feature remembers. Plus, with the DxO Smart Workspace, you can open your favorite tools, presets, and filters, close the ones you don’t use, and save your workflow for quick editing anytime.
DeepPRIME Is Only Available in PhotoLab 4
PhotoLab3 has Prime denoising, but DeepPRIME is a cut above with the use of an advanced Artificial Intelligence model. It’s better in almost every way so if denoising is an important part of your workflow give DeepPRIME a try through their 30 day free trial. If by you find you don’t need as much fine-tuning as is present with the DeepPRIME denoiser and demosaicer, you can always use Prime editing in PhotoLab 4 as well but I honestly can’t see myself defaulting to that very often.
It’s Good to Stay on the Cutting Edge
Another reason I’d say you should upgrade to PhotoLab 4 is that it’s new. Yes, PhotoLab 3 is new too, it just came out this year, but it’s no longer the newest PhotoLab product. If you feel the itch to buy the new iPhone whenever it drops, it’s because you want to stay on the cutting edge of what’s fresh. The same should apply to your photo editing software.
Upgrading Isn’t That Expensive
Still not totally convinced? The upgrade from PhotoLab 3 to PhotoLab 4 is only $69 and as previously mentioned at the time of this writing it was on sale for $49. If any of the new features appeal to you that’s a pretty cheap upgrade.
Hardware & Software Requirements
DxO PhotoLab 4 works on both Windows and Mac computers. For Windows users, it’s recommended you’re running Microsoft Windows 10 64-bit edition. Older versions of Windows, such as Windows 7 64-Bit with Service Pack 1 and Windows 8.1 64-bit also suffice.
You need an Open C1 1.2 graphics card with at least 1 gig of video memory, DirectX 9.0, 4 gigs of hard drive space, 4 gigs of RAM, and an Intel Core i5 processor. An AMD 64 X2 or Intel Core 2 processor are also acceptable.
Mac users should be running OS X 10.11, El Capitan, or 10.13 macOS High Sierra. 10.12, macOS Sierra, is acceptable too. Your graphics card should have 512 megabytes of video memory and your computer 2 gigs of hard disc space and 4 to 6 gigs of RAM.
Conclusion
DxO PhotoLab 4 is the newest version of PhotoLab. It introduces several new features and tools, including the amazing denoiser/demosaicer DeepPRIME, DxO Smart Workspace for managing your edits and your time, Advanced History for making edits across a group of photos, and DxO Instant Watermarking for protecting your images.
Whether this will be your first foray into PhotoLab or you’re upgrading from PhotoLab 3 to PhotoLab 4, I’d strongly encourage you to take this new version for a test drive. Here’s a link to the free 30 day trial of DxO Photolab 4.


Comments
Black Friday Sales For Photography 2020 | Photographers Delight | Cool Wildlife
ACDSee Photo Studio Ultimate 2021 Review | Cool Wildlife
Comments are closed.