Topaz Sharpen AI Review 2022 | Sharpen Blurry Images
Producing tack-sharp photos is as easy as 1-2-3 with Topaz Sharpen AI. See how even blurry images can be sharpened to perfection. With selective adjustments, you’ll learn how to selectively sharpen just the areas of the image that require it.
For those of you wishing to trial or purchase Topaz Sharpen AI or any other Topaz Labs products, please consider using my affiliate link. It helps to support my content creation efforts and there is no extra cost to you.
Topaz Labs has now changed its policy regarding discount codes. You will no longer find active discount codes through a Google search. Only Topaz Labs or affiliates running active campaigns will be provided with temporary discount codes going forward.
I invite you to contact me at bmaynard@coolwildlife.com. I will often have a discount code available for one of my campaigns or one from a Topaz campaign and I will happily share it with you.
GETTING STARTED WITH TOPAZ SHARPEN AI
Smarter Sharpening Through AI and Auto Settings
Topaz Sharpen AI has gotten really smart through the use of its artificial intelligence algorithms. You still have the choice to do things manually if you wish however I recommend you give Topaz’s AUTO feature a try as a starting point. My testing has shown that it is very accurate at selecting the appropriate image quality model. As good as it is, you still have the option to adjust the Remove Blur slider to suit your taste. I also move the suppress noise slider to zero as I use Topaz Denoise AI as a first step to handle any noise reduction that is required.
If you are not familiar with Topaz Denoise AI you can read my full review at Topaz Denoise AI Review.
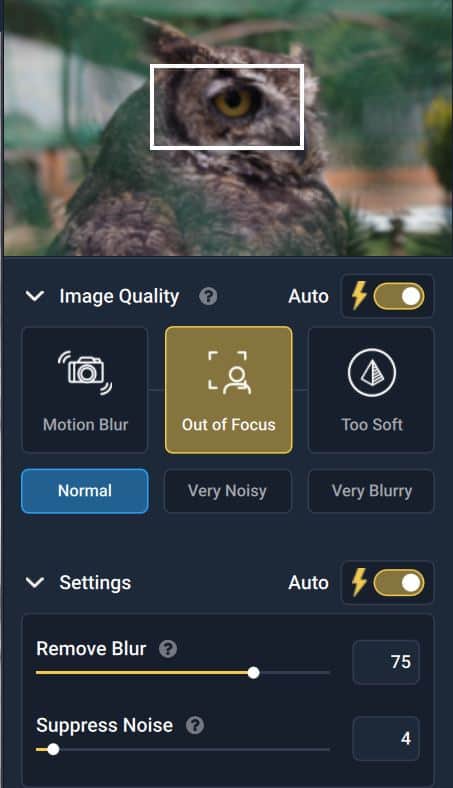
When you first drop an image into Sharpen AI pay attention to the right hand side of the dashboard. You may not even realize it, but the AI magic is happening behind the scenes to select what the software believes is the best image quality model and remove blur and noise settings suited to sharpen your image with the best results.
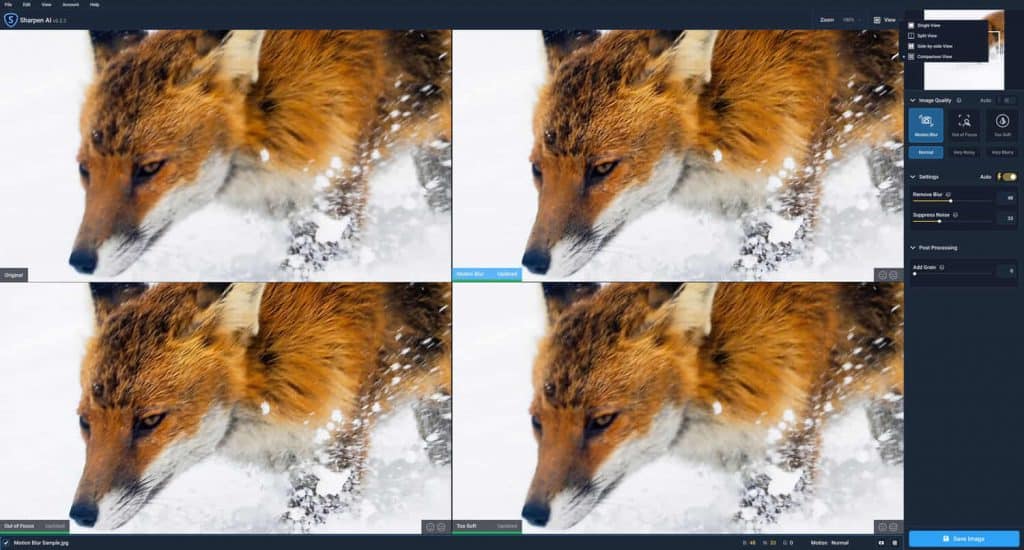
Case in hand, this red fox was on the move and as a result there is a degree of motion blur in this image making it less than sharp. Notice in the image below that Sharpen AI recognized the image as having motion blur and selected that image quality mode to perform the sharpening.
Comparison View | Fast & Complete Control
As good as the Topaz Sharpen AI AUTO mode is I still like to see the results from each image quality mode for myself. This allows me to override the software selection if I think that an alternate mode did a better job.
To access the comparison view click on view tab in the top right of the dashboard and select comparison view from the drop down menu. Select 100% from the Zoom tab and you’ll be presented with a screen like the one below with four tiles.
The original image will be top left with motion blur, Out of Focus and Too Soft displaying in the other three tiles. While zoomed in to 100% or 200% you’ll quickly be able to see which of the three image quality modes did the best job on your image.
In the case of this action shot of the red fox, the software had suggested Motion Blur as the best choice and is was absolutely correct.
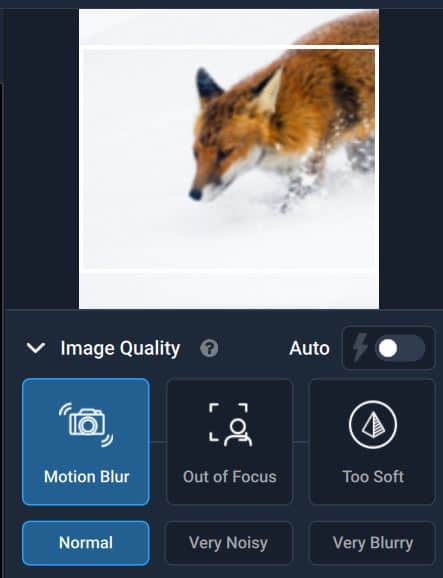
Understanding The Three AI Models:
There are three image quality models to choose from. Understanding when to use each model will help you better select the appropriate one as it relates to your photograph.
Motion Blur – As the name implies, use this method of image sharpening when you have camera shake or blur from reduced shutter speed especially noticeable when subjects are on the move. Motion blur is very common when hand holding longer lenses.
Out Of Focus – Best used when you believe that your image is not sharp because you missed the focus point. In wildlife photography, you’ll be assessing the eye for tack-sharp focus. If the eye is soft but another part of the image near the eye is sharp you likely missed the key focus point. In this case take a look at Out of Focus in the comparison view, it likely yields the sharpest image.
Too Soft – This is your go to model for general sharpening when an image is soft overall. This model is the one I use least in my workflow as a wildlife photographer.
Alternative Views
Once you’ve selected the best model to be applied to your image I suggest you move out of the comparison view. You now have the option to choose from single view, split view or side-by-side view.
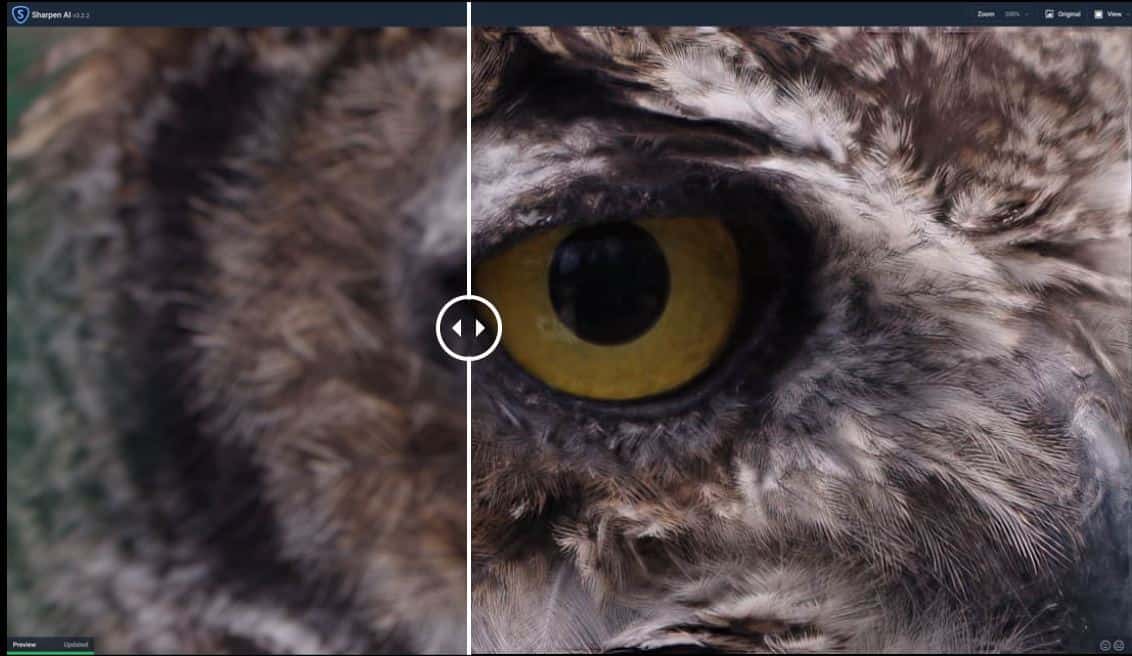
The single view and side-by-side views are exactly as they sound. My go to view when refining an image is the split view. It allows you to drag a slider across your image and see how the image changes in real-time.
Try dragging the slider across the sample image below to see what I’m talking about.
Directly below the image quality AI model buttons are additional controls. These controls can be used to further refine your image for even better results.
Normal. The most commonly used choice. A photo is soft and a little blurry.
Very Noisy. For images with noise. As mentioned above I always use Topaz Denoise AI to reduce noise prior to sharpening any image.
Very Blurry. Provides an additional level of sharpening for images that are blurry.
The decision on which of these three controls to use is best made by trial and error. I always start with normal and if that does not produce the desired result I try the other two controls to see if I get a better result.
Switching To Manual Controls
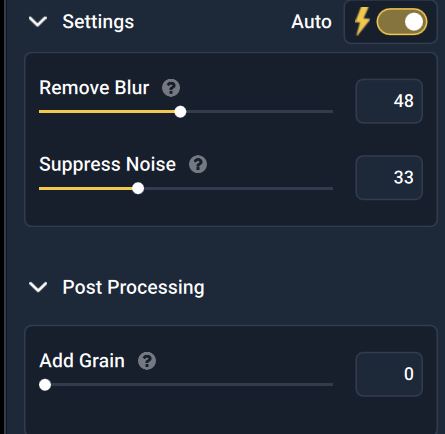
In all three image sharpening modes, the artificial intelligence (AI) within the software analyzes the image and sets the sliders to the recommended settings for correcting the image. While that’s great, it does not always produce the sharpest image. This is where you turn off AUTO and manually move the sliders until you achieve the desired result. There are three additional sliders as follows:
Remove Blur: This slider allows you to increase or decrease the level of sharpening that is applied to your image. Note: Use this slider after you have selected the appropriate image quality model through the comparison view.
Suppress Noise: Increase or decrease the amount of noise in your image. As stated above, I always apply noise reduction through Topaz Denoise AI prior to bringing an image into Sharpen AI so I zero out this slider.
Add Grain: Reduces smoothness by reintroducing grain to your overall image. In my wildlife image editing I never use this slider.
Rescuing a Blurry Image
Earlier I promised to show you how a blurry image could be rescued using Sharpen AI. Prior to using Sharpen AI I would have sent this image to the trash bin.
In this use case, I zoomed into 200% of the image. Selected AUTO and let the Sharpen AI algorithm select the settings it felt were best. As you can see from this image it selected the Out Of Focus model on Normal and set the Remove Blur slider to 75 and suppress noise to 4.
Hover your mouse over the slider and move left to right to see the resulting image. I think you’ll agree that the final result is an image now worth keeping.
For those of you who are visual, Topaz Labs has a short 10 minute video that walks you through most of the things that we have covered so far.
Topaz Labs Sharpen AI Mask Quick Start
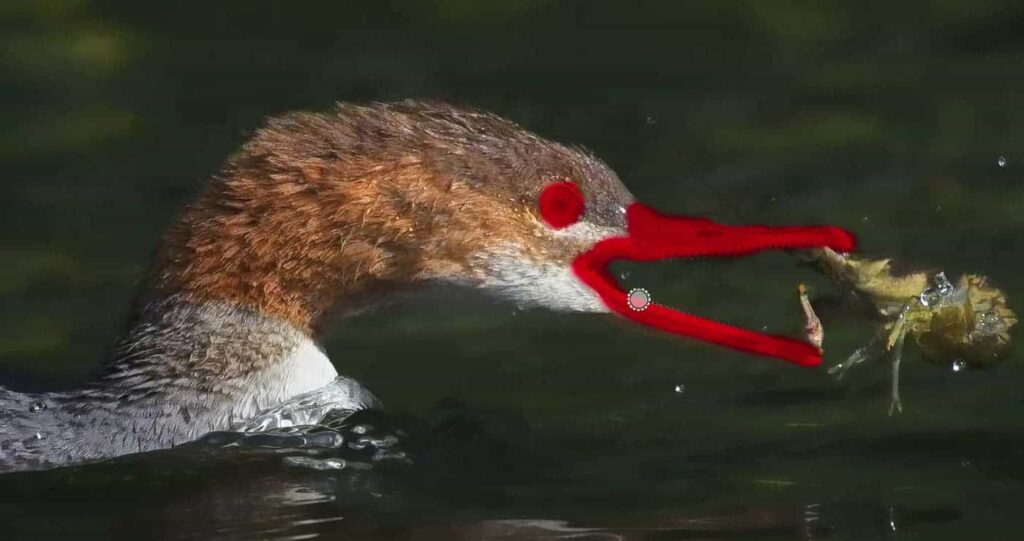
Selective image sharpening within Topaz Sharpen AI can now be done in a few easy steps. Wildlife photographers especially are obsessed with the detail in their images starting with the eyes. Sharpness in the eye of your subject is the first place to turn your attention. If the eye is not in focus the image is headed for the trash bin unless one of the three image quality models can return the focus. This is where selective sharpening through masking really shines.
The fastest way I have found to see if an eye can be brought back to focus is to zoom in to 200% on the eye and select the comparison view. Adjust the sliders and see if one of the image quality models can rescue the image. Topaz says that their algorithm can rescue an image that is out of focus by as much as 10 pixels so it’s worth giving it a try before deleting an image.
If the eyes are in focus, I turn my image sharpening to the specific details in skin, scales, fur, feathers or whatever else I feel will make the image pop. All the while leaving the background bokeh blurry and smooth for maximum impact.
I think the ability to mask sharpen is a real game changer for wildlife photographers and I am not aware of any other sharpening tool on the market that offers this feature. Gone is the extra step of creating a layer mask in Photoshop. Ready to give selective image adjustments a try?
How do you use the Topaz Sharpen AI Masking Tool?
Open Topaz Sharpen AI stand alone or Photoshop
Browse and open your image
Choose the best image quality model with comparison view
Select the masking tool
Check the box for overlay
Change the size of your brush with radius
Check the box to turn on edge aware
Paint in where you want to sharpen
Adjust the sliders and click apply mask
STEP BY STEP VIDEO
How To Use the Topaz Labs Sharpen AI Masking Tool
The masking for selective adjustments to just the parts of your image that you wish to apply it to is a little more in depth. For that piece of the Sharpen AI walk through I created a Topaz Sharpen AI Masking tool video for you to watch. This video was created on version 2 of Sharpen AI so you’ll notice one or two of the buttons don’t look the same however the masking concepts are exactly the same. Enjoy!
Batch Processing:
One other feature worthy of mention is batch processing. You now have the option to import multiple images quickly and easily. You can apply the same settings to all images for rapid processing or you can single out an image, or a handful of images, and apply different settings before completing your batch process.
Wedding photographers, I’m sure they will love this new feature but as a wildlife photographer I had to think about how I might apply this new feature. My typical workflow sees me reviewing all of the images from a shoot and selecting to review only those that are a 10/10 based on my criteria for a winning image.
Is Batch Processing Helpful For Wildlife?
Often times I may have rattled off 10’s of shots of the same subject in burst mode and I am trying to select only the very best image from that sequence. Say I have 30 images of the same subject shot in a burst, I could batch process them in Topaz Sharpen AI before I review and select the best image based on which one is the sharpest. I may try this after my next shoot to determine if it is helpful in the process or whether it just adds another step to my workflow that is unnecessary.
Topaz Sharpen AI Workflow – Complete Step By Step Guide
If you’re looking for a more in depth tutorial style review you will find it useful to read through my detailed Step By Step Sharpen AI Workflow Guide. I walk you through every aspect of Sharpen AI from start to finish.
Bundle & Save:
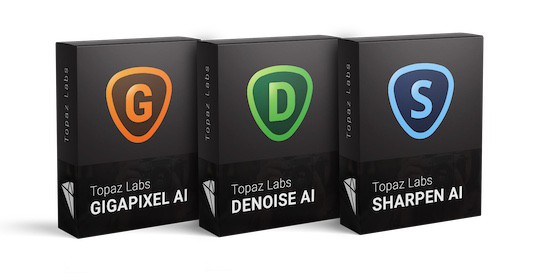
You could purchase each of these products; Topaz Denoise AI v2.0,Topaz Sharpen AI and Topaz Gigapixel AI separately but you’ll save about $60 by purchasing them through Topaz’s Image Quality Bundle if you wait for it to go on sale. Pro Tip, the bundle goes on sale regularly. Trust me, you’ll want all three products eventually so you might as well pay a little extra upfront to save $60 on the back end.
Since we all like to save money, below are two money-saving tips:
Money Saving Tip #1:
Firstly, you need to know that Topaz Sharpen AI is one of three products included in the Topaz Image Quality Bundle AI. This link will take you to my summary review of the products included in the bundle.
I highly recommend every wildlife photographer consider having all three solutions as part of their editing kit. You can buy Sharpen AI by itself, however most photographers, including myself, quickly realize that they also have a need to denoise and enlarge many of their images. Thus they eventually buy Denoise and Gigapixel.
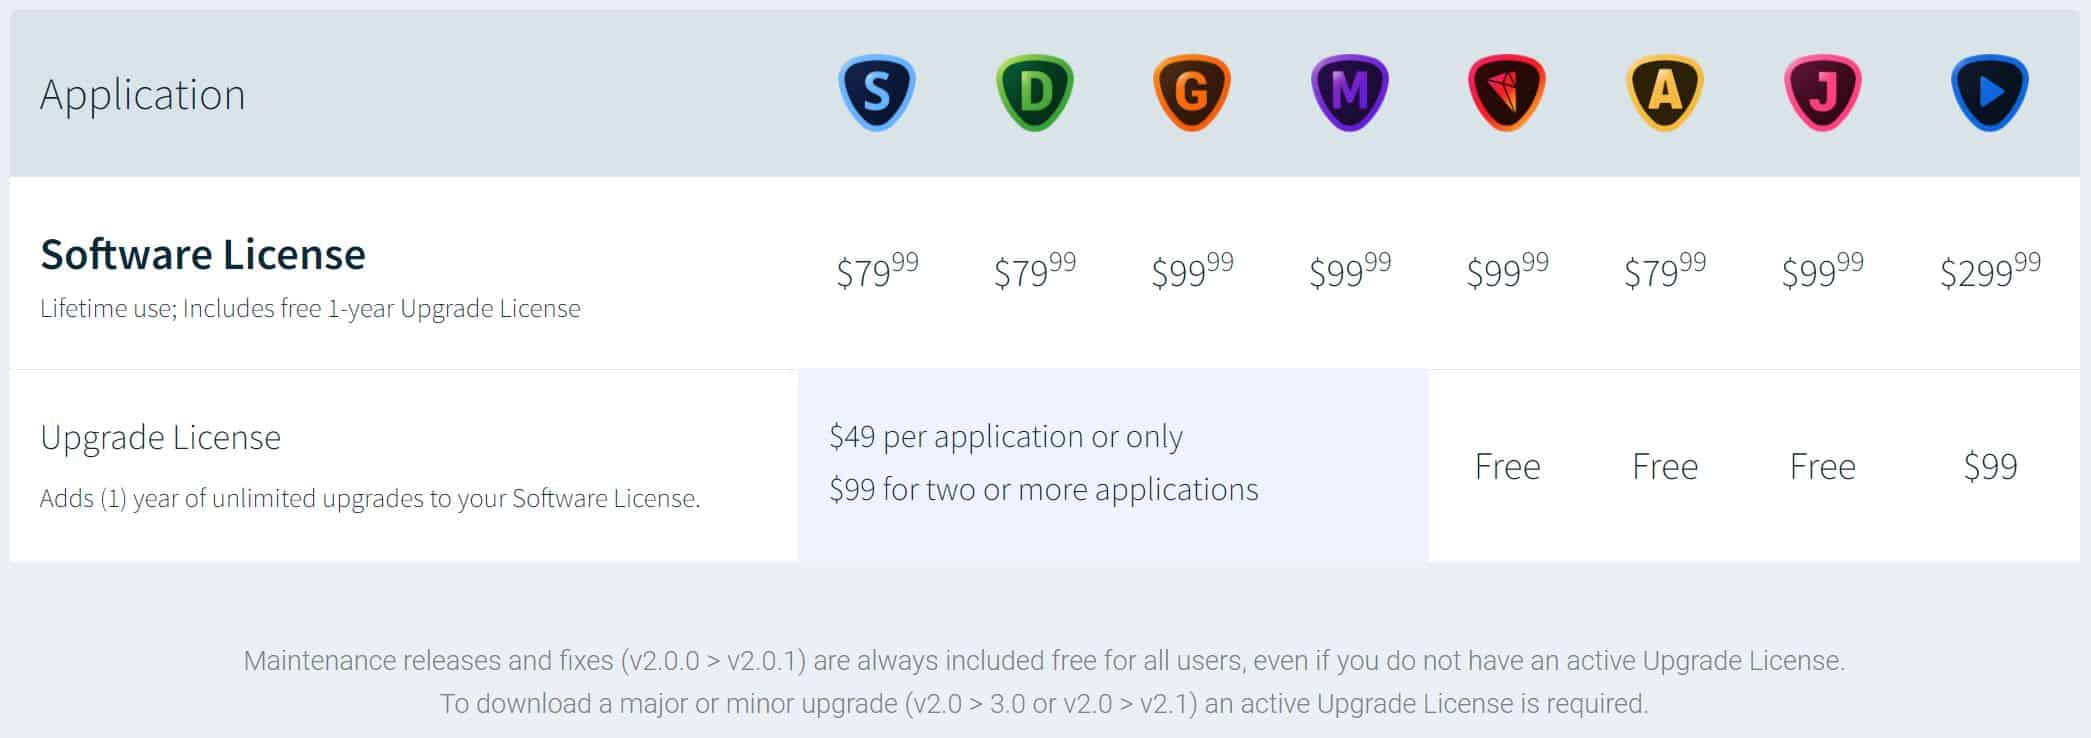
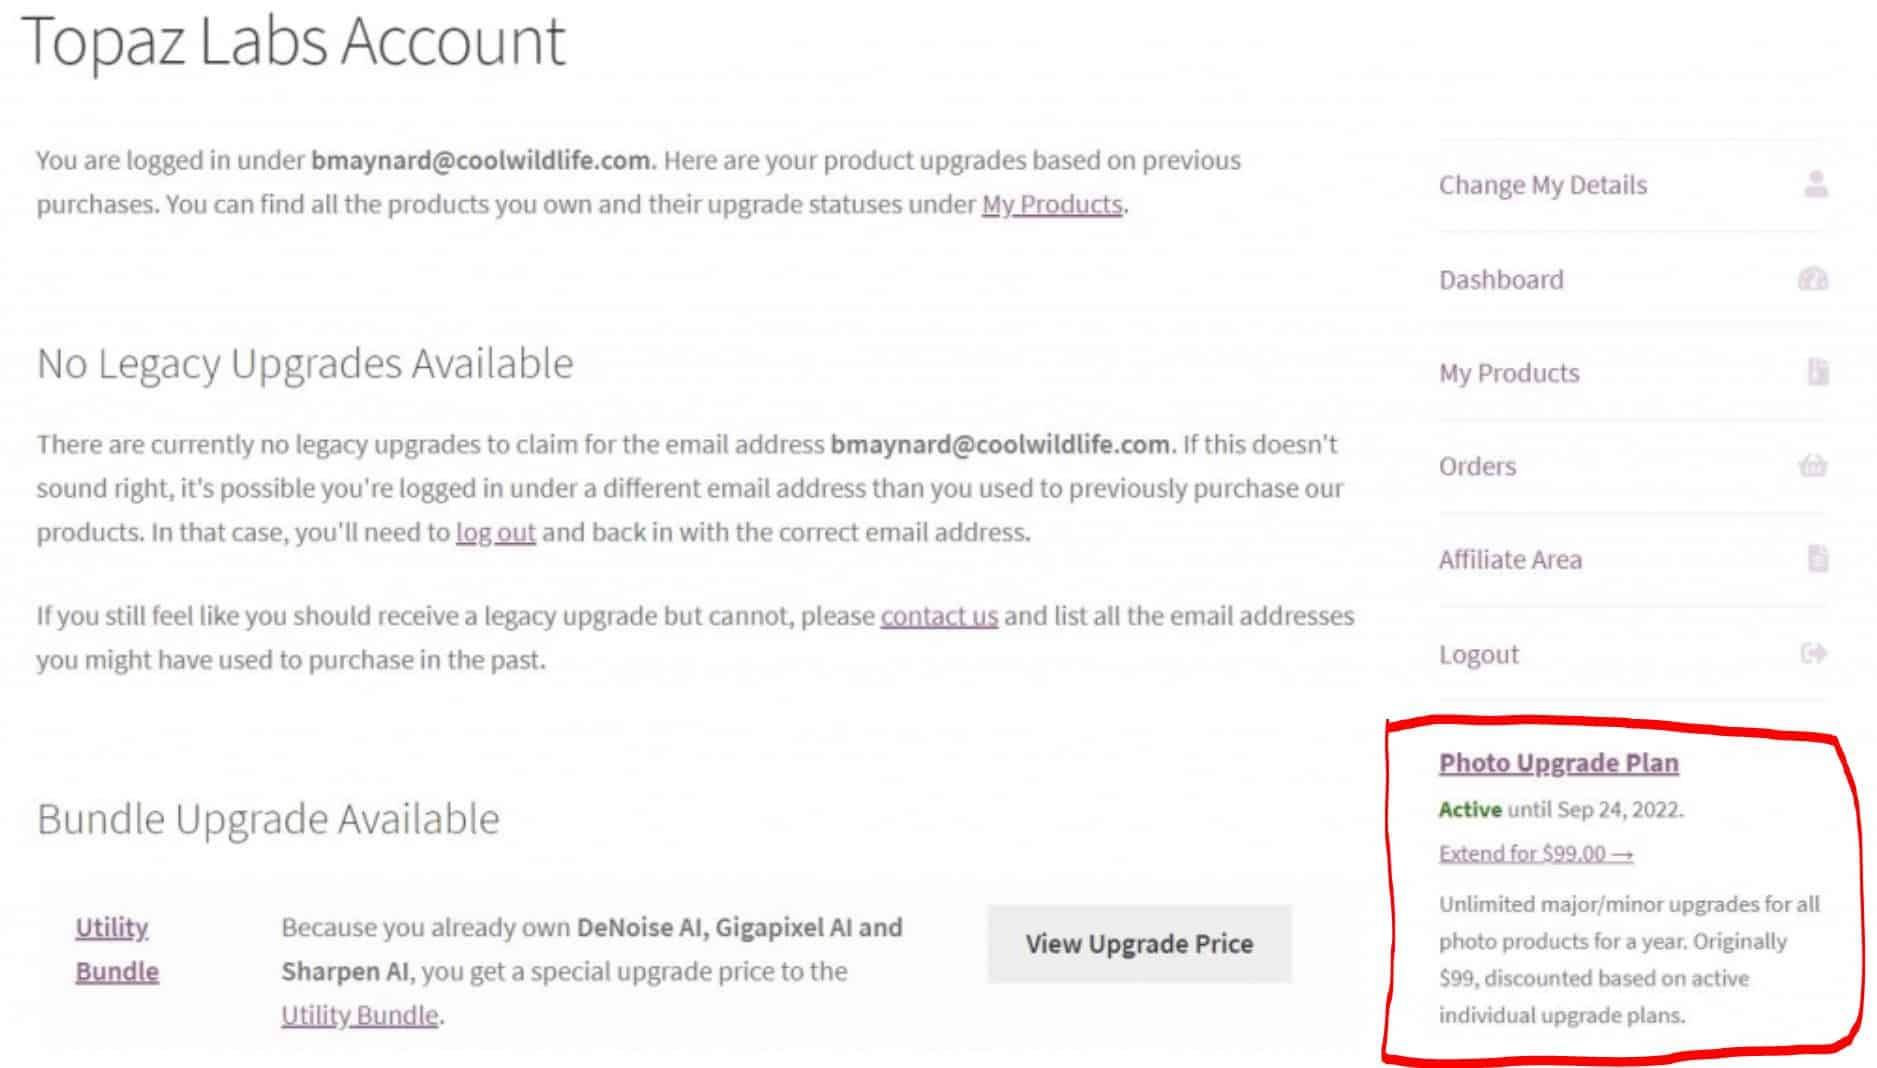
Topaz Labs recently implemented an annual charge for upgrades. The per product upgrade price is $49. For those of you who own two or more products you will want to use the NEW Photo Upgrade Plan. The photo upgrade plan is $99 and provides you with unlimited major/minor upgrades to all Topaz Labs products for a period of one year. I own every product in the Topaz Labs suite so this upgrade plan provides huge annual savings for me.
It can be difficult to find the Topaz Photo Upgrade Plan on their website. You have to login to your Topaz Labs dashboard and as shown below highlighted in red you should now see the Photo Upgrade Plan. If you click on this link to the NEW Photo Upgrade Plan, login to your dashboard you should now see the Photo Upgrade Plan in your view.
If you want additional information regarding Topaz Labs pricing there is a good video on the Topaz website explaining, “How Topaz Pricing Works”.
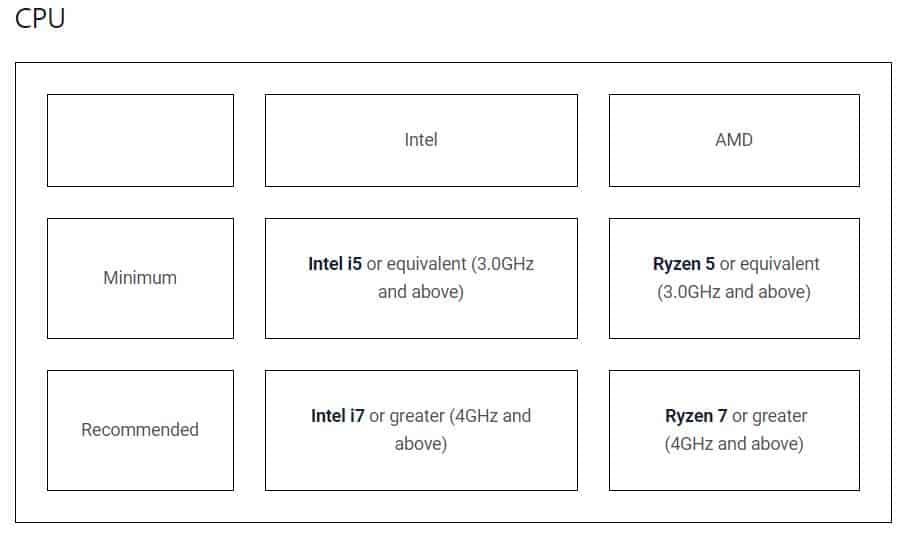
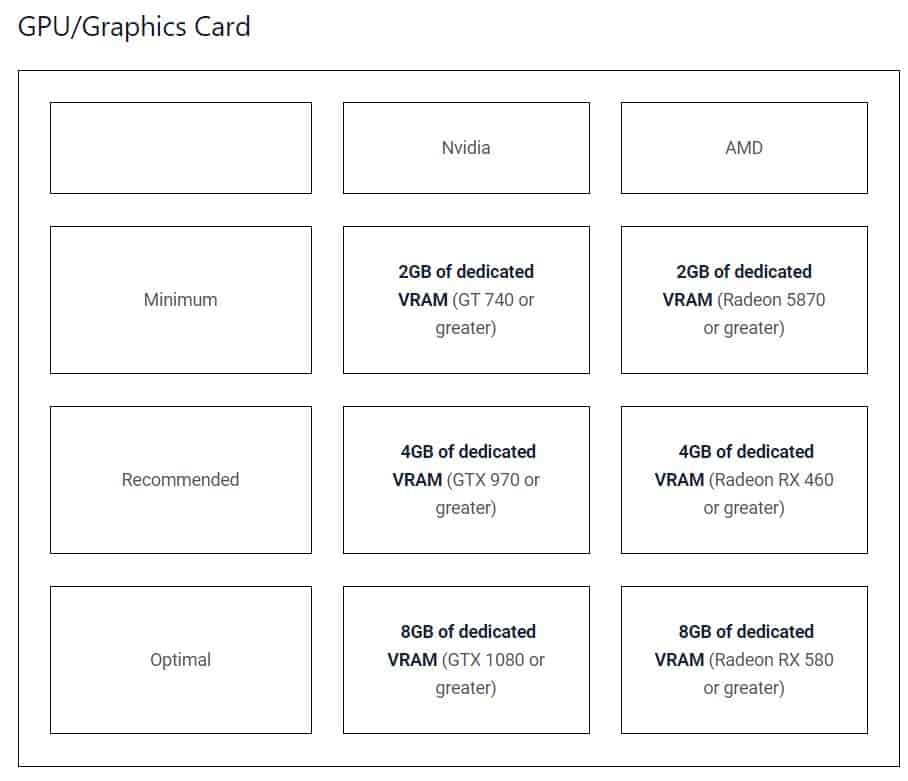
System Requirements
Windows: Windows 7, 8, 10 (64-bit only)
*As of Jan 14, 2020, Microsoft has ended its support for Windows 7.
Mac: macOS version 10.12 (Sierra) and above
Topaz Labs currently do not support Linux-based operating systems.
RAM – Minimum 8GB, Recommended 16GB, Optimal 32GB
Monitor
A monitor that outputs at a resolution of at least 1024 x 768 is recommended.
CPU and GPU Requirements
For peak performance your system’s graphic drivers need to be fully up to date, which you can accomplish by following this guide that Topaz Labs put together for you. Updating your GPU
All Topaz Labs products also require OpenGL version 3.3 or later.
A note on openVINO: Topaz Labs products support Intel’s openVINO toolset for high-speed CPU-based rendering. If you are currently using an Intel CPU, you can enable openVINO in the Preferences menu of any Topaz product.
Minimum: Requirements for application to function, users should expect slow performance, large files may cause crashing
Recommended: Users should experience no performance issues, though slowness may occur with large files
Optimal: Users should not experience any performance issues
Topaz Labs does not support Intel HD Graphics 4600 or lower.
Conclusion:
Topaz Sharpen AI has long been a part of my editing workflow for image sharpening. It produces results that are unmatched by most of its competitors and with the addition of selective adjustments through masking there really isn’t a better choice on the market.
Topaz Labs does offer a free 30-day trial and you can follow this link to go to Topaz Sharpen AI directly.
Related Posts
There’s more to discover — explore these related posts.
Best AI Image Background Remover: Hands-On Review 2025
Explore why Aiarty Image Matting is the best AI Image background remover for clean, precise masking of wildlife even in complex natural scenes. As a wildlife photographer, capturing the essence[…]
Topaz Denoise AI allows you to shoot at high ISO’s in low light with the confidence of knowing you can eliminate that noise while retaining crisp detail in your images[…]